Prepaid credits and wallets: bill usage against a balance
Usage-based charges are billed at the end of the billing period, so payment comes late. Prepaid credits let you collect it up front and draw the balance down as usage arrives.
Prepaid credits increase predictability. You collect payments in advance, then monitor how the balance of your customers’ wallets evolves.
You can create up to 6 active wallets per customer, each with its own settings. A wallet can be scoped to specific fees or billable metrics, include usage limitations, and define its own recurring top-up rules.When a subscription or progressive billing invoice is generated, Lago automatically applies available wallet credits to reduce the invoice total.Wallet priority controls the order in which wallets are applied, from 1 to 50, where 1 is applied first and 50 last.When several wallets share the same priority, the wallet that expires soonest is applied first, and wallets without an expiration date are applied after those with one. Wallets with the same priority and expiration date are applied in creation order, oldest first.
Dashboard
API
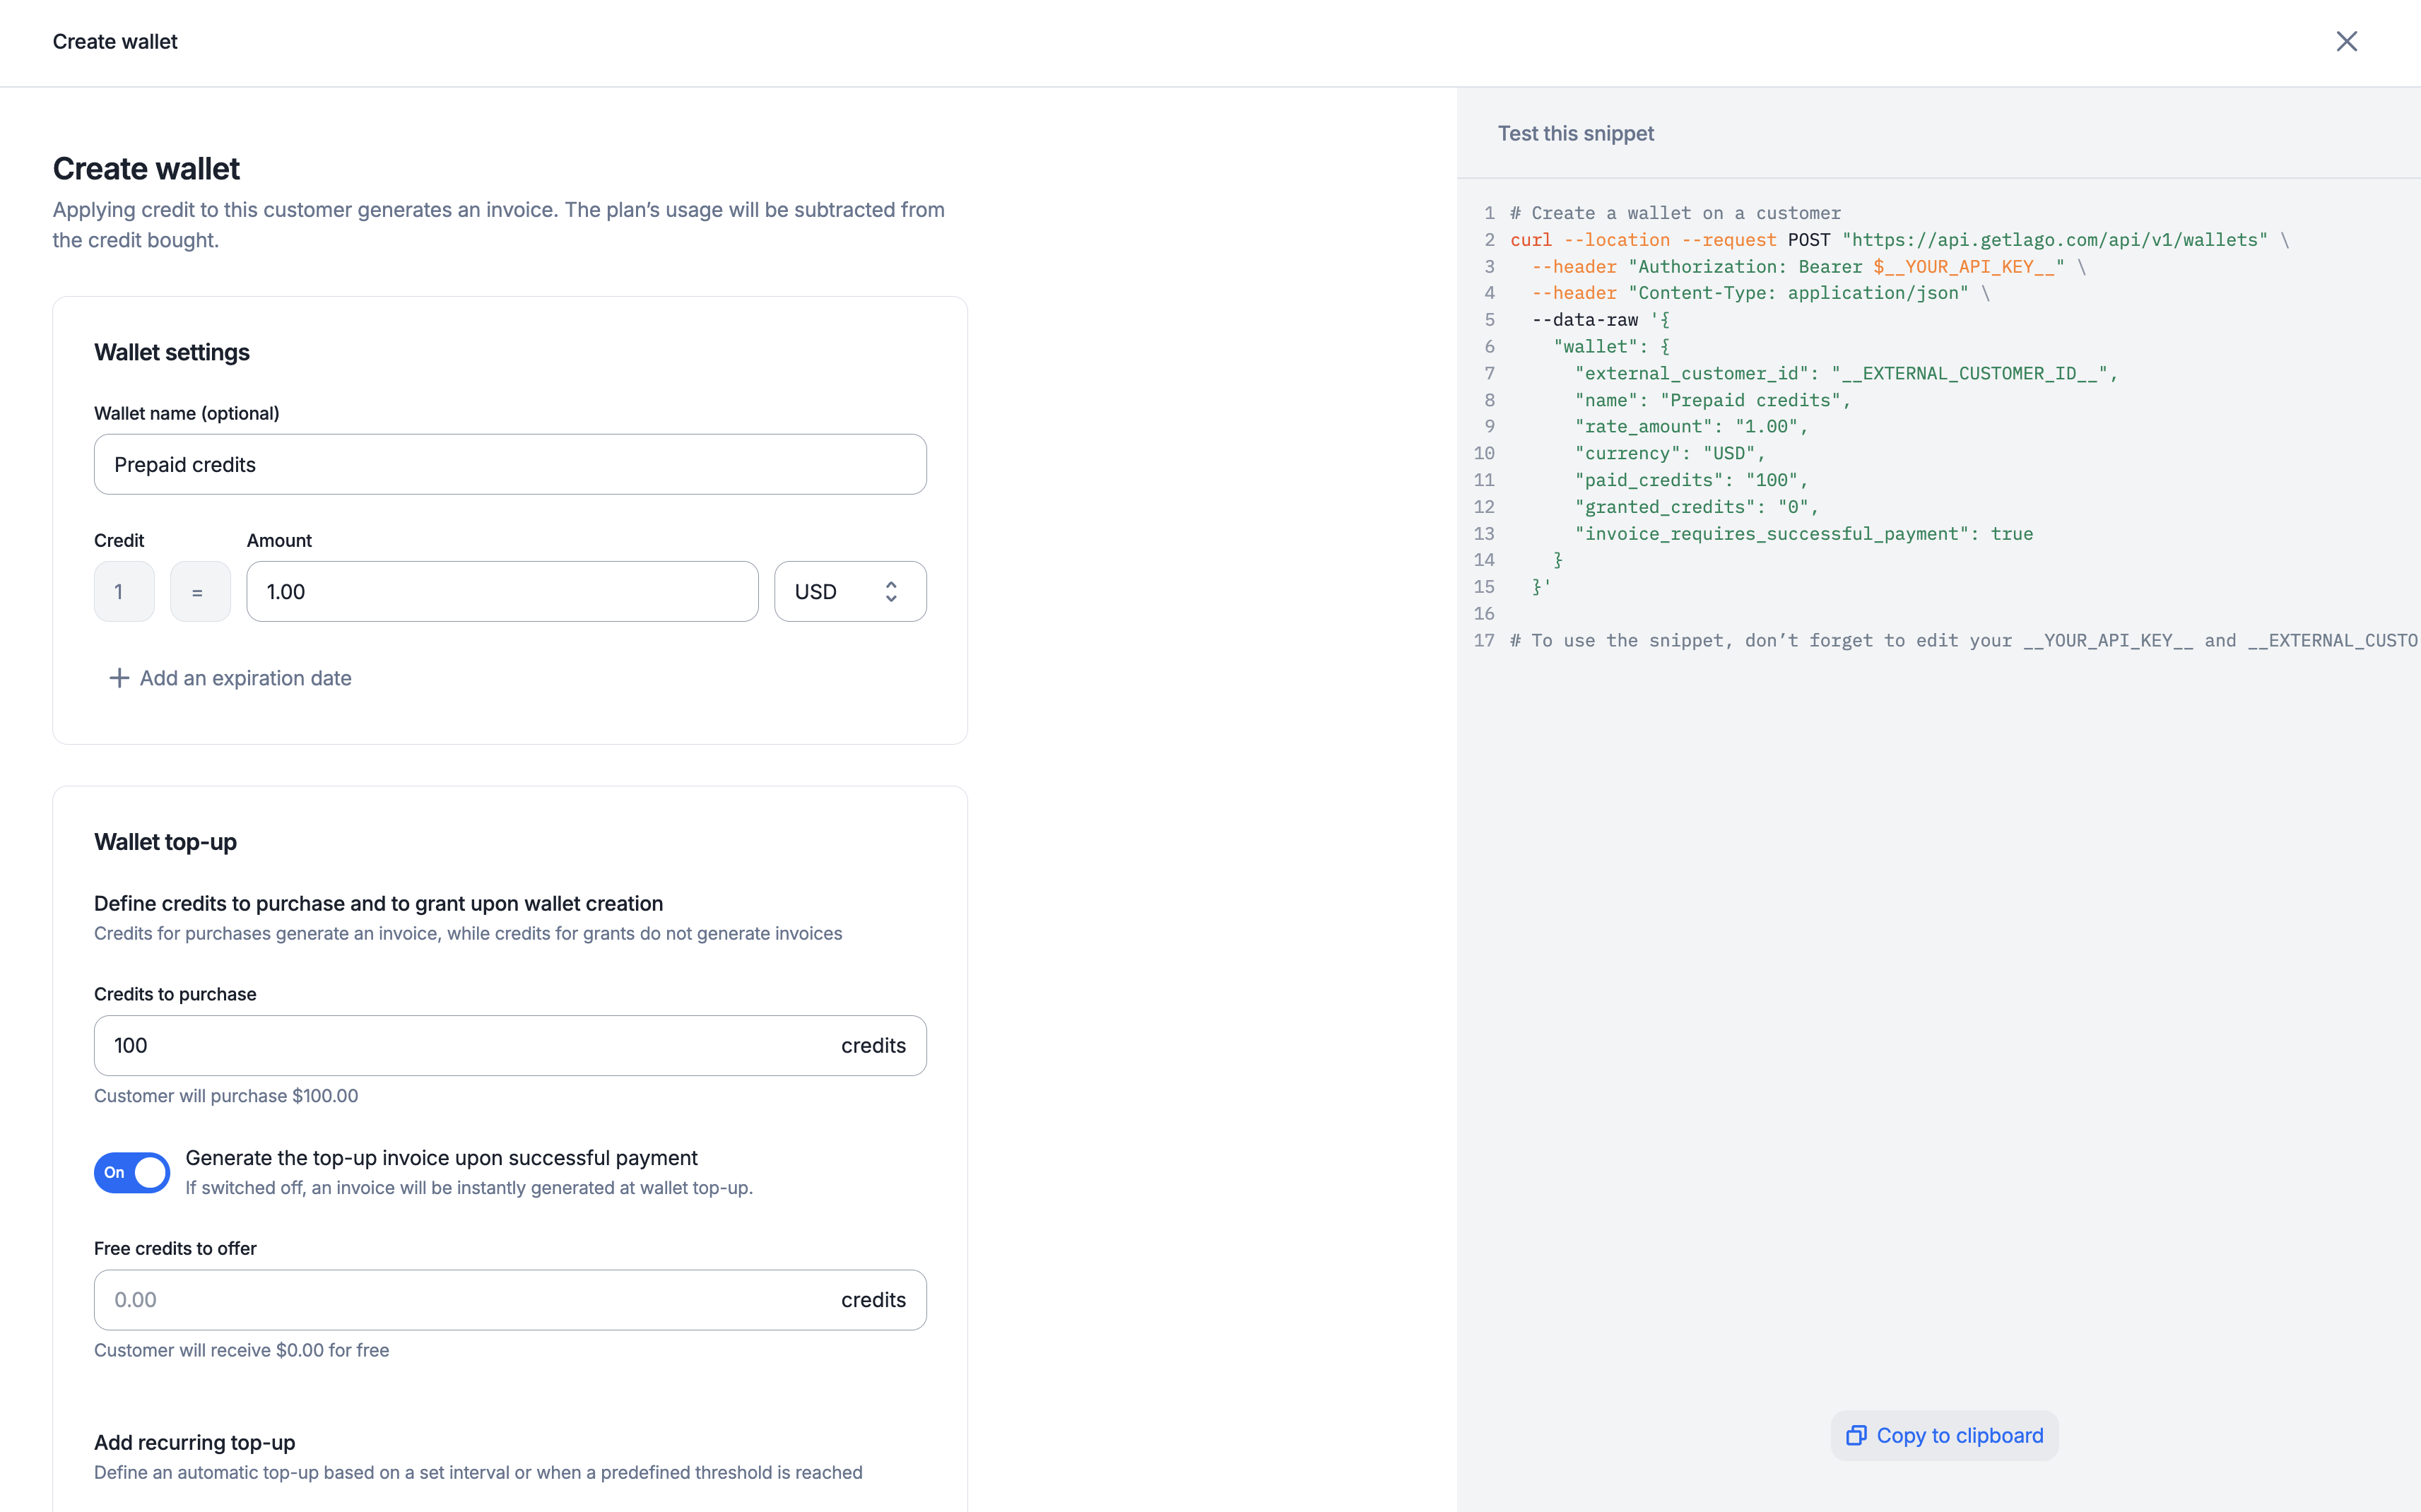
To create a wallet for one of your customers through the user interface:
Access the “Customers” section via the side menu;
Select a customer from the list;
Open the “Wallets” tab and click “Add wallet & credits” on the right;
Choose a name for the wallet (optional);
Set the credit value (e.g. 1 credit = $5);
Define the wallet priority;
Enter the number of credits to be purchased and/or granted for free;
Determine whether the wallet transaction generates an invoice after a top-up or only following a successful payment;
Define a PO number to be used on invoices generated from this wallet;
The currency of the wallet can differ from the default currency of the customer.
Prepaid credits only apply to invoices sharing the same currency as the wallet.
A wallet’s payment terms determine when invoices for its purchased credits are due. They apply to credit purchases, including manual and recurring top-ups. They do not set the payment terms of subscription invoices that use those credits.When creating or editing the wallet, open Invoicing settings. Keep the inherited customer term, or choose a payment-term type and its days or month settings, then save. If the customer has no term of their own, the billing entity’s default applies. To return to the default later, choose inheritance.For example, your customer uses Net 30 for subscriptions, but you set their wallet to Due on receipt. A top-up invoice dated April 10, 2026 is due April 10; a subscription invoice dated the same day is due May 10.See Payment terms for all six options and examples. Changes apply to future invoices; existing invoices retain their stored term. From the API, send payment_term when you create or update the wallet.
Giving a customer more time to pay does not make purchased credits available before payment. For example, a Net 15 top-up invoice dated April 10 is due April 25, but the credits are added only when payment is confirmed. The invoicing after successful payment option separately controls when the invoice is issued.
PREMIUM FEATURE ✨This feature is only available to users with a premium license. Please
contact us to get access to Lago Cloud and Lago
Self-Hosted Premium.
Keep track of the real-time balance of your customers’ wallets. Lago provides two types of balance:
Balance: the invoiced balance, which reflects the prepaid credits left in the wallet. It updates each time an invoice is finalized for the customer.
Ongoing balance: the balance that accounts for current usage, including taxes and draft invoices. It estimates the consumption of the balance close to real time, and also updates each time an invoice is finalized for the customer.
Prepaid credits settled in a wallet are applied to upcoming subscription invoices. They are deducted from the post-tax subtotal, after any credit notes have been applied.
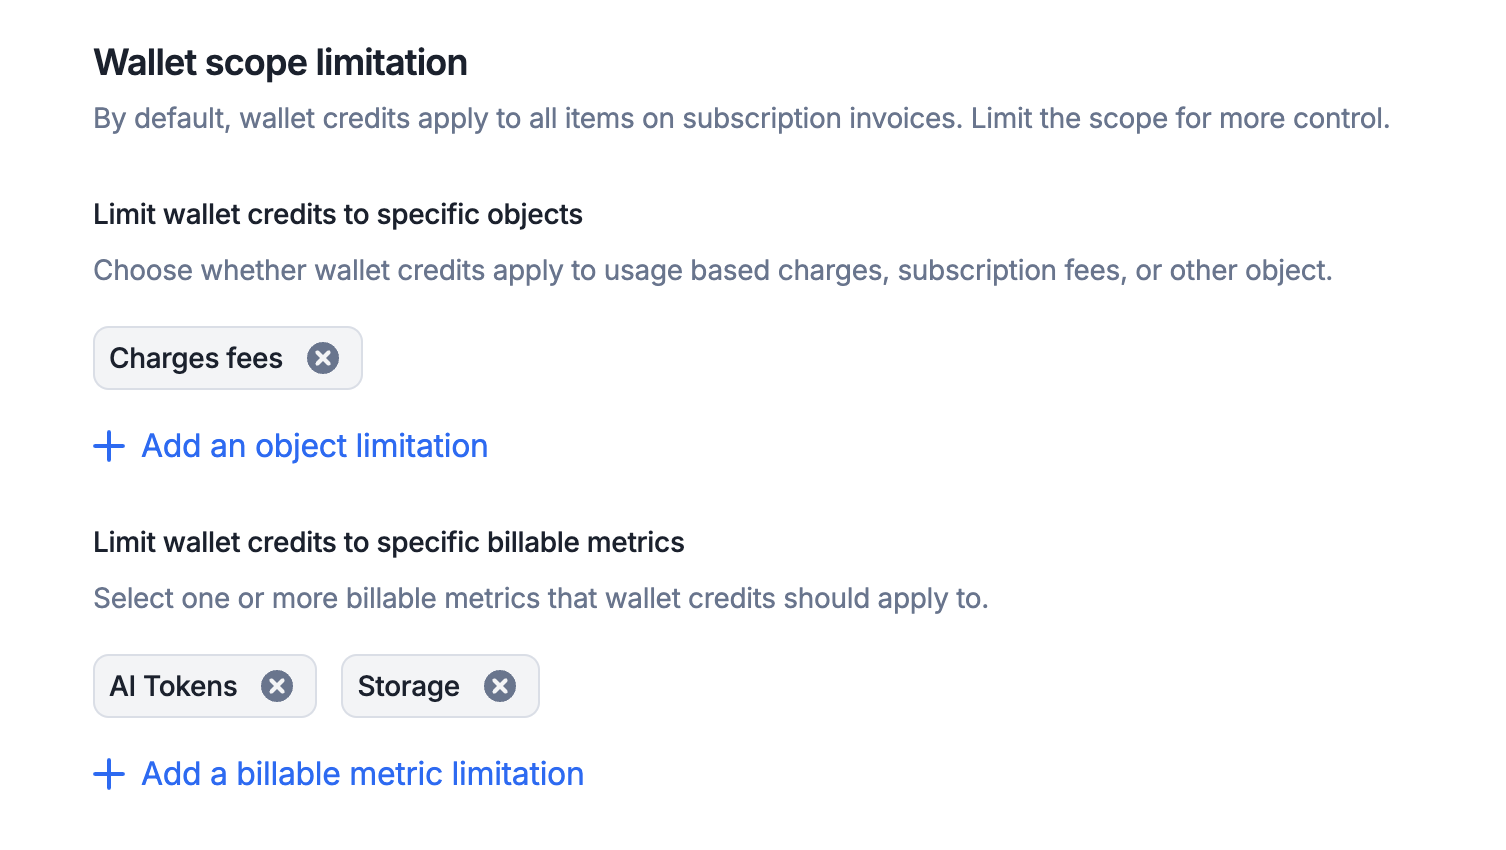
By default, prepaid credits apply to every fee type. You can refine this behavior by configuring limitation rules directly in the wallet. The create a wallet endpoint lists the fee types a wallet can be restricted to.
Dashboard
API
To limit the scope of prepaid credits through the user interface:
Create or edit an existing wallet;
In the “Limit wallet credits to specific objects” section, add one or more object limitations; and
Limit the prepaid credits to specific billable metrics, if you need to.
Selecting every item has the same effect as selecting none. Leave the options unselected unless you need a restriction.
When enabled, this option delays issuing an invoice for a wallet top-up until a successful payment is made. If disabled, the invoice is issued immediately upon the wallet top-up, whatever the payment status. This setting applies to all the transactions of the wallet, and you can override it on individual transactions or on recurring rules.With this option enabled, the invoice is issued on the day the payment succeeds and is due that same day, whatever the wallet’s payment term.
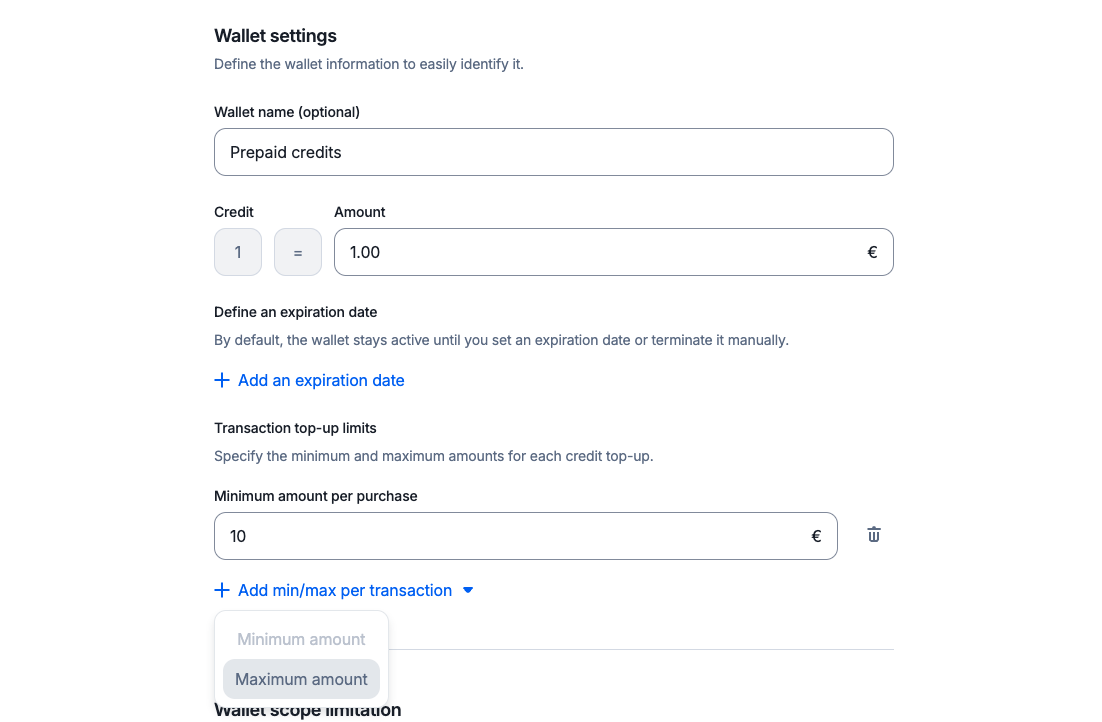
For each wallet, you can set minimum and maximum limits per paid transaction.
When these limits are defined, any top-up attempt must fall within the specified range. Transactions below the minimum or above the maximum are rejected.
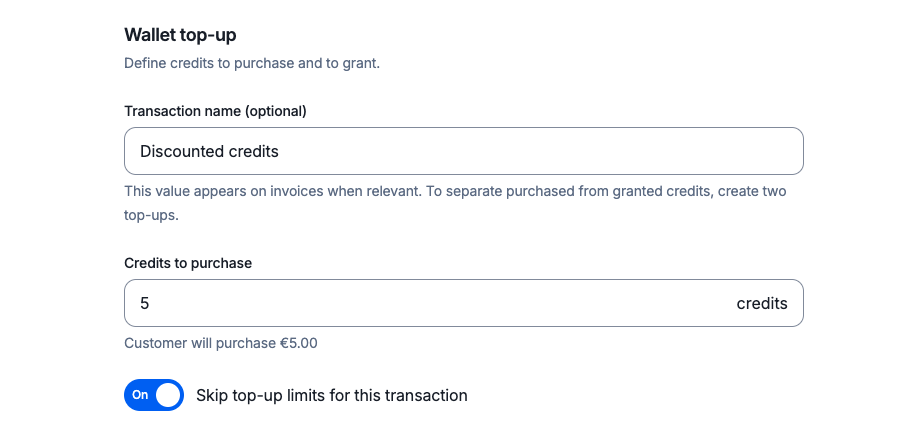
You can ignore these limits on a top-up by adding the ignore_paid_top_up_limits flag to the payload, or by enabling “Skip top-up limits for this transaction” in the dashboard. It works on single top-ups and on automatic ones (recurring wallet transactions).
If you don’t set an expiration date, prepaid credits are carried over to the next billing period until the wallet balance is zero.If you define an expiration date, all the remaining credits are automatically voided when that date is reached.To modify the expiration date of the prepaid credits through the user interface:
Open the “Wallets” tab and click “Edit wallet” on the right;
Select “Edit information”;
Modify the expiration date; and
Click “Edit information” to confirm.
The expiration date displayed in the app is based on the organization’s timezone.You can also terminate a wallet manually, before its expiration date:
Open the “Wallets” tab and click “Edit wallet” on the right;
Select “Terminate wallet”; and
Click again to confirm.
Terminating a wallet instantly voids all the remaining credits. This action
cannot be undone.
{"docsConfig":{"theme":"mint","$schema":"https://mintlify.com/docs.json","name":"Lago","description":"Developer documentation for Lago, the open-source billing platform for usage metering, subscriptions, invoicing, payments, and revenue operations.","colors":{"primary":"#006CFA","light":"#006CFA","dark":"#006CFA"},"logo":{"light":"https://mintcdn.com/lago-docs/zZSJbpe68PHhSs3x/logo/light.svg?fit=max\u0026auto=format\u0026n=zZSJbpe68PHhSs3x\u0026q=85\u0026s=b4af3001527c985b81858b9a0928534c","dark":"https://mintcdn.com/lago-docs/zZSJbpe68PHhSs3x/logo/dark.svg?fit=max\u0026auto=format\u0026n=zZSJbpe68PHhSs3x\u0026q=85\u0026s=1eb7aacac796b0cc6bf05be790a792b1"},"favicon":"https://mintcdn.com/lago-docs/8N-yOElNGe9jRGG5/favicon.svg?fit=max\u0026auto=format\u0026n=8N-yOElNGe9jRGG5\u0026q=85\u0026s=5c319e58dd9b5c5b8a31cf2ad8009a1c","api":{"openapi":"https://swagger.getlago.com/openapi.yaml","mdx":{"server":"https://api.getlago.com/api/v1"}},"background":{"color":{"light":"#F5F5EF","dark":"#131923"}},"navbar":{"links":[{"href":"https://getlago.com/book-a-demo","label":"Book a Demo"}],"primary":{"type":"button","label":"Get Started","href":"https://getlago.com/book-a-demo"}},"footer":{"socials":{"github":"https://github.com/getlago/lago","slack":"https://getlago.com/slack","x":"https://x.com/getlago","linkedin":"https://www.linkedin.com/company/getlago","youtube":"https://www.youtube.com/channel/UCp6ltp7n3SgDVsmerJ7O7ZA"},"links":[{"header":"Documentation","items":[{"label":"Get started","href":"https://getlago.com/docs/guide/introduction/welcome-to-lago"},{"label":"API reference","href":"https://getlago.com/docs/api-reference/intro"},{"label":"Integrations","href":"https://getlago.com/docs/integrations/introduction"},{"label":"Templates","href":"https://getlago.com/docs/templates/introduction"},{"label":"Changelog","href":"https://getlago.com/docs/changelog/product"},{"label":"FAQ","href":"https://getlago.com/docs/faq/about-lago"}]},{"header":"Developers","items":[{"label":"Developer hub","href":"https://getlago.com/docs/developers"},{"label":"Authentication","href":"https://getlago.com/docs/auth"},{"label":"Webhooks","href":"https://getlago.com/docs/guide/webhooks"},{"label":"SDKs","href":"https://getlago.com/docs/developers"},{"label":"OpenAPI spec","href":"https://swagger.getlago.com/"},{"label":"MCP server","href":"https://getlago.com/docs/guide/ai-agents/mcp-server"},{"label":"Self-hosted","href":"https://getlago.com/docs/guide/lago-self-hosted/overview"},{"label":"llms.txt","href":"https://getlago.com/docs/llms.txt"}]},{"header":"Platform","items":[{"label":"Usage metering","href":"https://getlago.com/platform/usage-metering"},{"label":"Billing \u0026 invoicing","href":"https://getlago.com/platform/billing-invoicing"},{"label":"Cash collection","href":"https://getlago.com/platform/cash-collection"},{"label":"Revenue analytics","href":"https://getlago.com/platform/revenue-analytics"},{"label":"Entitlements","href":"https://getlago.com/platform/entitlements"},{"label":"Lago AI","href":"https://getlago.com/platform/ai"},{"label":"Pricing","href":"https://getlago.com/pricing"}]},{"header":"Company","items":[{"label":"About Lago","href":"https://getlago.com/docs/about"},{"label":"Customers","href":"https://getlago.com/customers"},{"label":"Blog","href":"https://getlago.com/blog"},{"label":"Contact","href":"https://getlago.com/docs/contact"},{"label":"Trust center","href":"https://security.getlago.com"},{"label":"Status","href":"https://status.getlago.com"}]}]},"seo":{"metatags":{"canonical":"https://getlago.com/docs","description":"Developer documentation for Lago's API-first billing platform, including OpenAPI, SDKs, webhooks, MCP, authentication, and implementation guides.","keywords":"Lago API, billing API, usage metering API, OpenAPI, billing SDK, Lago MCP"},"organization":{"id":"https://getlago.com/#organization","name":"Lago","legalName":"Get Lago Corp.","url":"https://getlago.com","logo":"https://getlago.com/docs/logo/light.svg","sameAs":["https://github.com/getlago","https://www.linkedin.com/company/getlago","https://x.com/GetLago","https://www.youtube.com/channel/UCp6ltp7n3SgDVsmerJ7O7ZA"]},"indexing":"all"},"fonts":{"heading":{"family":"GT America","weight":700,"source":"fonts/GT-America-Standard-Medium.woff2","format":"woff2"},"body":{"family":"GT America","source":"fonts/GT-America-Standard-Regular.woff2","format":"woff2"}},"styling":{"codeblocks":"dark","latex":true},"integrations":{"ga4":{"measurementId":"G-743BQ9THCG"},"cookies":{"key":"lago_docs_analytics","value":"granted"}},"errors":{"404":{"redirect":false,"title":"Documentation page not found","description":"No Lago documentation exists at this URL. Start at [Lago Developer Documentation](/welcome), browse [Developer Resources](/developers), inspect the [documentation index](/llms.txt) or [sitemap](/sitemap.xml), or search the [API reference](/api-reference/intro)."}},"contextual":{"options":["copy","view","chatgpt","claude"],"display":"header"},"navigation":{"global":{"anchors":[{"anchor":"Blog","icon":"newspaper","href":"https://getlago.com/blog"},{"anchor":"Community","icon":"slack","href":"https://getlago.com/slack"},{"anchor":"GitHub","icon":"github","href":"https://github.com/getlago/lago"},{"anchor":"Status","icon":"signal-bars","href":"https://status.getlago.com/"}]},"pages":[]}},"deployment":{"deploymentMetadataValue":{"subdomain":"lago-docs","hasAudioNarration":false,"actualSubdomain":"lago-docs","customDomains":["getlago.com"],"gitSource":{"type":"github","owner":"getlago","repo":"lago-doc","deployBranch":"main","contentDirectory":"","isPrivate":false,"mountPath":"","label":""},"feedback":{"thumbs":true,"edits":true,"issues":true},"entitlements":{"AI_CHAT":{"status":"ENABLED"},"WEB_MCP":{"status":"ENABLED"},"NARRATION":{"status":"ENABLED"}},"buildId":"6af3588f57f36b6fdeef499d","clientVersion":"0.0.4102","searchFilterCounts":[{"language":"default","tag":"API References","count":243},{"language":"default","tag":"API Reference","count":243},{"language":"default","tag":"Guide","count":206},{"language":"default","tag":"Integrations","count":54},{"language":"default","tag":"Plans","count":46},{"language":"default","tag":"Resources","count":46},{"language":"default","tag":"Charges","count":39},{"language":"default","tag":"Pricing \u0026 Subscriptions","count":35},{"language":"default","tag":"Subscriptions","count":31},{"language":"default","tag":"Invoices","count":27}]},"assistantConfig":{},"basePath":"/docs","hasChatPermissions":true,"hasWebMcpPermissions":true,"toggles":[{"name":"kill-isr","enabled":true,"variant":{"name":"disabled","enabled":false,"feature_enabled":true},"impressionData":false},{"name":"custom-rbac-roles","enabled":true,"variant":{"name":"disabled","enabled":false,"feature_enabled":true},"impressionData":false},{"name":"agent-mintlify-slack","enabled":true,"variant":{"name":"disabled","enabled":false,"feature_enabled":true},"impressionData":false},{"name":"agent-integrations-settings","enabled":true,"variant":{"name":"disabled","enabled":false,"feature_enabled":true},"impressionData":false},{"name":"rbac-expansion","enabled":true,"variant":{"name":"disabled","enabled":false,"feature_enabled":true},"impressionData":false},{"name":"automations-pr-grouping","enabled":true,"variant":{"name":"disabled","enabled":false,"feature_enabled":true},"impressionData":false},{"name":"custom-prefix","enabled":true,"variant":{"name":"disabled","enabled":false,"feature_enabled":true},"impressionData":false},{"name":"analytics-v7","enabled":true,"variant":{"name":"disabled","enabled":false,"feature_enabled":true},"impressionData":false},{"name":"user-flows-analytics","enabled":true,"variant":{"name":"disabled","enabled":false,"feature_enabled":true},"impressionData":false},{"name":"no-publish-flow","enabled":true,"variant":{"name":"disabled","enabled":false,"feature_enabled":true},"impressionData":false},{"name":"workos-onboarding","enabled":true,"variant":{"name":"disabled","enabled":false,"feature_enabled":true},"impressionData":false},{"name":"llms-txt-v2","enabled":true,"variant":{"name":"disabled","enabled":false,"feature_enabled":true},"impressionData":false},{"name":"snapshot-serving-live","enabled":true,"variant":{"name":"disabled","enabled":false,"feature_enabled":true},"impressionData":false},{"name":"stripTemperatureMiddleware","enabled":true,"variant":{"name":"disabled","enabled":false,"feature_enabled":true},"impressionData":false},{"name":"support-platform-pylon-zendesk","enabled":true,"variant":{"name":"disabled","enabled":false,"feature_enabled":true},"impressionData":false},{"name":"snapshot-serving","enabled":true,"variant":{"name":"disabled","enabled":false,"feature_enabled":true},"impressionData":false},{"name":"instant-rollback","enabled":true,"variant":{"name":"disabled","enabled":false,"feature_enabled":true},"impressionData":false},{"name":"granular-notifications-server","enabled":true,"variant":{"name":"disabled","enabled":false,"feature_enabled":true},"impressionData":false},{"name":"granular-notifications","enabled":true,"variant":{"name":"disabled","enabled":false,"feature_enabled":true},"impressionData":false},{"name":"automations-fable","enabled":true,"variant":{"name":"disabled","enabled":false,"feature_enabled":true},"impressionData":false},{"name":"fixed-ai-action-pricing","enabled":true,"variant":{"name":"disabled","enabled":false,"feature_enabled":true},"impressionData":false},{"name":"automation-resolve-merge-conflict","enabled":true,"variant":{"name":"disabled","enabled":false,"feature_enabled":true},"impressionData":false},{"name":"scoped-publishing","enabled":true,"variant":{"name":"disabled","enabled":false,"feature_enabled":true},"impressionData":false},{"name":"mintql","enabled":true,"variant":{"name":"disabled","enabled":false,"feature_enabled":true},"impressionData":false},{"name":"page-level-analytics","enabled":true,"variant":{"name":"disabled","enabled":false,"feature_enabled":true},"impressionData":false},{"name":"editor-version-history-v2","enabled":true,"variant":{"name":"disabled","enabled":false,"feature_enabled":true},"impressionData":false},{"name":"billing-page-v2","enabled":true,"variant":{"name":"disabled","enabled":false,"feature_enabled":true},"impressionData":false},{"name":"full-page-search","enabled":true,"variant":{"name":"disabled","enabled":false,"feature_enabled":true},"impressionData":false},{"name":"workspace-projects","enabled":true,"variant":{"name":"disabled","enabled":false,"feature_enabled":true},"impressionData":false},{"name":"assistant-v5","enabled":true,"variant":{"name":"disabled","enabled":false,"feature_enabled":true},"impressionData":false},{"name":"fork-pr-previews","enabled":true,"variant":{"name":"disabled","enabled":false,"feature_enabled":true},"impressionData":false},{"name":"revalidation-jwt","enabled":true,"variant":{"name":"disabled","enabled":false,"feature_enabled":true},"impressionData":false},{"name":"workos-sso-scim","enabled":true,"variant":{"name":"disabled","enabled":false,"feature_enabled":true},"impressionData":false},{"name":"hobby-abuse-scan","enabled":true,"variant":{"name":"disabled","enabled":false,"feature_enabled":true},"impressionData":false},{"name":"dashboard-inbox","enabled":true,"variant":{"name":"disabled","enabled":false,"feature_enabled":true},"impressionData":false},{"name":"workos-signup","enabled":true,"variant":{"name":"disabled","enabled":false,"feature_enabled":true},"impressionData":false},{"name":"turbopuffer-dual-write","enabled":true,"variant":{"name":"disabled","enabled":false,"feature_enabled":true},"impressionData":false},{"name":"workos-enabled","enabled":true,"variant":{"name":"disabled","enabled":false,"feature_enabled":true},"impressionData":false},{"name":"approve-review-flow","enabled":true,"variant":{"name":"disabled","enabled":false,"feature_enabled":true},"impressionData":false},{"name":"editor-metadata","enabled":true,"variant":{"name":"disabled","enabled":false,"feature_enabled":true},"impressionData":false},{"name":"sso-setup-deadline-banner","enabled":true,"variant":{"name":"disabled","enabled":false,"feature_enabled":true},"impressionData":false},{"name":"turbopuffer-serve","enabled":true,"variant":{"name":"disabled","enabled":false,"feature_enabled":true},"impressionData":false},{"name":"live-agents","enabled":true,"variant":{"name":"disabled","enabled":false,"feature_enabled":true},"impressionData":false}],"googleFontsInlined":false},"customCss":[{"filePath":"style.css","content":"html{visibility:hidden;background-color:#F5F5EF}@media (prefers-color-scheme: dark){html{background-color:#131923}}html.ready{visibility:visible}.dark .welcome-card{background-color:#1c2535!important;border-color:rgba(255, 255, 255, 0.1)!important;box-shadow:0 1px 2px 0 rgba(0, 0, 0, 0.3)!important;color:#e5e7eb}.dark .welcome-card:hover{background-color:#243044!important}.dark .welcome-card h3{color:#ffffff}.dark .welcome-card p{color:#9ca3af!important}#changelog-month-nav{padding-left:2.5rem;width:19rem;box-sizing:border-box;margin-bottom:1.75rem;max-height:45vh;overflow-y:auto}#changelog-month-nav .changelog-month-nav__year{margin:0 0 0.5rem;font-size:0.875rem;line-height:1.5rem;font-weight:500;color:#364152}#changelog-month-nav .changelog-month-nav__list{list-style:none;margin:0;padding:0;border-left:1px solid rgba(0, 0, 0, 0.08)}#changelog-month-nav .changelog-month-nav__list a{display:block;padding:0.25rem 0 0.25rem 0.75rem;margin-left:-1px;border-left:1px solid transparent;font-size:0.875rem;line-height:1.5rem;color:#697586;text-decoration:none;transition:color 0.15s ease, border-color 0.15s ease}#changelog-month-nav .changelog-month-nav__list a:hover{color:#121926}#changelog-month-nav .changelog-month-nav__list a.is-active{color:#006CFA;border-left-color:#006CFA;font-weight:500}.dark #changelog-month-nav .changelog-month-nav__year{color:#cdd5df}.dark #changelog-month-nav .changelog-month-nav__list{border-left-color:rgba(255, 255, 255, 0.12)}.dark #changelog-month-nav .changelog-month-nav__list a{color:#9aa4b2}.dark #changelog-month-nav .changelog-month-nav__list a:hover{color:#ffffff}.dark #changelog-month-nav .changelog-month-nav__list a.is-active{color:#4d9bff;border-left-color:#4d9bff}.update-container>div:first-child{display:none}.update-container>div:nth-child(2){flex:1 1 100%;max-width:100%;width:100%}.update-container{gap:0}#footer a[href*=\"utm_campaign=poweredBy\"]{display:none}"}],"page":{"pagePath":"guide/wallet-and-prepaid-credits/overview","slug":"/guide/wallet-and-prepaid-credits/overview","pageMetadata":{"title":"Prepaid credits and wallets: bill usage against a balance","sidebarTitle":"Overview","description":"Usage-based charges are billed at the end of the billing period, so payment comes late. Prepaid credits let you collect it up front and draw the balance down as usage arrives.","href":"/guide/wallet-and-prepaid-credits/overview"},"description":{"compiledSource":"\"use strict\";\nconst {jsx: _jsx} = arguments[0];\nconst {useMDXComponents: _provideComponents} = arguments[0];\nfunction _createMdxContent(props) {\n const _components = {\n p: \"p\",\n ..._provideComponents(),\n ...props.components\n };\n return _jsx(_components.p, {\n children: \"Usage-based charges are billed at the end of the billing period, so payment comes late. Prepaid credits let you collect it up front and draw the balance down as usage arrives.\"\n });\n}\nfunction MDXContent(props = {}) {\n const {wrapper: MDXLayout} = {\n ..._provideComponents(),\n ...props.components\n };\n return MDXLayout ? _jsx(MDXLayout, {\n ...props,\n children: _jsx(_createMdxContent, {\n ...props\n })\n }) : _createMdxContent(props);\n}\nreturn {\n default: MDXContent\n};\n","frontmatter":{},"scope":{}},"pageType":"default","mdx":{"mdxSource":{"compiledSource":"\"use strict\";const{Fragment:_Fragment,jsx:_jsx,jsxs:_jsxs}=arguments[0];const{useMDXComponents:_provideComponents}=arguments[0];function _createMdxContent(props){const _components={a:`a`,code:`code`,li:`li`,ol:`ol`,p:`p`,pre:`pre`,span:`span`,strong:`strong`,..._provideComponents(),...props.components},{CodeBlock,Frame,Heading,Info,OptimizedImage,Tab,Tabs,Warning}=_components;if(!CodeBlock)_missingMdxReference(`CodeBlock`,true);if(!Frame)_missingMdxReference(`Frame`,true);if(!Heading)_missingMdxReference(`Heading`,true);if(!Info)_missingMdxReference(`Info`,true);if(!OptimizedImage)_missingMdxReference(`OptimizedImage`,true);if(!Tab)_missingMdxReference(`Tab`,true);if(!Tabs)_missingMdxReference(`Tabs`,true);if(!Warning)_missingMdxReference(`Warning`,true);return _jsxs(_Fragment,{children:[_jsx(_components.p,{children:`Prepaid credits increase predictability. You collect payments in advance, then monitor how the balance of your customers’ wallets evolves.`}),`\n`,_jsx(Heading,{level:`2`,id:`create-wallets`,children:`Create wallets`}),`\n`,_jsx(_components.p,{children:`You can create up to 6 active wallets per customer, each with its own settings. A wallet can be scoped to specific fees or billable metrics, include usage limitations, and define its own recurring top-up rules.`}),`\n`,_jsx(_components.p,{children:`When a subscription or progressive billing invoice is generated, Lago automatically applies available wallet credits to reduce the invoice total.`}),`\n`,_jsx(_components.p,{children:`Wallet priority controls the order in which wallets are applied, from 1 to 50, where 1 is applied first and 50 last.`}),`\n`,_jsxs(_components.p,{children:[`When several wallets share the same priority, the wallet that expires soonest is applied first, and wallets without an `,_jsx(_components.a,{href:`#expiration-date-and-termination`,children:`expiration date`}),` are applied after those with one. Wallets with the same priority and expiration date are applied in creation order, oldest first.`]}),`\n`,_jsxs(Tabs,{children:[_jsxs(Tab,{title:`Dashboard`,id:`dashboard`,children:[_jsx(_components.p,{children:`To create a wallet for one of your customers through the user interface:`}),_jsxs(_components.ol,{children:[`\n`,_jsxs(_components.li,{children:[`Access the `,_jsx(_components.strong,{children:`“Customers”`}),` section via the side menu;`]}),`\n`,_jsx(_components.li,{children:`Select a customer from the list;`}),`\n`,_jsxs(_components.li,{children:[`Open the `,_jsx(_components.strong,{children:`“Wallets”`}),` tab and click `,_jsx(_components.strong,{children:`“Add wallet \u0026 credits”`}),` on the right;`]}),`\n`,_jsx(_components.li,{children:`Choose a name for the wallet (optional);`}),`\n`,_jsx(_components.li,{children:`Set the credit value (e.g. 1 credit = $5);`}),`\n`,_jsx(_components.li,{children:`Define the wallet priority;`}),`\n`,_jsx(_components.li,{children:`Enter the number of credits to be purchased and/or granted for free;`}),`\n`,_jsx(_components.li,{children:`Determine whether the wallet transaction generates an invoice after a top-up or only following a successful payment;`}),`\n`,_jsx(_components.li,{children:`Define a PO number to be used on invoices generated from this wallet;`}),`\n`,_jsxs(_components.li,{children:[`Set the `,_jsx(_components.a,{href:`#expiration-date-and-termination`,children:`expiration date`}),` (optional); and`]}),`\n`,_jsxs(_components.li,{children:[`Click `,_jsx(_components.strong,{children:`“Add wallet \u0026 credits”`}),` to confirm.`]}),`\n`]}),_jsx(Info,{children:_jsx(_components.p,{children:`The currency of the wallet can differ from the default currency of the customer.\nPrepaid credits only apply to invoices sharing the same currency as the wallet.`})})]}),_jsx(Tab,{title:`API`,id:`api`,children:_jsx(CodeBlock,{filename:`Create a credit wallet`,numberOfLines:`24`,language:`shellscript`,children:_jsx(_components.pre,{className:`shiki shiki-themes dark-plus dark-plus`,style:{backgroundColor:`#0B0C0E`,\"--shiki-dark-bg\":`#0B0C0E`,color:`#D4D4D4`,\"--shiki-dark\":`#D4D4D4`},language:`shellscript`,children:_jsxs(_components.code,{language:`shellscript`,numberOfLines:`24`,children:[_jsxs(_components.span,{className:`line`,children:[_jsx(_components.span,{style:{color:`#9CDCFE`,\"--shiki-dark\":`#9CDCFE`},children:`LAGO_URL`}),_jsx(_components.span,{style:{color:`#D4D4D4`,\"--shiki-dark\":`#D4D4D4`},children:`=`}),_jsx(_components.span,{style:{color:`#CE9178`,\"--shiki-dark\":`#CE9178`},children:`\"https://api.getlago.com\"`})]}),`\n`,_jsxs(_components.span,{className:`line`,children:[_jsx(_components.span,{style:{color:`#9CDCFE`,\"--shiki-dark\":`#9CDCFE`},children:`API_KEY`}),_jsx(_components.span,{style:{color:`#D4D4D4`,\"--shiki-dark\":`#D4D4D4`},children:`=`}),_jsx(_components.span,{style:{color:`#CE9178`,\"--shiki-dark\":`#CE9178`},children:`\"__YOUR_API_KEY__\"`})]}),`\n`,_jsx(_components.span,{className:`line`}),`\n`,_jsxs(_components.span,{className:`line`,children:[_jsx(_components.span,{style:{color:`#DCDCAA`,\"--shiki-dark\":`#DCDCAA`},children:`curl`}),_jsx(_components.span,{style:{color:`#569CD6`,\"--shiki-dark\":`#569CD6`},children:` --location`}),_jsx(_components.span,{style:{color:`#569CD6`,\"--shiki-dark\":`#569CD6`},children:` --request`}),_jsx(_components.span,{style:{color:`#CE9178`,\"--shiki-dark\":`#CE9178`},children:` POST`}),_jsx(_components.span,{style:{color:`#CE9178`,\"--shiki-dark\":`#CE9178`},children:` \"`}),_jsx(_components.span,{style:{color:`#9CDCFE`,\"--shiki-dark\":`#9CDCFE`},children:`$LAGO_URL`}),_jsx(_components.span,{style:{color:`#CE9178`,\"--shiki-dark\":`#CE9178`},children:`/api/v1/wallets\"`}),_jsx(_components.span,{style:{color:`#D7BA7D`,\"--shiki-dark\":`#D7BA7D`},children:` \\\\`})]}),`\n`,_jsxs(_components.span,{className:`line`,children:[_jsx(_components.span,{style:{color:`#569CD6`,\"--shiki-dark\":`#569CD6`},children:` --header`}),_jsx(_components.span,{style:{color:`#CE9178`,\"--shiki-dark\":`#CE9178`},children:` \"Authorization: Bearer `}),_jsx(_components.span,{style:{color:`#9CDCFE`,\"--shiki-dark\":`#9CDCFE`},children:`$API_KEY`}),_jsx(_components.span,{style:{color:`#CE9178`,\"--shiki-dark\":`#CE9178`},children:`\"`}),_jsx(_components.span,{style:{color:`#D7BA7D`,\"--shiki-dark\":`#D7BA7D`},children:` \\\\`})]}),`\n`,_jsxs(_components.span,{className:`line`,children:[_jsx(_components.span,{style:{color:`#569CD6`,\"--shiki-dark\":`#569CD6`},children:` --header`}),_jsx(_components.span,{style:{color:`#CE9178`,\"--shiki-dark\":`#CE9178`},children:` 'Content-Type: application/json'`}),_jsx(_components.span,{style:{color:`#D7BA7D`,\"--shiki-dark\":`#D7BA7D`},children:` \\\\`})]}),`\n`,_jsxs(_components.span,{className:`line`,children:[_jsx(_components.span,{style:{color:`#569CD6`,\"--shiki-dark\":`#569CD6`},children:` --data-raw`}),_jsx(_components.span,{style:{color:`#CE9178`,\"--shiki-dark\":`#CE9178`},children:` '{`})]}),`\n`,_jsx(_components.span,{className:`line`,children:_jsx(_components.span,{style:{color:`#CE9178`,\"--shiki-dark\":`#CE9178`},children:` \"wallet\": {`})}),`\n`,_jsx(_components.span,{className:`line`,children:_jsx(_components.span,{style:{color:`#CE9178`,\"--shiki-dark\":`#CE9178`},children:` \"external_customer_id\": \"hooli_1234\",`})}),`\n`,_jsx(_components.span,{className:`line`,children:_jsx(_components.span,{style:{color:`#CE9178`,\"--shiki-dark\":`#CE9178`},children:` \"name\": \"Prepaid credits\",`})}),`\n`,_jsx(_components.span,{className:`line`,children:_jsx(_components.span,{style:{color:`#CE9178`,\"--shiki-dark\":`#CE9178`},children:` \"rate_amount\": \"1.0\",`})}),`\n`,_jsx(_components.span,{className:`line`,children:_jsx(_components.span,{style:{color:`#CE9178`,\"--shiki-dark\":`#CE9178`},children:` \"paid_credits\": \"100.0\",`})}),`\n`,_jsx(_components.span,{className:`line`,children:_jsx(_components.span,{style:{color:`#CE9178`,\"--shiki-dark\":`#CE9178`},children:` \"granted_credits\": \"50.0\",`})}),`\n`,_jsx(_components.span,{className:`line`,children:_jsx(_components.span,{style:{color:`#CE9178`,\"--shiki-dark\":`#CE9178`},children:` \"currency\": \"USD\",`})}),`\n`,_jsx(_components.span,{className:`line`,children:_jsx(_components.span,{style:{color:`#CE9178`,\"--shiki-dark\":`#CE9178`},children:` \"expiration_at\": \"2022-07-07T23:59:59Z\",`})}),`\n`,_jsx(_components.span,{className:`line`,children:_jsx(_components.span,{style:{color:`#CE9178`,\"--shiki-dark\":`#CE9178`},children:` \"invoice_requires_successful_payment\": false,`})}),`\n`,_jsx(_components.span,{className:`line`,children:_jsx(_components.span,{style:{color:`#CE9178`,\"--shiki-dark\":`#CE9178`},children:` \"transaction_metadata\": [`})}),`\n`,_jsx(_components.span,{className:`line`,children:_jsx(_components.span,{style:{color:`#CE9178`,\"--shiki-dark\":`#CE9178`},children:` {`})}),`\n`,_jsx(_components.span,{className:`line`,children:_jsx(_components.span,{style:{color:`#CE9178`,\"--shiki-dark\":`#CE9178`},children:` \"key\": \"top-up-type\",`})}),`\n`,_jsx(_components.span,{className:`line`,children:_jsx(_components.span,{style:{color:`#CE9178`,\"--shiki-dark\":`#CE9178`},children:` \"value\": \"manual\"`})}),`\n`,_jsx(_components.span,{className:`line`,children:_jsx(_components.span,{style:{color:`#CE9178`,\"--shiki-dark\":`#CE9178`},children:` }`})}),`\n`,_jsx(_components.span,{className:`line`,children:_jsx(_components.span,{style:{color:`#CE9178`,\"--shiki-dark\":`#CE9178`},children:` ]`})}),`\n`,_jsx(_components.span,{className:`line`,children:_jsx(_components.span,{style:{color:`#CE9178`,\"--shiki-dark\":`#CE9178`},children:` }`})}),`\n`,_jsx(_components.span,{className:`line`,children:_jsx(_components.span,{style:{color:`#CE9178`,\"--shiki-dark\":`#CE9178`},children:` }'`})}),`\n`]})})})})]}),`\n`,_jsx(OptimizedImage,{src:`https://mintcdn.com/lago-docs/x0ux42rCkjpwz1jk/guide/images/new-wallet.png?fit=max\u0026auto=format\u0026n=x0ux42rCkjpwz1jk\u0026q=85\u0026s=c0a008e6c1b04855ead9ae514e580fdc`,alt:`Creation of a wallet via the user interface`,\"data-og-width\":`3426`,width:`3426`,\"data-og-height\":`2140`,height:`2140`,\"data-path\":`guide/images/new-wallet.png`,\"data-optimize\":`true`,\"data-opv\":`3`,srcset:`https://mintcdn.com/lago-docs/x0ux42rCkjpwz1jk/guide/images/new-wallet.png?w=280\u0026fit=max\u0026auto=format\u0026n=x0ux42rCkjpwz1jk\u0026q=85\u0026s=38e712fa83d2770f2a8a466a02ea9fd1 280w, https://mintcdn.com/lago-docs/x0ux42rCkjpwz1jk/guide/images/new-wallet.png?w=560\u0026fit=max\u0026auto=format\u0026n=x0ux42rCkjpwz1jk\u0026q=85\u0026s=c112a24786b4e323bb7c4f5de831b754 560w, https://mintcdn.com/lago-docs/x0ux42rCkjpwz1jk/guide/images/new-wallet.png?w=840\u0026fit=max\u0026auto=format\u0026n=x0ux42rCkjpwz1jk\u0026q=85\u0026s=e39856161f535cbb3741cfbd52d86f3f 840w, https://mintcdn.com/lago-docs/x0ux42rCkjpwz1jk/guide/images/new-wallet.png?w=1100\u0026fit=max\u0026auto=format\u0026n=x0ux42rCkjpwz1jk\u0026q=85\u0026s=d320d19e09f705a17808fd527cf7395c 1100w, https://mintcdn.com/lago-docs/x0ux42rCkjpwz1jk/guide/images/new-wallet.png?w=1650\u0026fit=max\u0026auto=format\u0026n=x0ux42rCkjpwz1jk\u0026q=85\u0026s=abd0f2af02d99c76e20c689ab7cdc968 1650w, https://mintcdn.com/lago-docs/x0ux42rCkjpwz1jk/guide/images/new-wallet.png?w=2500\u0026fit=max\u0026auto=format\u0026n=x0ux42rCkjpwz1jk\u0026q=85\u0026s=d108ed8dc7500834ad05cc47e9e75ea4 2500w`}),`\n`,_jsx(_components.p,{children:`Free credits are added to the customer’s wallet instantly, while purchased credits are added to the wallet when payment is confirmed (see below).`}),`\n`,_jsx(Heading,{level:`2`,id:`payment-terms`,children:`Payment terms`}),`\n`,_jsx(_components.p,{children:`A wallet’s payment terms determine when invoices for its purchased credits are due. They apply to credit purchases, including manual and recurring top-ups. They do not set the payment terms of subscription invoices that use those credits.`}),`\n`,_jsxs(_components.p,{children:[`When creating or editing the wallet, open `,_jsx(_components.strong,{children:`Invoicing settings`}),`. Keep the inherited customer term, or choose a payment-term type and its days or month settings, then save. If the customer has no term of their own, the billing entity’s default applies. To return to the default later, choose inheritance.`]}),`\n`,_jsxs(_components.p,{children:[`For example, your customer uses `,_jsx(_components.strong,{children:`Net 30`}),` for subscriptions, but you set their wallet to `,_jsx(_components.strong,{children:`Due on receipt`}),`. A top-up invoice dated `,_jsx(_components.strong,{children:`April 10, 2026`}),` is due `,_jsx(_components.strong,{children:`April 10`}),`; a subscription invoice dated the same day is due `,_jsx(_components.strong,{children:`May 10`}),`.`]}),`\n`,_jsxs(_components.p,{children:[`See `,_jsx(_components.a,{href:`/guide/invoicing/invoicing-settings/payment-term#choose-a-payment-term`,children:`Payment terms`}),` for all six options and examples. Changes apply to future invoices; existing invoices retain their stored term. From the API, send `,_jsx(_components.code,{children:`payment_term`}),` when you `,_jsx(_components.a,{href:`/api-reference/wallets/create`,children:`create`}),` or `,_jsx(_components.a,{href:`/api-reference/wallets/update`,children:`update`}),` the wallet.`]}),`\n`,_jsx(Info,{children:_jsxs(_components.p,{children:[`Giving a customer more time to pay does not make purchased credits available before payment. For example, a Net 15 top-up invoice dated April 10 is due April 25, but the credits are added only when payment is confirmed. The `,_jsx(_components.a,{href:`#invoicing-after-successful-payment-option`,children:`invoicing after successful payment option`}),` separately controls when the invoice is issued.`]})}),`\n`,_jsx(Heading,{level:`2`,id:`real-time-wallet-balance`,children:`Real-time wallet balance`}),`\n`,_jsxs(Info,{children:[_jsxs(_components.p,{children:[_jsx(_components.strong,{children:`PREMIUM FEATURE`}),` ✨`]}),_jsxs(_components.p,{children:[`This feature is only available to users with a premium license. Please\n`,_jsx(_components.strong,{children:_jsx(_components.a,{href:`mailto:hello@getlago.com`,children:`contact us`})}),` to get access to Lago Cloud and Lago\nSelf-Hosted Premium.`]})]}),`\n`,_jsx(_components.p,{children:`Keep track of the real-time balance of your customers’ wallets. Lago provides two types of balance:`}),`\n`,_jsxs(_components.ol,{children:[`\n`,_jsxs(_components.li,{children:[_jsx(_components.strong,{children:`Balance:`}),` the invoiced balance, which reflects the prepaid credits left in the wallet. It updates each time an invoice is finalized for the customer.`]}),`\n`,_jsxs(_components.li,{children:[_jsx(_components.strong,{children:`Ongoing balance:`}),` the balance that accounts for current usage, including taxes and draft invoices. It estimates the consumption of the balance close to real time, and also updates each time an invoice is finalized for the customer.`]}),`\n`]}),`\n`,_jsx(Heading,{level:`2`,id:`application-scope`,children:`Application scope`}),`\n`,_jsxs(_components.p,{children:[`Prepaid credits settled in a wallet are applied to upcoming `,_jsx(_components.strong,{children:`subscription invoices`}),`. They are deducted from the post-tax subtotal, after any credit notes have been applied.`]}),`\n`,_jsx(CodeBlock,{numberOfLines:`15`,language:`text`,children:_jsx(_components.pre,{className:`shiki shiki-themes dark-plus dark-plus`,style:{backgroundColor:`#0B0C0E`,\"--shiki-dark-bg\":`#0B0C0E`,color:`#D4D4D4`,\"--shiki-dark\":`#D4D4D4`},language:`text`,children:_jsxs(_components.code,{language:`text`,numberOfLines:`15`,children:[_jsx(_components.span,{className:`line`,children:_jsx(_components.span,{children:`## EXAMPLE OF INVOICE`})}),`\n`,_jsx(_components.span,{className:`line`,children:_jsx(_components.span,{})}),`\n`,_jsx(_components.span,{className:`line`,children:_jsx(_components.span,{children:`All subscriptions fee $50.00`})}),`\n`,_jsx(_components.span,{className:`line`,children:_jsx(_components.span,{children:`All usage-based fees $20.00`})}),`\n`,_jsx(_components.span,{className:`line`,children:_jsx(_components.span,{children:`Coupons -$10.00`})}),`\n`,_jsx(_components.span,{className:`line`,children:_jsx(_components.span,{children:`-------------------------------`})}),`\n`,_jsx(_components.span,{className:`line`,children:_jsx(_components.span,{children:`Subtotal (excl. tax) $60.00`})}),`\n`,_jsx(_components.span,{className:`line`,children:_jsx(_components.span,{children:`Tax (10%) $ 6.00`})}),`\n`,_jsx(_components.span,{className:`line`,children:_jsx(_components.span,{children:`-------------------------------`})}),`\n`,_jsx(_components.span,{className:`line`,children:_jsx(_components.span,{children:`Subtotal (incl. tax) $66.00`})}),`\n`,_jsx(_components.span,{className:`line`,children:_jsx(_components.span,{children:`Credit notes -$20.00`})}),`\n`,_jsx(_components.span,{className:`line`,children:_jsx(_components.span,{children:`Prepaid credits -$30.00`})}),`\n`,_jsx(_components.span,{className:`line`,children:_jsx(_components.span,{children:`-------------------------------`})}),`\n`,_jsx(_components.span,{className:`line`,children:_jsx(_components.span,{children:`Total $16.00`})}),`\n`,_jsx(_components.span,{className:`line`,children:_jsx(_components.span,{})})]})})}),`\n`,_jsx(Info,{children:`Prepaid credits do not apply to one-off invoices.`}),`\n`,_jsxs(_components.p,{children:[`By default, prepaid credits apply to every fee type. You can refine this behavior by configuring limitation rules directly in the wallet. The `,_jsx(_components.a,{href:`/api-reference/wallets/create`,children:`create a wallet`}),` endpoint lists the fee types a wallet can be restricted to.`]}),`\n`,_jsxs(Tabs,{children:[_jsxs(Tab,{title:`Dashboard`,id:`dashboard-2`,children:[_jsx(_components.p,{children:`To limit the scope of prepaid credits through the user interface:`}),_jsxs(_components.ol,{children:[`\n`,_jsx(_components.li,{children:`Create or edit an existing wallet;`}),`\n`,_jsxs(_components.li,{children:[`In the `,_jsx(_components.strong,{children:`“Limit wallet credits to specific objects”`}),` section, add one or more object limitations; and`]}),`\n`,_jsx(_components.li,{children:`Limit the prepaid credits to specific billable metrics, if you need to.`}),`\n`]}),_jsx(Info,{children:`Selecting every item has the same effect as selecting none. Leave the options unselected unless you need a restriction.`}),_jsx(Frame,{caption:`Limit wallet prepaid credits to specific objects`,children:_jsx(OptimizedImage,{src:`https://mintcdn.com/lago-docs/x0ux42rCkjpwz1jk/guide/images/wallet-application-scope.png?fit=max\u0026auto=format\u0026n=x0ux42rCkjpwz1jk\u0026q=85\u0026s=89d63d930261356e64377932bcd57abd`,alt:`Wallet form section limiting prepaid credits to specific objects`,\"data-og-width\":`1506`,width:`1506`,\"data-og-height\":`850`,height:`850`,\"data-path\":`guide/images/wallet-application-scope.png`,\"data-optimize\":`true`,\"data-opv\":`3`,srcset:`https://mintcdn.com/lago-docs/x0ux42rCkjpwz1jk/guide/images/wallet-application-scope.png?w=280\u0026fit=max\u0026auto=format\u0026n=x0ux42rCkjpwz1jk\u0026q=85\u0026s=cfc319be1085940cf4513ea30805eab5 280w, https://mintcdn.com/lago-docs/x0ux42rCkjpwz1jk/guide/images/wallet-application-scope.png?w=560\u0026fit=max\u0026auto=format\u0026n=x0ux42rCkjpwz1jk\u0026q=85\u0026s=c4216655d2d2c5287b615605d5ce8470 560w, https://mintcdn.com/lago-docs/x0ux42rCkjpwz1jk/guide/images/wallet-application-scope.png?w=840\u0026fit=max\u0026auto=format\u0026n=x0ux42rCkjpwz1jk\u0026q=85\u0026s=14deb0c6ce9efadc8ff6faa9da590310 840w, https://mintcdn.com/lago-docs/x0ux42rCkjpwz1jk/guide/images/wallet-application-scope.png?w=1100\u0026fit=max\u0026auto=format\u0026n=x0ux42rCkjpwz1jk\u0026q=85\u0026s=0bcbd7c435ffb36a12e806c89ee6b12d 1100w, https://mintcdn.com/lago-docs/x0ux42rCkjpwz1jk/guide/images/wallet-application-scope.png?w=1650\u0026fit=max\u0026auto=format\u0026n=x0ux42rCkjpwz1jk\u0026q=85\u0026s=e4912eea2c0d8b3bfc3f8f610e6d568b 1650w, https://mintcdn.com/lago-docs/x0ux42rCkjpwz1jk/guide/images/wallet-application-scope.png?w=2500\u0026fit=max\u0026auto=format\u0026n=x0ux42rCkjpwz1jk\u0026q=85\u0026s=c68433d86634844306bc50a22818dbc9 2500w`})})]}),_jsx(Tab,{title:`API`,id:`api-2`,children:_jsx(CodeBlock,{filename:`Scope wallet to specific fee`,numberOfLines:`19`,language:`shellscript`,children:_jsx(_components.pre,{className:`shiki shiki-themes dark-plus dark-plus`,style:{backgroundColor:`#0B0C0E`,\"--shiki-dark-bg\":`#0B0C0E`,color:`#D4D4D4`,\"--shiki-dark\":`#D4D4D4`},language:`shellscript`,children:_jsxs(_components.code,{language:`shellscript`,numberOfLines:`19`,children:[_jsxs(_components.span,{className:`line`,children:[_jsx(_components.span,{style:{color:`#9CDCFE`,\"--shiki-dark\":`#9CDCFE`},children:`LAGO_URL`}),_jsx(_components.span,{style:{color:`#D4D4D4`,\"--shiki-dark\":`#D4D4D4`},children:`=`}),_jsx(_components.span,{style:{color:`#CE9178`,\"--shiki-dark\":`#CE9178`},children:`\"https://api.getlago.com\"`})]}),`\n`,_jsxs(_components.span,{className:`line`,children:[_jsx(_components.span,{style:{color:`#9CDCFE`,\"--shiki-dark\":`#9CDCFE`},children:`API_KEY`}),_jsx(_components.span,{style:{color:`#D4D4D4`,\"--shiki-dark\":`#D4D4D4`},children:`=`}),_jsx(_components.span,{style:{color:`#CE9178`,\"--shiki-dark\":`#CE9178`},children:`\"__YOUR_API_KEY__\"`})]}),`\n`,_jsx(_components.span,{className:`line`}),`\n`,_jsxs(_components.span,{className:`line`,children:[_jsx(_components.span,{style:{color:`#DCDCAA`,\"--shiki-dark\":`#DCDCAA`},children:`curl`}),_jsx(_components.span,{style:{color:`#569CD6`,\"--shiki-dark\":`#569CD6`},children:` --location`}),_jsx(_components.span,{style:{color:`#569CD6`,\"--shiki-dark\":`#569CD6`},children:` --request`}),_jsx(_components.span,{style:{color:`#CE9178`,\"--shiki-dark\":`#CE9178`},children:` POST`}),_jsx(_components.span,{style:{color:`#CE9178`,\"--shiki-dark\":`#CE9178`},children:` \"`}),_jsx(_components.span,{style:{color:`#9CDCFE`,\"--shiki-dark\":`#9CDCFE`},children:`$LAGO_URL`}),_jsx(_components.span,{style:{color:`#CE9178`,\"--shiki-dark\":`#CE9178`},children:`/api/v1/wallets\"`}),_jsx(_components.span,{style:{color:`#D7BA7D`,\"--shiki-dark\":`#D7BA7D`},children:` \\\\`})]}),`\n`,_jsxs(_components.span,{className:`line`,children:[_jsx(_components.span,{style:{color:`#569CD6`,\"--shiki-dark\":`#569CD6`},children:` --header`}),_jsx(_components.span,{style:{color:`#CE9178`,\"--shiki-dark\":`#CE9178`},children:` \"Authorization: Bearer `}),_jsx(_components.span,{style:{color:`#9CDCFE`,\"--shiki-dark\":`#9CDCFE`},children:`$API_KEY`}),_jsx(_components.span,{style:{color:`#CE9178`,\"--shiki-dark\":`#CE9178`},children:`\"`}),_jsx(_components.span,{style:{color:`#D7BA7D`,\"--shiki-dark\":`#D7BA7D`},children:` \\\\`})]}),`\n`,_jsxs(_components.span,{className:`line`,children:[_jsx(_components.span,{style:{color:`#569CD6`,\"--shiki-dark\":`#569CD6`},children:` --header`}),_jsx(_components.span,{style:{color:`#CE9178`,\"--shiki-dark\":`#CE9178`},children:` \"Content-Type: application/json\"`}),_jsx(_components.span,{style:{color:`#D7BA7D`,\"--shiki-dark\":`#D7BA7D`},children:` \\\\`})]}),`\n`,_jsxs(_components.span,{className:`line`,children:[_jsx(_components.span,{style:{color:`#569CD6`,\"--shiki-dark\":`#569CD6`},children:` --data-raw`}),_jsx(_components.span,{style:{color:`#CE9178`,\"--shiki-dark\":`#CE9178`},children:` '{`})]}),`\n`,_jsx(_components.span,{className:`line`,children:_jsx(_components.span,{style:{color:`#CE9178`,\"--shiki-dark\":`#CE9178`},children:` \"wallet\": {`})}),`\n`,_jsx(_components.span,{className:`line`,children:_jsx(_components.span,{style:{color:`#CE9178`,\"--shiki-dark\":`#CE9178`},children:` \"external_customer_id\": \"hooli_1234\",`})}),`\n`,_jsx(_components.span,{className:`line`,children:_jsx(_components.span,{style:{color:`#CE9178`,\"--shiki-dark\":`#CE9178`},children:` \"name\": \"Prepaid credits\",`})}),`\n`,_jsx(_components.span,{className:`line`,children:_jsx(_components.span,{style:{color:`#CE9178`,\"--shiki-dark\":`#CE9178`},children:` \"rate_amount\": 1.0,`})}),`\n`,_jsx(_components.span,{className:`line`,children:_jsx(_components.span,{style:{color:`#CE9178`,\"--shiki-dark\":`#CE9178`},children:` \"paid_credits\": 100.0,`})}),`\n`,_jsx(_components.span,{className:`line`,children:_jsx(_components.span,{style:{color:`#CE9178`,\"--shiki-dark\":`#CE9178`},children:` \"granted_credits\": 50.0,`})}),`\n`,_jsx(_components.span,{className:`line`,children:_jsx(_components.span,{style:{color:`#CE9178`,\"--shiki-dark\":`#CE9178`},children:` \"currency\": \"USD\",`})}),`\n`,_jsx(_components.span,{className:`line`,children:_jsx(_components.span,{style:{color:`#CE9178`,\"--shiki-dark\":`#CE9178`},children:` \"applies_to\": {`})}),`\n`,_jsx(_components.span,{className:`line`,children:_jsx(_components.span,{style:{color:`#CE9178`,\"--shiki-dark\":`#CE9178`},children:` \"fee_types\": [\"charge\", \"commitment\", \"subscription\"]`})}),`\n`,_jsx(_components.span,{className:`line`,children:_jsx(_components.span,{style:{color:`#CE9178`,\"--shiki-dark\":`#CE9178`},children:` }`})}),`\n`,_jsx(_components.span,{className:`line`,children:_jsx(_components.span,{style:{color:`#CE9178`,\"--shiki-dark\":`#CE9178`},children:` }`})}),`\n`,_jsx(_components.span,{className:`line`,children:_jsx(_components.span,{style:{color:`#CE9178`,\"--shiki-dark\":`#CE9178`},children:` }'`})}),`\n`]})})})})]}),`\n`,_jsx(Heading,{level:`2`,id:`invoicing-after-successful-payment-option`,children:`Invoicing after successful payment option`}),`\n`,_jsx(_components.p,{children:`When enabled, this option delays issuing an invoice for a wallet top-up until a successful payment is made. If disabled, the invoice is issued immediately upon the wallet top-up, whatever the payment status. This setting applies to all the transactions of the wallet, and you can override it on individual transactions or on recurring rules.`}),`\n`,_jsx(_components.p,{children:`With this option enabled, the invoice is issued on the day the payment succeeds and is due that same day, whatever the wallet’s payment term.`}),`\n`,_jsx(Heading,{level:`2`,id:`wallet-transaction-limits`,children:`Wallet transaction limits`}),`\n`,_jsxs(Tabs,{children:[_jsxs(Tab,{title:`Dashboard`,id:`dashboard-3`,children:[_jsx(_components.p,{children:`For each wallet, you can set minimum and maximum limits per paid transaction.\nWhen these limits are defined, any top-up attempt must fall within the specified range. Transactions below the minimum or above the maximum are rejected.`}),_jsx(Frame,{caption:`Wallet transaction limits`,children:_jsx(OptimizedImage,{src:`https://mintcdn.com/lago-docs/GNaCV_1x6xTnMzlW/guide/images/min-max-wallet-limits.png?fit=max\u0026auto=format\u0026n=GNaCV_1x6xTnMzlW\u0026q=85\u0026s=d757b2c6ae707d63808a1e98664e6a14`,alt:`Wallet form section with the minimum and maximum amounts per paid top-up`,\"data-og-width\":`1102`,width:`1102`,\"data-og-height\":`722`,height:`722`,\"data-path\":`guide/images/min-max-wallet-limits.png`,\"data-optimize\":`true`,\"data-opv\":`3`,srcset:`https://mintcdn.com/lago-docs/GNaCV_1x6xTnMzlW/guide/images/min-max-wallet-limits.png?w=280\u0026fit=max\u0026auto=format\u0026n=GNaCV_1x6xTnMzlW\u0026q=85\u0026s=6d6687edba7b9bda402b6e191caaef7b 280w, https://mintcdn.com/lago-docs/GNaCV_1x6xTnMzlW/guide/images/min-max-wallet-limits.png?w=560\u0026fit=max\u0026auto=format\u0026n=GNaCV_1x6xTnMzlW\u0026q=85\u0026s=aa164d8f9089f98d04eb6acc9c66621f 560w, https://mintcdn.com/lago-docs/GNaCV_1x6xTnMzlW/guide/images/min-max-wallet-limits.png?w=840\u0026fit=max\u0026auto=format\u0026n=GNaCV_1x6xTnMzlW\u0026q=85\u0026s=fbe164be96eed48b77d8169800050d78 840w, https://mintcdn.com/lago-docs/GNaCV_1x6xTnMzlW/guide/images/min-max-wallet-limits.png?w=1100\u0026fit=max\u0026auto=format\u0026n=GNaCV_1x6xTnMzlW\u0026q=85\u0026s=d9b404b45447eca7479e638d4b3f7a19 1100w, https://mintcdn.com/lago-docs/GNaCV_1x6xTnMzlW/guide/images/min-max-wallet-limits.png?w=1650\u0026fit=max\u0026auto=format\u0026n=GNaCV_1x6xTnMzlW\u0026q=85\u0026s=adeac885687e3409b12055bad29a18be 1650w, https://mintcdn.com/lago-docs/GNaCV_1x6xTnMzlW/guide/images/min-max-wallet-limits.png?w=2500\u0026fit=max\u0026auto=format\u0026n=GNaCV_1x6xTnMzlW\u0026q=85\u0026s=ac3732e20004ab72e30d68270c78f36e 2500w`})})]}),_jsx(Tab,{title:`API`,id:`api-3`,children:_jsx(CodeBlock,{filename:`Add wallet min and max limits`,numberOfLines:`15`,language:`shellscript`,children:_jsx(_components.pre,{className:`shiki shiki-themes dark-plus dark-plus`,style:{backgroundColor:`#0B0C0E`,\"--shiki-dark-bg\":`#0B0C0E`,color:`#D4D4D4`,\"--shiki-dark\":`#D4D4D4`},language:`shellscript`,children:_jsxs(_components.code,{language:`shellscript`,numberOfLines:`15`,children:[_jsxs(_components.span,{className:`line`,children:[_jsx(_components.span,{style:{color:`#9CDCFE`,\"--shiki-dark\":`#9CDCFE`},children:`LAGO_URL`}),_jsx(_components.span,{style:{color:`#D4D4D4`,\"--shiki-dark\":`#D4D4D4`},children:`=`}),_jsx(_components.span,{style:{color:`#CE9178`,\"--shiki-dark\":`#CE9178`},children:`\"https://api.getlago.com\"`})]}),`\n`,_jsxs(_components.span,{className:`line`,children:[_jsx(_components.span,{style:{color:`#9CDCFE`,\"--shiki-dark\":`#9CDCFE`},children:`API_KEY`}),_jsx(_components.span,{style:{color:`#D4D4D4`,\"--shiki-dark\":`#D4D4D4`},children:`=`}),_jsx(_components.span,{style:{color:`#CE9178`,\"--shiki-dark\":`#CE9178`},children:`\"__YOUR_API_KEY__\"`})]}),`\n`,_jsx(_components.span,{className:`line`}),`\n`,_jsxs(_components.span,{className:`line`,children:[_jsx(_components.span,{style:{color:`#DCDCAA`,\"--shiki-dark\":`#DCDCAA`},children:`curl`}),_jsx(_components.span,{style:{color:`#569CD6`,\"--shiki-dark\":`#569CD6`},children:` --location`}),_jsx(_components.span,{style:{color:`#569CD6`,\"--shiki-dark\":`#569CD6`},children:` --request`}),_jsx(_components.span,{style:{color:`#CE9178`,\"--shiki-dark\":`#CE9178`},children:` POST`}),_jsx(_components.span,{style:{color:`#CE9178`,\"--shiki-dark\":`#CE9178`},children:` \"`}),_jsx(_components.span,{style:{color:`#9CDCFE`,\"--shiki-dark\":`#9CDCFE`},children:`$LAGO_URL`}),_jsx(_components.span,{style:{color:`#CE9178`,\"--shiki-dark\":`#CE9178`},children:`/api/v1/wallets\"`}),_jsx(_components.span,{style:{color:`#D7BA7D`,\"--shiki-dark\":`#D7BA7D`},children:` \\\\`})]}),`\n`,_jsxs(_components.span,{className:`line`,children:[_jsx(_components.span,{style:{color:`#569CD6`,\"--shiki-dark\":`#569CD6`},children:` --header`}),_jsx(_components.span,{style:{color:`#CE9178`,\"--shiki-dark\":`#CE9178`},children:` \"Authorization: Bearer `}),_jsx(_components.span,{style:{color:`#9CDCFE`,\"--shiki-dark\":`#9CDCFE`},children:`$API_KEY`}),_jsx(_components.span,{style:{color:`#CE9178`,\"--shiki-dark\":`#CE9178`},children:`\"`}),_jsx(_components.span,{style:{color:`#D7BA7D`,\"--shiki-dark\":`#D7BA7D`},children:` \\\\`})]}),`\n`,_jsxs(_components.span,{className:`line`,children:[_jsx(_components.span,{style:{color:`#569CD6`,\"--shiki-dark\":`#569CD6`},children:` --header`}),_jsx(_components.span,{style:{color:`#CE9178`,\"--shiki-dark\":`#CE9178`},children:` \"Content-Type: application/json\"`}),_jsx(_components.span,{style:{color:`#D7BA7D`,\"--shiki-dark\":`#D7BA7D`},children:` \\\\`})]}),`\n`,_jsxs(_components.span,{className:`line`,children:[_jsx(_components.span,{style:{color:`#569CD6`,\"--shiki-dark\":`#569CD6`},children:` --data-raw`}),_jsx(_components.span,{style:{color:`#CE9178`,\"--shiki-dark\":`#CE9178`},children:` '{`})]}),`\n`,_jsx(_components.span,{className:`line`,children:_jsx(_components.span,{style:{color:`#CE9178`,\"--shiki-dark\":`#CE9178`},children:` \"wallet\": {`})}),`\n`,_jsx(_components.span,{className:`line`,children:_jsx(_components.span,{style:{color:`#CE9178`,\"--shiki-dark\":`#CE9178`},children:` \"external_customer_id\": \"hooli_1234\",`})}),`\n`,_jsx(_components.span,{className:`line`,children:_jsx(_components.span,{style:{color:`#CE9178`,\"--shiki-dark\":`#CE9178`},children:` \"name\": \"Prepaid credits\",`})}),`\n`,_jsx(_components.span,{className:`line`,children:_jsx(_components.span,{style:{color:`#CE9178`,\"--shiki-dark\":`#CE9178`},children:` \"rate_amount\": 1.0,`})}),`\n`,_jsx(_components.span,{className:`line`,children:_jsx(_components.span,{style:{color:`#CE9178`,\"--shiki-dark\":`#CE9178`},children:` \"paid_top_up_min_amount_cents\": 1000,`})}),`\n`,_jsx(_components.span,{className:`line`,children:_jsx(_components.span,{style:{color:`#CE9178`,\"--shiki-dark\":`#CE9178`},children:` \"paid_top_up_max_amount_cents\": 100000`})}),`\n`,_jsx(_components.span,{className:`line`,children:_jsx(_components.span,{style:{color:`#CE9178`,\"--shiki-dark\":`#CE9178`},children:` }`})}),`\n`,_jsx(_components.span,{className:`line`,children:_jsx(_components.span,{style:{color:`#CE9178`,\"--shiki-dark\":`#CE9178`},children:` }'`})}),`\n`]})})})})]}),`\n`,_jsxs(_components.p,{children:[`You can ignore these limits on a top-up by adding the `,_jsx(_components.code,{children:`ignore_paid_top_up_limits`}),` flag to the payload, or by enabling `,_jsx(_components.strong,{children:`“Skip top-up limits for this transaction”`}),` in the dashboard. It works on single top-ups and on automatic ones (recurring wallet transactions).`]}),`\n`,_jsx(Frame,{caption:`Skip wallet limits for a single transaction`,children:_jsx(OptimizedImage,{src:`https://mintcdn.com/lago-docs/GNaCV_1x6xTnMzlW/guide/images/skip-wallet-limits.png?fit=max\u0026auto=format\u0026n=GNaCV_1x6xTnMzlW\u0026q=85\u0026s=dfd78574644cc307d12da73795a47cfd`,alt:`Top-up form with the option to skip the top-up limits for this transaction`,\"data-og-width\":`905`,width:`905`,\"data-og-height\":`431`,height:`431`,\"data-path\":`guide/images/skip-wallet-limits.png`,\"data-optimize\":`true`,\"data-opv\":`3`,srcset:`https://mintcdn.com/lago-docs/GNaCV_1x6xTnMzlW/guide/images/skip-wallet-limits.png?w=280\u0026fit=max\u0026auto=format\u0026n=GNaCV_1x6xTnMzlW\u0026q=85\u0026s=fe28c24c7ba32ab2cbc432c705641e3f 280w, https://mintcdn.com/lago-docs/GNaCV_1x6xTnMzlW/guide/images/skip-wallet-limits.png?w=560\u0026fit=max\u0026auto=format\u0026n=GNaCV_1x6xTnMzlW\u0026q=85\u0026s=7d1300f62462bcf8ea1cc7af4a6f0981 560w, https://mintcdn.com/lago-docs/GNaCV_1x6xTnMzlW/guide/images/skip-wallet-limits.png?w=840\u0026fit=max\u0026auto=format\u0026n=GNaCV_1x6xTnMzlW\u0026q=85\u0026s=e4c171774a0f3fe4ea414cf900c01746 840w, https://mintcdn.com/lago-docs/GNaCV_1x6xTnMzlW/guide/images/skip-wallet-limits.png?w=1100\u0026fit=max\u0026auto=format\u0026n=GNaCV_1x6xTnMzlW\u0026q=85\u0026s=5327116b5141116e90d73c8e2f08cc1d 1100w, https://mintcdn.com/lago-docs/GNaCV_1x6xTnMzlW/guide/images/skip-wallet-limits.png?w=1650\u0026fit=max\u0026auto=format\u0026n=GNaCV_1x6xTnMzlW\u0026q=85\u0026s=d4a415e4e057f335b7b55b27e1fa962f 1650w, https://mintcdn.com/lago-docs/GNaCV_1x6xTnMzlW/guide/images/skip-wallet-limits.png?w=2500\u0026fit=max\u0026auto=format\u0026n=GNaCV_1x6xTnMzlW\u0026q=85\u0026s=18d2aed87cc5b453c760235b4bef3290 2500w`})}),`\n`,_jsx(Heading,{level:`2`,id:`expiration-date-and-termination`,children:`Expiration date and termination`}),`\n`,_jsx(_components.p,{children:`If you don’t set an expiration date, prepaid credits are carried over to the next billing period until the wallet balance is zero.`}),`\n`,_jsxs(_components.p,{children:[`If you define an expiration date, all the remaining credits are `,_jsx(_components.strong,{children:`automatically voided`}),` when that date is reached.`]}),`\n`,_jsx(_components.p,{children:`To modify the expiration date of the prepaid credits through the user interface:`}),`\n`,_jsxs(_components.ol,{children:[`\n`,_jsxs(_components.li,{children:[`Open the `,_jsx(_components.strong,{children:`“Wallets”`}),` tab and click `,_jsx(_components.strong,{children:`“Edit wallet”`}),` on the right;`]}),`\n`,_jsxs(_components.li,{children:[`Select `,_jsx(_components.strong,{children:`“Edit information”`}),`;`]}),`\n`,_jsx(_components.li,{children:`Modify the expiration date; and`}),`\n`,_jsxs(_components.li,{children:[`Click `,_jsx(_components.strong,{children:`“Edit information”`}),` to confirm.`]}),`\n`]}),`\n`,_jsx(_components.p,{children:`The expiration date displayed in the app is based on the organization’s timezone.`}),`\n`,_jsx(_components.p,{children:`You can also terminate a wallet manually, before its expiration date:`}),`\n`,_jsxs(_components.ol,{children:[`\n`,_jsxs(_components.li,{children:[`Open the `,_jsx(_components.strong,{children:`“Wallets”`}),` tab and click `,_jsx(_components.strong,{children:`“Edit wallet”`}),` on the right;`]}),`\n`,_jsxs(_components.li,{children:[`Select `,_jsx(_components.strong,{children:`“Terminate wallet”`}),`; and`]}),`\n`,_jsx(_components.li,{children:`Click again to confirm.`}),`\n`]}),`\n`,_jsx(Warning,{children:_jsxs(_components.p,{children:[`Terminating a wallet instantly voids all the remaining credits. This action\n`,_jsx(_components.strong,{children:`cannot be undone`}),`.`]})})]})}function MDXContent(props={}){const{wrapper:MDXLayout}={..._provideComponents(),...props.components};return MDXLayout?_jsx(MDXLayout,{...props,children:_jsx(_createMdxContent,{...props})}):_createMdxContent(props)}return{default:MDXContent};function _missingMdxReference(id,component){throw new Error(`Expected `+(component?`component`:`object`)+\" `\"+id+\"` to be defined: you likely forgot to import, pass, or provide it.\")}","frontmatter":{},"scope":{"codeStyling":"dark","config":{},"pageMetadata":{"title":"Prepaid credits and wallets: bill usage against a balance","sidebarTitle":"Overview","description":"Usage-based charges are billed at the end of the billing period, so payment comes late. Prepaid credits let you collect it up front and draw the balance down as usage arrives.","href":"/guide/wallet-and-prepaid-credits/overview"}}},"mdxSourceWithNoJs":null},"mdxExtracts":{"tableOfContents":[{"title":"Create wallets","slug":"create-wallets","depth":2,"children":[]},{"title":"Payment terms","slug":"payment-terms","depth":2,"children":[]},{"title":"Real-time wallet balance","slug":"real-time-wallet-balance","depth":2,"children":[]},{"title":"Application scope","slug":"application-scope","depth":2,"children":[]},{"title":"Invoicing after successful payment option","slug":"invoicing-after-successful-payment-option","depth":2,"children":[]},{"title":"Wallet transaction limits","slug":"wallet-transaction-limits","depth":2,"children":[]},{"title":"Expiration date and termination","slug":"expiration-date-and-termination","depth":2,"children":[]}],"codeExamples":{}},"jsLinks":["/docs/_mintlify/custom/lago-docs/a0e77058367d9146/canonical.js","/docs/_mintlify/custom/lago-docs/fa2446312177e9c6/loader.js","/docs/_mintlify/custom/lago-docs/c55d8403f7fc83ad/changelog-anchor-redirect.js","/docs/_mintlify/custom/lago-docs/8c326c8b67b47933/changelog-month-nav.js","/docs/_mintlify/custom/lago-docs/103c90943d27f62a/webmcp.js","/docs/_mintlify/custom/lago-docs/1219fb859e5c496e/github-outbound.js"],"subdomain":"lago-docs","siteName":"Lago","title":"Prepaid credits and wallets: bill usage against a balance - Lago","navMaps":{"firstHrefInVersion":{},"firstHrefInLanguage":{}},"lastModified":"2026-11-10T17:47:18.165Z","originalFileLocation":"guide/wallet-and-prepaid-credits/overview.mdx"},"headHtml":"\u003cscript data-mint-head>(function(){var d=document.documentElement,p=null;if(!p){try{p=localStorage.getItem(\"isDarkMode\")}catch(e){}if(p==='true')p='dark';else if(p==='false')p='light';if(p!=='light'\u0026\u0026p!=='dark'\u0026\u0026p!=='system')p=\"system\"}var r=p==='system'?(matchMedia(\"(prefers-color-scheme: dark)\").matches?'dark':'light'):p;d.classList.remove(r==='dark'?'light':'dark');d.classList.add(r);d.setAttribute(\"data-theme-preference\",p)})();\u003c/script>\u003cmeta data-mint-head name=\"description\" content=\"Usage-based charges are billed at the end of the billing period, so payment comes late. Prepaid credits let you collect it up front and draw the balance down as usage arrives.\">\u003cmeta data-mint-head name=\"keywords\" content=\"Lago API, billing API, usage metering API, OpenAPI, billing SDK, Lago MCP\">\u003cmeta data-mint-head name=\"application-name\" content=\"Lago\">\u003cmeta data-mint-head name=\"generator\" content=\"Mintlify\">\u003clink data-mint-head rel=\"icon\" type=\"image/png\" sizes=\"192x192\" href=\"/docs/mintlify-assets/_mintlify/favicons/lago-docs/PXUAhcpsneOuo3Dn/_generated/favicon/android-chrome-192x192.png\" media=\"(prefers-color-scheme: light)\">\u003clink data-mint-head rel=\"apple-touch-icon\" type=\"image/png\" sizes=\"180x180\" href=\"/docs/mintlify-assets/_mintlify/favicons/lago-docs/PXUAhcpsneOuo3Dn/_generated/favicon/apple-touch-icon.png\">\u003clink data-mint-head rel=\"icon\" type=\"image/png\" sizes=\"16x16\" href=\"/docs/mintlify-assets/_mintlify/favicons/lago-docs/PXUAhcpsneOuo3Dn/_generated/favicon/favicon-16x16.png\" media=\"(prefers-color-scheme: light)\">\u003clink data-mint-head rel=\"icon\" type=\"image/png\" sizes=\"32x32\" href=\"/docs/mintlify-assets/_mintlify/favicons/lago-docs/PXUAhcpsneOuo3Dn/_generated/favicon/favicon-32x32.png\" media=\"(prefers-color-scheme: light)\">\u003clink data-mint-head rel=\"shortcut icon\" type=\"image/x-icon\" href=\"/docs/mintlify-assets/_mintlify/favicons/lago-docs/PXUAhcpsneOuo3Dn/_generated/favicon/favicon.ico\" media=\"(prefers-color-scheme: light)\">\u003clink data-mint-head rel=\"icon\" type=\"image/png\" sizes=\"192x192\" href=\"/docs/mintlify-assets/_mintlify/favicons/lago-docs/PXUAhcpsneOuo3Dn/_generated/favicon-dark/android-chrome-192x192.png\" media=\"(prefers-color-scheme: dark)\">\u003clink data-mint-head rel=\"icon\" type=\"image/png\" sizes=\"16x16\" href=\"/docs/mintlify-assets/_mintlify/favicons/lago-docs/PXUAhcpsneOuo3Dn/_generated/favicon-dark/favicon-16x16.png\" media=\"(prefers-color-scheme: dark)\">\u003clink data-mint-head rel=\"icon\" type=\"image/png\" sizes=\"32x32\" href=\"/docs/mintlify-assets/_mintlify/favicons/lago-docs/PXUAhcpsneOuo3Dn/_generated/favicon-dark/favicon-32x32.png\" media=\"(prefers-color-scheme: dark)\">\u003clink data-mint-head rel=\"shortcut icon\" type=\"image/x-icon\" href=\"/docs/mintlify-assets/_mintlify/favicons/lago-docs/PXUAhcpsneOuo3Dn/_generated/favicon-dark/favicon.ico\" media=\"(prefers-color-scheme: dark)\">\u003cmeta data-mint-head property=\"og:title\" content=\"Prepaid credits and wallets: bill usage against a balance - Lago\">\u003cmeta data-mint-head property=\"og:description\" content=\"Usage-based charges are billed at the end of the billing period, so payment comes late. Prepaid credits let you collect it up front and draw the balance down as usage arrives.\">\u003cmeta data-mint-head property=\"og:site_name\" content=\"Lago\">\u003cmeta data-mint-head property=\"og:url\" content=\"https://getlago.com/docs/guide/wallet-and-prepaid-credits/overview\">\u003cmeta data-mint-head property=\"og:type\" content=\"website\">\u003cmeta data-mint-head property=\"og:image\" content=\"https://lago-docs.mintlify.site/docs/_mintlify/api/og/v2?division=Wallets+and+prepaid+credits\u0026amp;title=Prepaid+credits+and+wallets%3A+bill+usage+against+a+balance\u0026amp;description=Usage-based+charges+are+billed+at+the+end+of+the+billing+period%2C+so+payment+comes+late.+Prepaid+credits+let+you+collect+it+up+front+and+draw+the+balance+down+as\u0026amp;theme=e69bad9b2f17285816711238\u0026amp;signature=a6c156c0ceeebbc77d5f5e25d4394d6e966bad03196519e375deedac7e869c30\">\u003cmeta data-mint-head property=\"og:image:width\" content=\"1200\">\u003cmeta data-mint-head property=\"og:image:height\" content=\"630\">\u003cmeta data-mint-head name=\"twitter:card\" content=\"summary_large_image\">\u003cmeta data-mint-head name=\"twitter:title\" content=\"Prepaid credits and wallets: bill usage against a balance - Lago\">\u003cmeta data-mint-head name=\"twitter:description\" content=\"Usage-based charges are billed at the end of the billing period, so payment comes late. Prepaid credits let you collect it up front and draw the balance down as usage arrives.\">\u003cmeta data-mint-head name=\"twitter:image\" content=\"https://lago-docs.mintlify.site/docs/_mintlify/api/og/v2?division=Wallets+and+prepaid+credits\u0026amp;title=Prepaid+credits+and+wallets%3A+bill+usage+against+a+balance\u0026amp;description=Usage-based+charges+are+billed+at+the+end+of+the+billing+period%2C+so+payment+comes+late.+Prepaid+credits+let+you+collect+it+up+front+and+draw+the+balance+down+as\u0026amp;theme=e69bad9b2f17285816711238\u0026amp;signature=a6c156c0ceeebbc77d5f5e25d4394d6e966bad03196519e375deedac7e869c30\">\u003cmeta data-mint-head name=\"twitter:image:width\" content=\"1200\">\u003cmeta data-mint-head name=\"twitter:image:height\" content=\"630\">\u003cmeta data-mint-head name=\"msapplication-config\" content=\"/docs/mintlify-assets/_mintlify/favicons/lago-docs/PXUAhcpsneOuo3Dn/_generated/favicon/browserconfig.xml\">\u003cmeta data-mint-head name=\"apple-mobile-web-app-title\" content=\"Lago\">\u003cmeta data-mint-head name=\"msapplication-TileColor\" content=\"#006CFA\">\u003clink data-mint-head rel=\"canonical\" href=\"https://getlago.com/docs/guide/wallet-and-prepaid-credits/overview\">\u003clink data-mint-head rel=\"alternate\" type=\"application/xml\" href=\"/docs/sitemap.xml\">\u003clink data-mint-head rel=\"alternate\" type=\"text/markdown\" href=\"/docs/guide/wallet-and-prepaid-credits/overview.md\">\u003cscript data-mint-head type=\"application/ld+json\">{\"@context\":\"https://schema.org\",\"@graph\":[{\"@type\":\"Organization\",\"@id\":\"https://getlago.com/#organization\",\"name\":\"Lago\",\"legalName\":\"Get Lago Corp.\",\"url\":\"https://getlago.com\",\"logo\":{\"@type\":\"ImageObject\",\"url\":\"https://getlago.com/docs/logo/light.svg\"},\"sameAs\":[\"https://github.com/getlago\",\"https://www.linkedin.com/company/getlago\",\"https://x.com/GetLago\",\"https://www.youtube.com/channel/UCp6ltp7n3SgDVsmerJ7O7ZA\"]},{\"@type\":\"WebSite\",\"@id\":\"https://getlago.com/docs#website\",\"name\":\"Lago\",\"url\":\"https://getlago.com/docs\",\"publisher\":{\"@id\":\"https://getlago.com/#organization\"}},{\"@type\":\"WebPage\",\"@id\":\"https://getlago.com/docs/guide/wallet-and-prepaid-credits/overview#webpage\",\"url\":\"https://getlago.com/docs/guide/wallet-and-prepaid-credits/overview\",\"name\":\"Prepaid credits and wallets: bill usage against a balance\",\"description\":\"Usage-based charges are billed at the end of the billing period, so payment comes late. Prepaid credits let you collect it up front and draw the balance down as usage arrives.\",\"dateModified\":\"2026-11-10T17:47:18.165Z\",\"isPartOf\":{\"@id\":\"https://getlago.com/docs#website\"},\"breadcrumb\":{\"@id\":\"https://getlago.com/docs/guide/wallet-and-prepaid-credits/overview#breadcrumb\"}},{\"@type\":\"BreadcrumbList\",\"@id\":\"https://getlago.com/docs/guide/wallet-and-prepaid-credits/overview#breadcrumb\",\"itemListElement\":[{\"@type\":\"ListItem\",\"position\":1,\"name\":\"Payments \u0026 Cash Collection\",\"item\":\"https://getlago.com/docs/guide/payments/payment-providers\"},{\"@type\":\"ListItem\",\"position\":2,\"name\":\"Prepaid credits and wallets: bill usage against a balance\",\"item\":\"https://getlago.com/docs/guide/wallet-and-prepaid-credits/overview\"}]},{\"@type\":[\"Article\",\"TechArticle\"],\"@id\":\"https://getlago.com/docs/guide/wallet-and-prepaid-credits/overview#article\",\"headline\":\"Prepaid credits and wallets: bill usage against a balance\",\"name\":\"Prepaid credits and wallets: bill usage against a balance\",\"description\":\"Usage-based charges are billed at the end of the billing period, so payment comes late. Prepaid credits let you collect it up front and draw the balance down as usage arrives.\",\"url\":\"https://getlago.com/docs/guide/wallet-and-prepaid-credits/overview\",\"mainEntityOfPage\":{\"@id\":\"https://getlago.com/docs/guide/wallet-and-prepaid-credits/overview#webpage\"},\"dateModified\":\"2026-11-10T17:47:18.165Z\",\"publisher\":{\"@id\":\"https://getlago.com/#organization\"},\"isPartOf\":{\"@id\":\"https://getlago.com/docs#website\"}}]}\u003c/script>\u003cscript data-mint-head type=\"application/ld+json\">{\"@context\":\"https://schema.org\",\"@type\":\"WebSite\",\"name\":\"Lago\",\"publisher\":{\"@type\":\"Organization\",\"name\":\"Lago\"},\"provider\":{\"@type\":\"Organization\",\"name\":\"Mintlify\",\"url\":\"https://mintlify.com\"}}\u003c/script>","agentPointerHref":"/docs/guide/wallet-and-prepaid-credits/overview.md","siteName":"Lago","nav":{"global":{"anchors":[{"anchor":"Blog","icon":"newspaper","href":"https://getlago.com/blog"},{"anchor":"Community","icon":"slack","href":"https://getlago.com/slack"},{"anchor":"GitHub","icon":"github","href":"https://github.com/getlago/lago"},{"anchor":"Status","icon":"signal-bars","href":"https://status.getlago.com/"}]},"tabs":[{"tab":"Home","pages":[{"title":"Home","href":"/welcome"}]},{"tab":"Guide","groups":[{"group":"Introduction","pages":[{"title":"Welcome to Lago","href":"/guide/introduction/welcome-to-lago"},{"title":"Why billing is a nightmare","href":"/guide/introduction/why-billing-is-a-nightmare"}]},{"group":"Get started","pages":[{"title":"Lago Cloud","href":"/guide/lago-cloud"},{"group":"Lago Self-hosted","pages":[{"title":"Self-hosting overview","sidebarTitle":"Overview","href":"/guide/lago-self-hosted/overview"},{"title":"Docker","href":"/guide/lago-self-hosted/docker"},{"title":"Kubernetes","href":"/guide/lago-self-hosted/kubernetes"},{"title":"Compatibility matrix","href":"/guide/lago-self-hosted/compatibility-matrix"},{"title":"Database maintenance","href":"/guide/lago-self-hosted/database-maintenance"},{"title":"Tracking and analytics","href":"/guide/lago-self-hosted/tracking-analytics"},{"title":"Versions update","href":"/guide/lago-self-hosted/update-instance"},{"title":"Useful commands","href":"/guide/lago-self-hosted/commands"}]}]},{"group":"Events \u0026 Usage Components","pages":[{"group":"Billable metrics","pages":[{"title":"Create billable metrics","href":"/guide/billable-metrics/create-billable-metrics"},{"group":"Aggregation types","pages":[{"title":"Aggregation types: how usage is measured and counted","sidebarTitle":"Overview","href":"/guide/billable-metrics/aggregation-types/overview"},{"title":"Count","href":"/guide/billable-metrics/aggregation-types/count"},{"title":"Count unique","href":"/guide/billable-metrics/aggregation-types/count-unique"},{"title":"Latest","href":"/guide/billable-metrics/aggregation-types/latest"},{"title":"Max","href":"/guide/billable-metrics/aggregation-types/max"},{"title":"Sum","href":"/guide/billable-metrics/aggregation-types/sum"},{"title":"Weighted sum","href":"/guide/billable-metrics/aggregation-types/weighted-sum"},{"title":"CUSTOM","href":"/guide/billable-metrics/aggregation-types/custom-agg"},{"title":"Aggregation examples","href":"/guide/billable-metrics/aggregation-types/aggregation-examples"}]},{"title":"Recurring vs metered","href":"/guide/billable-metrics/recurring-vs-metered"},{"title":"SQL expressions","href":"/guide/billable-metrics/sql-expressions"},{"title":"Rounding","href":"/guide/billable-metrics/rounding"},{"title":"Filters and dimensions","href":"/guide/billable-metrics/filters"},{"title":"Delete billable metrics","href":"/guide/billable-metrics/delete-billable-metrics"}]},{"group":"Usage ingestion","pages":[{"title":"Ingest usage","href":"/guide/events/ingesting-usage"},{"title":"Performance and optimization","href":"/guide/events/usage-performances"},{"title":"Metering ingestion sources","href":"/guide/events/metering-source"},{"title":"Retrieve usage","href":"/guide/events/retrieve-usage"}]},{"group":"Governance","pages":[{"title":"Governance overview","href":"/guide/governance/overview"},{"title":"Core concepts","href":"/guide/governance/core-concepts"},{"title":"Set up governance","href":"/guide/governance/setting-up"},{"title":"Send attributed events","href":"/guide/governance/sending-events"},{"title":"Query attributed usage","href":"/guide/governance/query"}]},{"group":"Alerts","pages":[{"title":"Usage alerts","href":"/guide/alerts/usage-alerts"},{"title":"Credits consumption alerts","href":"/guide/alerts/credits-consumption-alerts"},{"title":"Alert resolution","href":"/guide/alerts/alert-resolution"}]}]},{"group":"Pricing \u0026 Subscriptions","pages":[{"group":"Plans","pages":[{"title":"Plans: price subscriptions, usage and hybrid models","sidebarTitle":"Overview","href":"/guide/plans/overview"},{"title":"Plan model","href":"/guide/plans/plan-model"},{"group":"Charges","pages":[{"title":"Usage based charge","href":"/guide/plans/charges/usage-based-charges"},{"title":"Fixed charge","href":"/guide/plans/charges/fixed-charges"},{"group":"Charge models","pages":[{"title":"Standard","href":"/guide/plans/charges/charge-models/standard"},{"title":"Graduated","href":"/guide/plans/charges/charge-models/graduated"},{"title":"Package","href":"/guide/plans/charges/charge-models/package"},{"title":"Percentage","href":"/guide/plans/charges/charge-models/percentage"},{"title":"Volume","href":"/guide/plans/charges/charge-models/volume"},{"title":"Graduated percentage","href":"/guide/plans/charges/charge-models/graduated-percentage"},{"title":"Dynamic","href":"/guide/plans/charges/charge-models/dynamic"},{"title":"Custom price","href":"/guide/plans/charges/charge-models/custom-price"}]},{"title":"Metered vs Recurring","href":"/guide/plans/charges/metered-vs-recurring"},{"title":"Arrears vs Advance","href":"/guide/plans/charges/arrears-vs-advance"},{"title":"Prorated vs Full","href":"/guide/plans/charges/prorated-vs-full"},{"title":"Spending minimums","href":"/guide/plans/charges/spending-minimum"},{"title":"Invoiceable vs Uninvoiceable","href":"/guide/plans/charges/invoiceable-vs-noninvoiceable"},{"title":"Charges with filters","href":"/guide/plans/charges/charges-with-filters"},{"title":"Group keys","href":"/guide/plans/charges/grouping"}]},{"title":"Custom pricing units","href":"/guide/plans/custom-pricing-units"},{"title":"Commitments","href":"/guide/plans/commitment"},{"title":"Progressive billing","href":"/guide/plans/progressive-billing"}]},{"group":"Customers","pages":[{"title":"Customer management","href":"/guide/customers/customer-management"},{"title":"Customer metadata","href":"/guide/customers/customer-metadata"},{"title":"Invoice a customer","href":"/guide/customers/invoice-customer"},{"title":"The customer portal","href":"/guide/customers/customer-portal"}]},{"title":"Billing entities","href":"/guide/billing-entities"},{"group":"Subscriptions","pages":[{"title":"Assign a plan to a customer","href":"/guide/subscriptions/assign-plan"},{"title":"Activation rules","href":"/guide/subscriptions/activation-rules"},{"title":"Upgrades and downgrades","href":"/guide/subscriptions/upgrades-downgrades"},{"title":"Edit a subscription","href":"/guide/subscriptions/edit-subscription"},{"title":"Terminate a subscription","href":"/guide/subscriptions/terminate-subscription"}]},{"title":"Coupons","href":"/guide/coupons"},{"title":"Entitlements","href":"/guide/entitlements"},{"title":"Emails","href":"/guide/emails"}]},{"group":"Quotes \u0026 Order Forms","pages":[{"title":"Quotes and order forms: from proposal to provisioned billing","sidebarTitle":"Overview","href":"/guide/quotes/overview"},{"title":"Creating a quote","href":"/guide/quotes/create-a-quote"},{"title":"Writing the quote content","href":"/guide/quotes/quote-editor"},{"title":"Order forms","href":"/guide/quotes/order-forms"},{"title":"Orders","href":"/guide/quotes/orders"},{"title":"Limitations","href":"/guide/quotes/limitations"}]},{"group":"Invoicing","pages":[{"group":"Invoices","pages":[{"title":"Invoicing: generate invoices from plans and usage","sidebarTitle":"Overview","href":"/guide/invoicing/overview"},{"group":"Invoicing settings","pages":[{"title":"Invoicing settings: customize invoices per billing entity","sidebarTitle":"Overview","href":"/guide/invoicing/invoicing-settings/overview"},{"title":"Invoice numbering","href":"/guide/invoicing/invoicing-settings/invoice-numbering"},{"title":"Grace period","href":"/guide/invoicing/invoicing-settings/grace-period"},{"title":"Payment terms","href":"/guide/invoicing/invoicing-settings/payment-term"},{"title":"Empty invoice generation","href":"/guide/invoicing/invoicing-settings/empty-invoices"},{"title":"Issuing date preferences","href":"/guide/invoicing/invoicing-settings/issuing_date"},{"title":"Taxes","href":"/guide/invoicing/invoicing-settings/taxes"}]},{"title":"Fees","href":"/guide/invoicing/fees"},{"title":"Draft invoices","href":"/guide/invoicing/draft-invoices"},{"title":"Download invoices","href":"/guide/invoicing/download-invoices"},{"title":"Invoice metadata","href":"/guide/invoicing/invoice-metadata"},{"title":"Preview an invoice","href":"/guide/invoicing/previews"},{"title":"Void invoices","href":"/guide/invoicing/void"}]},{"group":"One-off invoices","pages":[{"title":"Create add-ons","href":"/guide/one-off-invoices/create-add-ons"},{"title":"Issue one-off invoices","href":"/guide/one-off-invoices/create-one-off-invoices"}]},{"group":"Credit notes","pages":[{"title":"Credit notes: correct an invoice without losing the record","sidebarTitle":"Overview","href":"/guide/invoicing/credit-notes/overview"},{"title":"Credit note metadata","href":"/guide/invoicing/credit-notes/credit-note-metadata"}]},{"title":"Revenue share","href":"/guide/revenue-share"},{"group":"E-invoicing","pages":[{"title":"E-invoicing: generate invoices that comply by country","sidebarTitle":"Overview","href":"/guide/invoicing/e-invoicing/overview"},{"title":"E-Invoicing contributions","href":"/guide/invoicing/e-invoicing/contributions"}]}]},{"group":"Payments \u0026 Cash Collection","pages":[{"group":"Payments","pages":[{"title":"Payment provider integrations","href":"/guide/payments/payment-providers"},{"title":"Payment methods","href":"/guide/payments/payment-methods"},{"title":"Record manual payments","href":"/guide/payments/record-manual-payments"},{"title":"Payment pre-authorization","href":"/guide/payments/payment-authorization"},{"title":"Payment retries","href":"/guide/payments/payment-retries"},{"title":"Payment receipts","href":"/guide/payments/receipts"}]},{"group":"Dunning","pages":[{"title":"Manual dunning","href":"/guide/dunning/manual-dunning"},{"title":"Automatic dunning","description":"Automate customer communications to remind them of overdue invoices and recover outstanding balances through targeted dunning campaigns.","href":"/guide/dunning/automatic-dunning"}]},{"group":"Wallets and prepaid credits","pages":[{"title":"Prepaid credits and wallets: bill usage against a balance","sidebarTitle":"Overview","href":"/guide/wallet-and-prepaid-credits/overview"},{"title":"Top-up and void credits","description":"Add and void credits, to the customer's wallet.","href":"/guide/wallet-and-prepaid-credits/wallet-top-up-and-void"},{"title":"Traceability","href":"/guide/wallet-and-prepaid-credits/traceability"}]}]},{"group":"AI Agents and MCP","pages":[{"title":"AI tools for Lago","sidebarTitle":"AI tools","href":"/guide/ai-agents/for-agents"},{"title":"Build Lago billing with a coding agent","sidebarTitle":"Build with a coding agent","href":"/guide/ai-agents/coding-agents"},{"group":"Lago Agent SDK","pages":[{"title":"Agent SDK: bill LLM token usage from your application","sidebarTitle":"Overview","href":"/guide/ai-agents/agent-sdk/overview"},{"title":"Billing","href":"/guide/ai-agents/agent-sdk/billing"},{"group":"Providers","pages":[{"title":"OpenAI","href":"/guide/ai-agents/agent-sdk/openai"},{"title":"Anthropic","href":"/guide/ai-agents/agent-sdk/anthropic"},{"title":"AWS Bedrock","href":"/guide/ai-agents/agent-sdk/bedrock"},{"title":"Google Gemini","href":"/guide/ai-agents/agent-sdk/gemini"},{"title":"Mistral","href":"/guide/ai-agents/agent-sdk/mistral"}]},{"group":"Gateways","pages":[{"title":"Cloudflare AI Gateway","href":"/guide/ai-agents/agent-sdk/cloudflare"},{"title":"Databricks AI Gateway","href":"/guide/ai-agents/agent-sdk/databricks"},{"title":"Snowflake Cortex","href":"/guide/ai-agents/agent-sdk/snowflake"},{"title":"Ramp Router","href":"/guide/ai-agents/agent-sdk/ramp-router"}]},{"title":"Reference","href":"/guide/ai-agents/agent-sdk/reference"}]},{"title":"The Billing Assistant","href":"/guide/ai-agents/billing-assistant"},{"title":"The Finance Assistant","href":"/guide/ai-agents/finance-assistant"},{"title":"The Dunning Agent","href":"/guide/ai-agents/dunning-agent"},{"title":"MCP server for billing: connect coding agents to usage and invoices","sidebarTitle":"Lago MCP Server","href":"/guide/ai-agents/mcp-server"}]},{"group":"Data \u0026 Analytics","pages":[{"title":"Webhooks","href":"/guide/webhooks"},{"group":"Analytics","pages":[{"group":"Reports","pages":[{"title":"Billing analytics: read revenue, usage and invoice reports","sidebarTitle":"Overview","href":"/guide/analytics/overview"},{"group":"Subscriptions","pages":[{"title":"Active subscriptions","href":"/guide/analytics/subscriptions/active"},{"title":"New subscriptions","href":"/guide/analytics/subscriptions/new"},{"title":"Churn","href":"/guide/analytics/subscriptions/churn"}]},{"group":"Revenue","pages":[{"title":"Revenue streams","href":"/guide/analytics/revenue/revenue-streams"},{"title":"MRR","href":"/guide/analytics/revenue/mrr"}]},{"title":"Credit ledgers","href":"/guide/analytics/credit-ledgers"},{"title":"Usage","href":"/guide/analytics/usage"},{"group":"Cash collection","pages":[{"title":"Payments","href":"/guide/analytics/cash-collection/payments"},{"title":"Dunnings","href":"/guide/analytics/cash-collection/dunnings"}]},{"title":"Invoices","href":"/guide/analytics/invoices"}]},{"title":"Forecasted usage","href":"/guide/analytics/forecasted-usage"}]},{"group":"Data exports","pages":[{"title":"Export invoices","href":"/guide/invoicing/export"},{"title":"Lago Data Pipeline","href":"/integrations/data/lago-data-pipeline"}]}]},{"group":"Revenue recognition","tag":"Private beta","pages":[{"title":"Revenue recognition: turn billing into accrual-basis revenue","sidebarTitle":"Overview","href":"/guide/revenue-recognition/overview"},{"group":"How it works","pages":[{"title":"Methodology","href":"/guide/revenue-recognition/how-it-works/methodology"},{"title":"Subscriptions","href":"/guide/revenue-recognition/how-it-works/subscriptions"},{"title":"Usage-based charges","href":"/guide/revenue-recognition/how-it-works/usage-based-charges"},{"title":"Minimum commitments","href":"/guide/revenue-recognition/how-it-works/minimum-commitments"},{"title":"Taxes","href":"/guide/revenue-recognition/how-it-works/taxes"},{"title":"Payments","href":"/guide/revenue-recognition/how-it-works/payments"},{"title":"Credit notes and adjustments","href":"/guide/revenue-recognition/how-it-works/credit-notes-and-adjustments"},{"title":"Disputes and failed payments","href":"/guide/revenue-recognition/how-it-works/disputes-and-failed-payments"},{"title":"Wallets and prepaid credits","href":"/guide/revenue-recognition/how-it-works/wallets-and-prepaid-credits"}]},{"group":"Get started","pages":[{"title":"Enable revenue recognition","href":"/guide/revenue-recognition/get-started/enable"},{"title":"Prepare your billing data","href":"/guide/revenue-recognition/get-started/prepare-billing-data"},{"title":"Review your first reporting period","href":"/guide/revenue-recognition/get-started/review-first-period"},{"title":"Export revenue recognition data","href":"/guide/revenue-recognition/get-started/export"}]},{"group":"Reports","pages":[{"title":"Recognized Revenue","href":"/guide/revenue-recognition/reports/recognized-revenue"},{"title":"Deferred Revenue","href":"/guide/revenue-recognition/reports/deferred-revenue"},{"title":"Revenue Waterfall","href":"/guide/revenue-recognition/reports/revenue-waterfall"},{"title":"Statements","href":"/guide/revenue-recognition/reports/statements"},{"title":"Journal Entry Details","href":"/guide/revenue-recognition/reports/journal-entry-details"}]},{"group":"Examples","pages":[{"title":"Full lifecycle example","href":"/guide/revenue-recognition/examples/full-lifecycle"}]}]},{"group":"Resources","pages":[{"group":"Security","pages":[{"title":"Audit logs","href":"/guide/security/audit-logs"},{"title":"Security logs","href":"/guide/security/security-logs"},{"title":"API Keys","href":"/guide/security/api-keys"},{"title":"RBAC - Role-Based Access Control","href":"/guide/security/rbac"},{"title":"Single Sign-On (SSO)","href":"/guide/security/sso"},{"title":"SOC 2 Type 2","href":"/guide/security/soc"}]},{"title":"Integration testing","href":"/guide/integration-testing"},{"title":"Lago OpenAPI","href":"/guide/lago-open-api"},{"group":"Lago CLI","pages":[{"title":"Lago CLI: the billing API from your terminal","sidebarTitle":"Overview","href":"/guide/lago-cli/overview"},{"group":"Command reference","pages":[{"title":"Command reference","href":"/guide/lago-cli/commands/overview"},{"title":"Setup and diagnostics","href":"/guide/lago-cli/commands/setup"},{"title":"Helpers","href":"/guide/lago-cli/commands/helpers"},{"title":"Billable metrics","href":"/guide/lago-cli/commands/billable-metrics"},{"title":"Plans","href":"/guide/lago-cli/commands/plans"},{"title":"Features and entitlements","href":"/guide/lago-cli/commands/features-and-entitlements"},{"title":"Customers","href":"/guide/lago-cli/commands/customers"},{"title":"Subscriptions","href":"/guide/lago-cli/commands/subscriptions"},{"title":"Events","href":"/guide/lago-cli/commands/events"},{"title":"Invoices","href":"/guide/lago-cli/commands/invoices"},{"title":"Credit notes","href":"/guide/lago-cli/commands/credit-notes"},{"title":"Coupons and add-ons","href":"/guide/lago-cli/commands/coupons-and-add-ons"},{"title":"Wallets","href":"/guide/lago-cli/commands/wallets"},{"title":"Taxes and fees","href":"/guide/lago-cli/commands/taxes-and-fees"},{"title":"Payments","href":"/guide/lago-cli/commands/payments"},{"title":"Webhooks","href":"/guide/lago-cli/commands/webhooks"},{"title":"Analytics and logs","href":"/guide/lago-cli/commands/analytics-and-logs"},{"title":"Organization","href":"/guide/lago-cli/commands/organization"},{"title":"Quotes and orders","href":"/guide/lago-cli/commands/quotes-and-orders"}]}]},{"group":"Migrations","pages":[{"title":"Migration to v1.57.0","href":"/guide/migration/migration-to-v1.57.0"},{"title":"Migration to v1.56.0","href":"/guide/migration/migration-to-v1.56.0"},{"title":"Migration to v1.54.0","href":"/guide/migration/migration-to-v1.54.0"},{"title":"Migration to v1.52.0","href":"/guide/migration/migration-to-v1.52.0"},{"title":"Migration to v1.50.0","href":"/guide/migration/migration-to-v1.50.0"},{"title":"Migration to v1.45.0","href":"/guide/migration/migration-to-v1.45.0"},{"title":"Migration to v1.44.0","href":"/guide/migration/migration-to-v1.44.0"},{"title":"Migration to v1.43.0","href":"/guide/migration/migration-to-v1.43.0"},{"title":"Migration to v1.32.0","href":"/guide/migration/migration-to-v1.32.0"},{"title":"Migration to v1.31.0","href":"/guide/migration/migration-to-v1.31.0"},{"title":"Migration to v1.29.0","href":"/guide/migration/migration-to-v1.29.0"},{"title":"Migration to v1.28.1","href":"/guide/migration/migration-to-v1.28.1"},{"title":"Migration to v1.25.0","href":"/guide/migration/migration-to-v1.25.0"},{"title":"Migration to v1.20.0","href":"/guide/migration/migration-to-v1.20.0"},{"title":"Migration to v1.2.0","href":"/guide/migration/migration-to-v1.2.0"}]}]}]},{"tab":"API References","pages":[{"title":"API References","href":"/api-reference/intro"}]},{"tab":"Integrations","pages":[{"title":"Integrations","href":"/integrations/introduction"}]},{"tab":"Templates","pages":[{"title":"Templates","href":"/templates/introduction"}]},{"tab":"FAQ","pages":[{"title":"FAQ","href":"/faq/about-lago"}]},{"tab":"Knowledge Base","href":"https://knowledge.getlago.com"},{"tab":"Changelog","pages":[{"title":"Changelog","href":"/changelog/product"}]}]},"basePath":"","title":"Prepaid credits and wallets: bill usage against a balance - Lago","buildId":"dpl_2AK98Hxhwu4fUXpx9atbv41cC328","deploymentId":"dpl_2AK98Hxhwu4fUXpx9atbv41cC328","dynamics":["a74be98ba7","07c022d89b"],"chunks":["zoom-image-lightbox-T84NdC3b.js","lightbox-handle-r17bVUz3.js","Frame-Buk2KjK6.js","DynamicMarkdown-DYYZTGpa.js"]}