PREMIUM ADD-ON ✨This integration is only available to users with a specific paying add-on. Please
contact us to get access to Salesforce CRM integration.
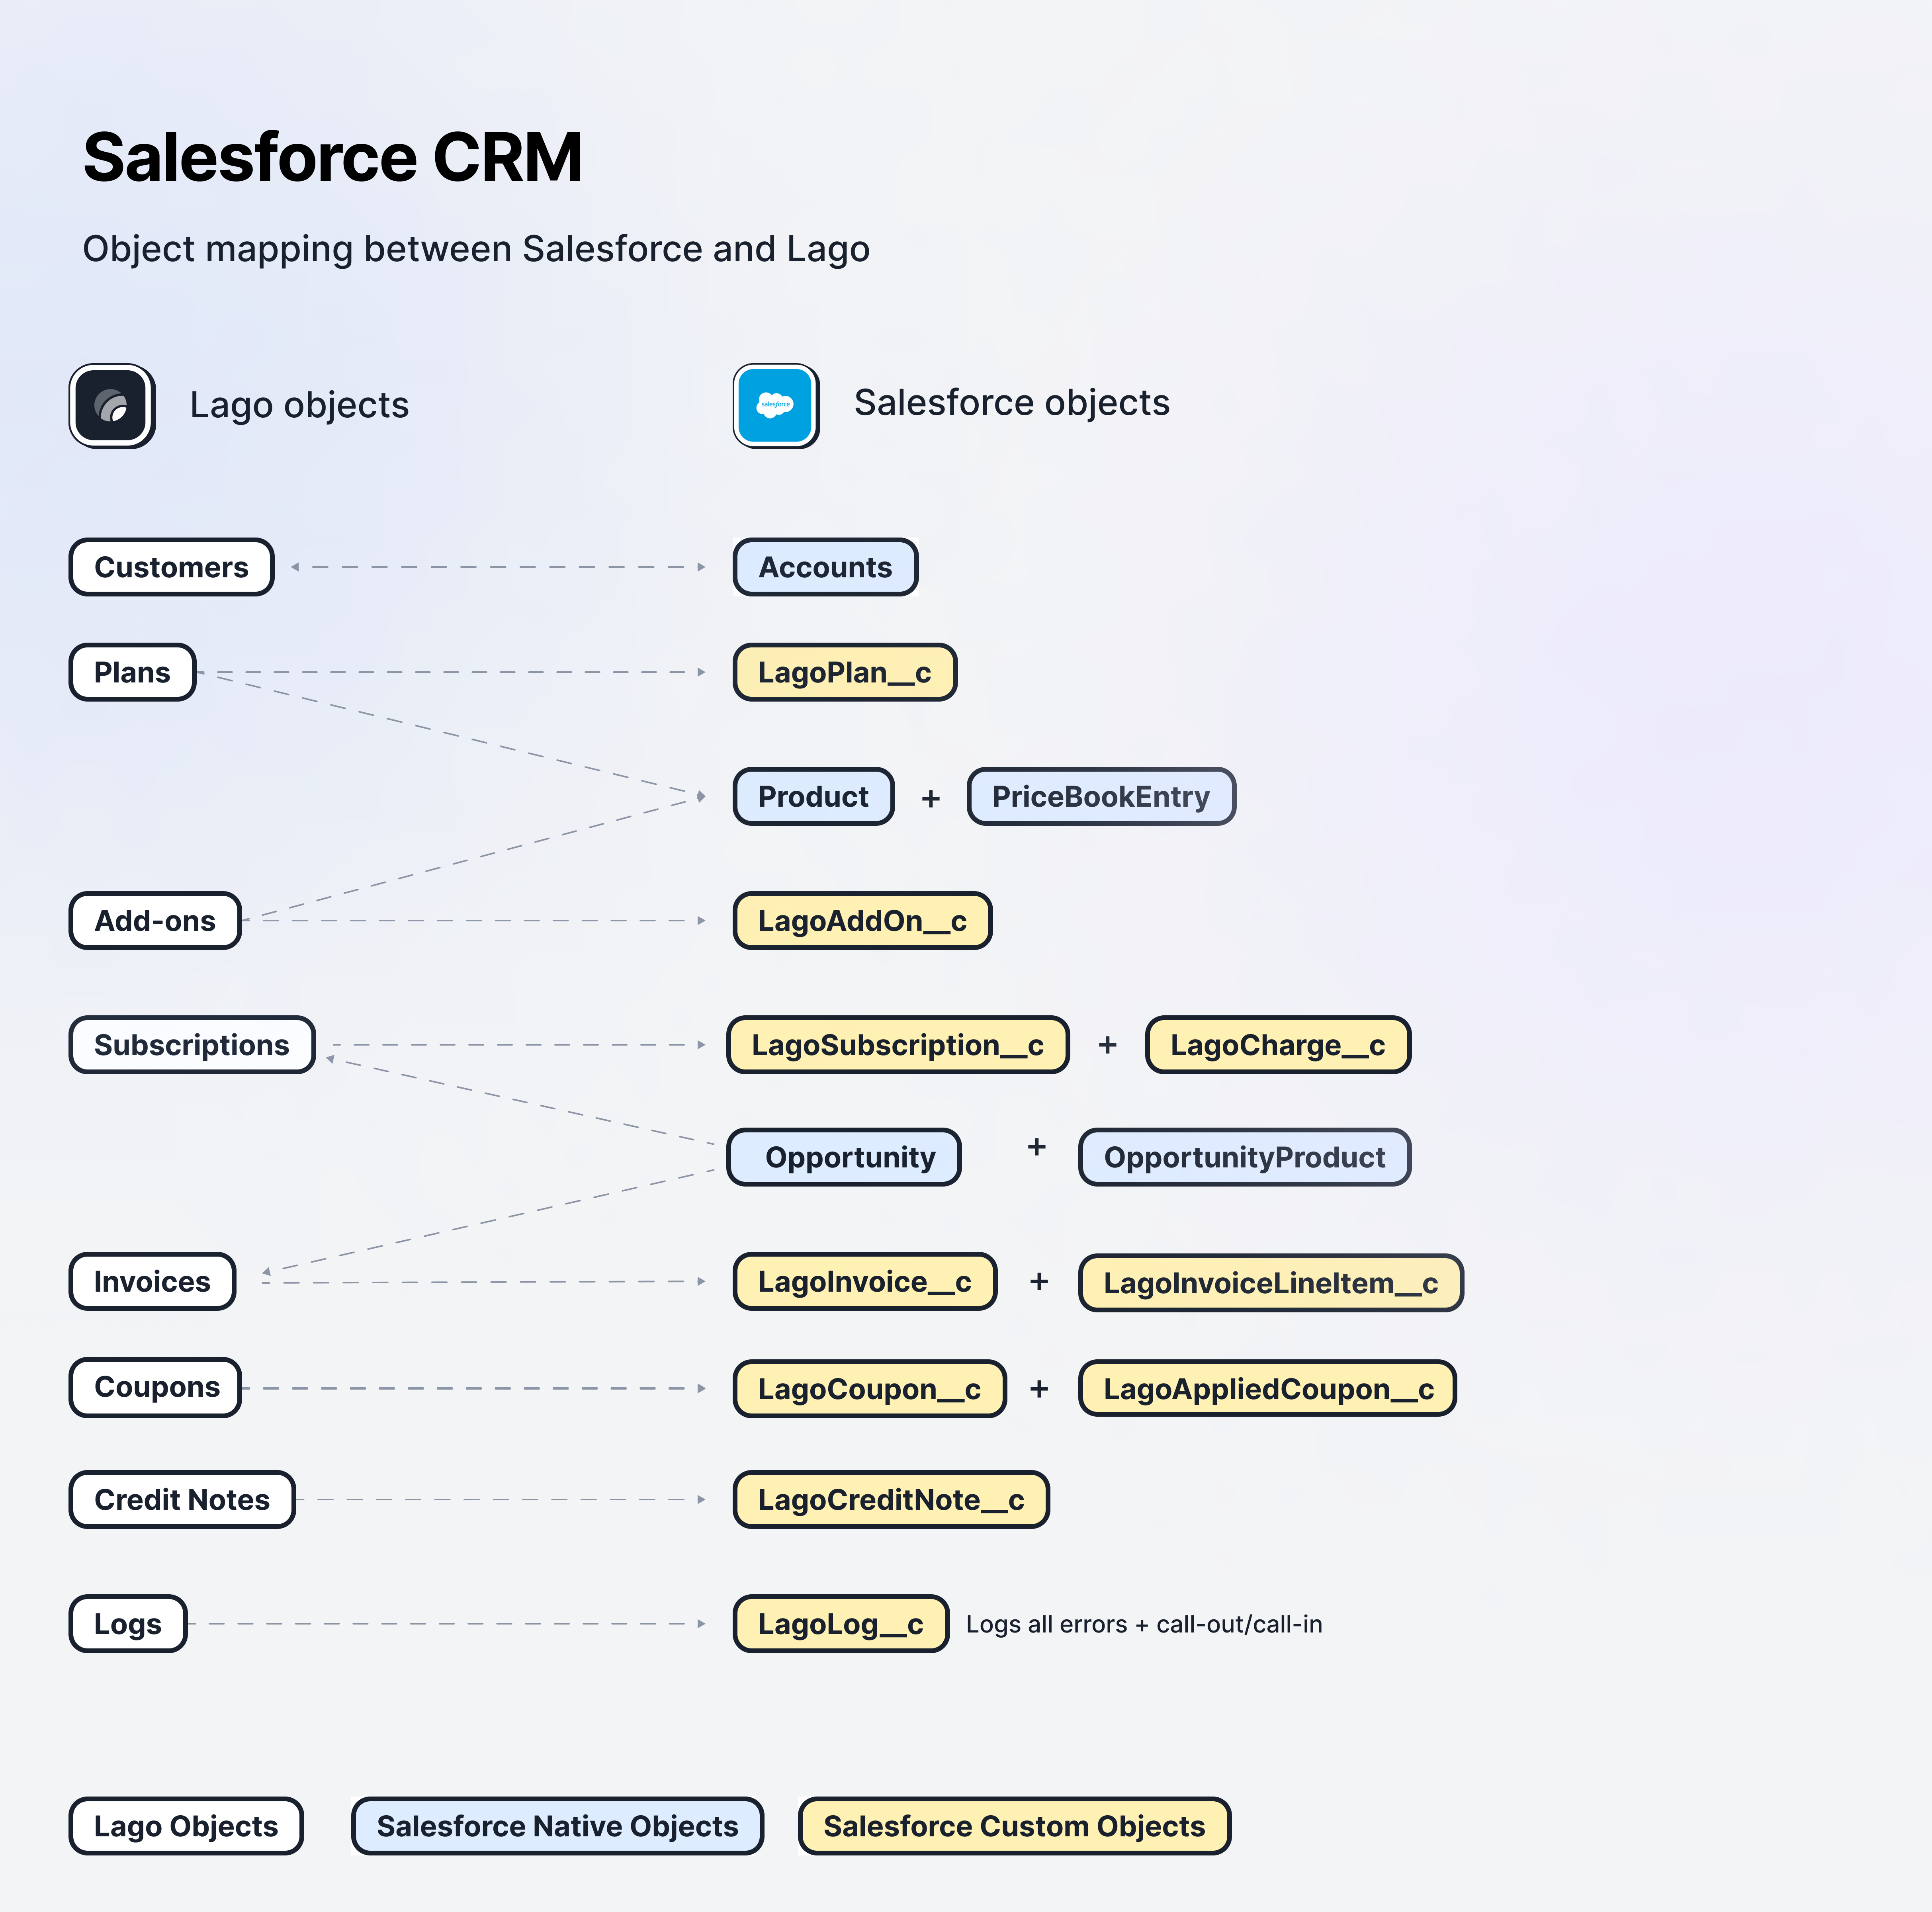
Object mapping
I. Integration configuration
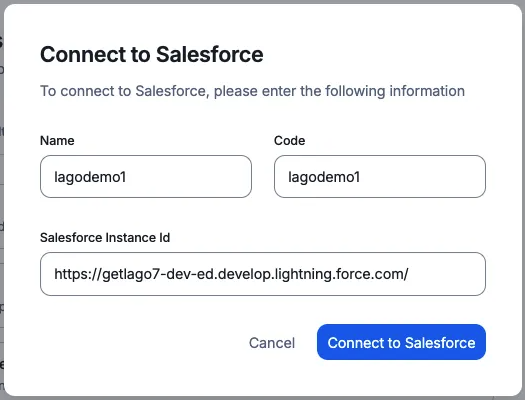
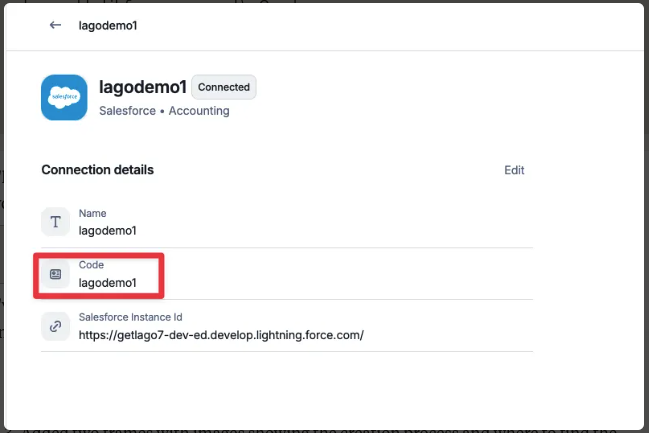
Create integration for Salesforce on Lago Side
To gain premium access to our Salesforce Package application, please don’t hesitate to contact us. Login to Lago as admin user, navigate to Settings > Integrations > Salesforce (allowed only if team has enabled it for your account), and click “Create new”. Enter the following details:- Name
- Code
- Salesforce Instance (URL of your Salesforce instance)
Install Salesforce CRM Package
You can initiate the installation process by clicking on the provided link, which will direct you to the installation page where you can follow step-by-step instructions for a seamless integration. If you have any questions or need assistance during the installation, our dedicated support team is here to help you every step of the way.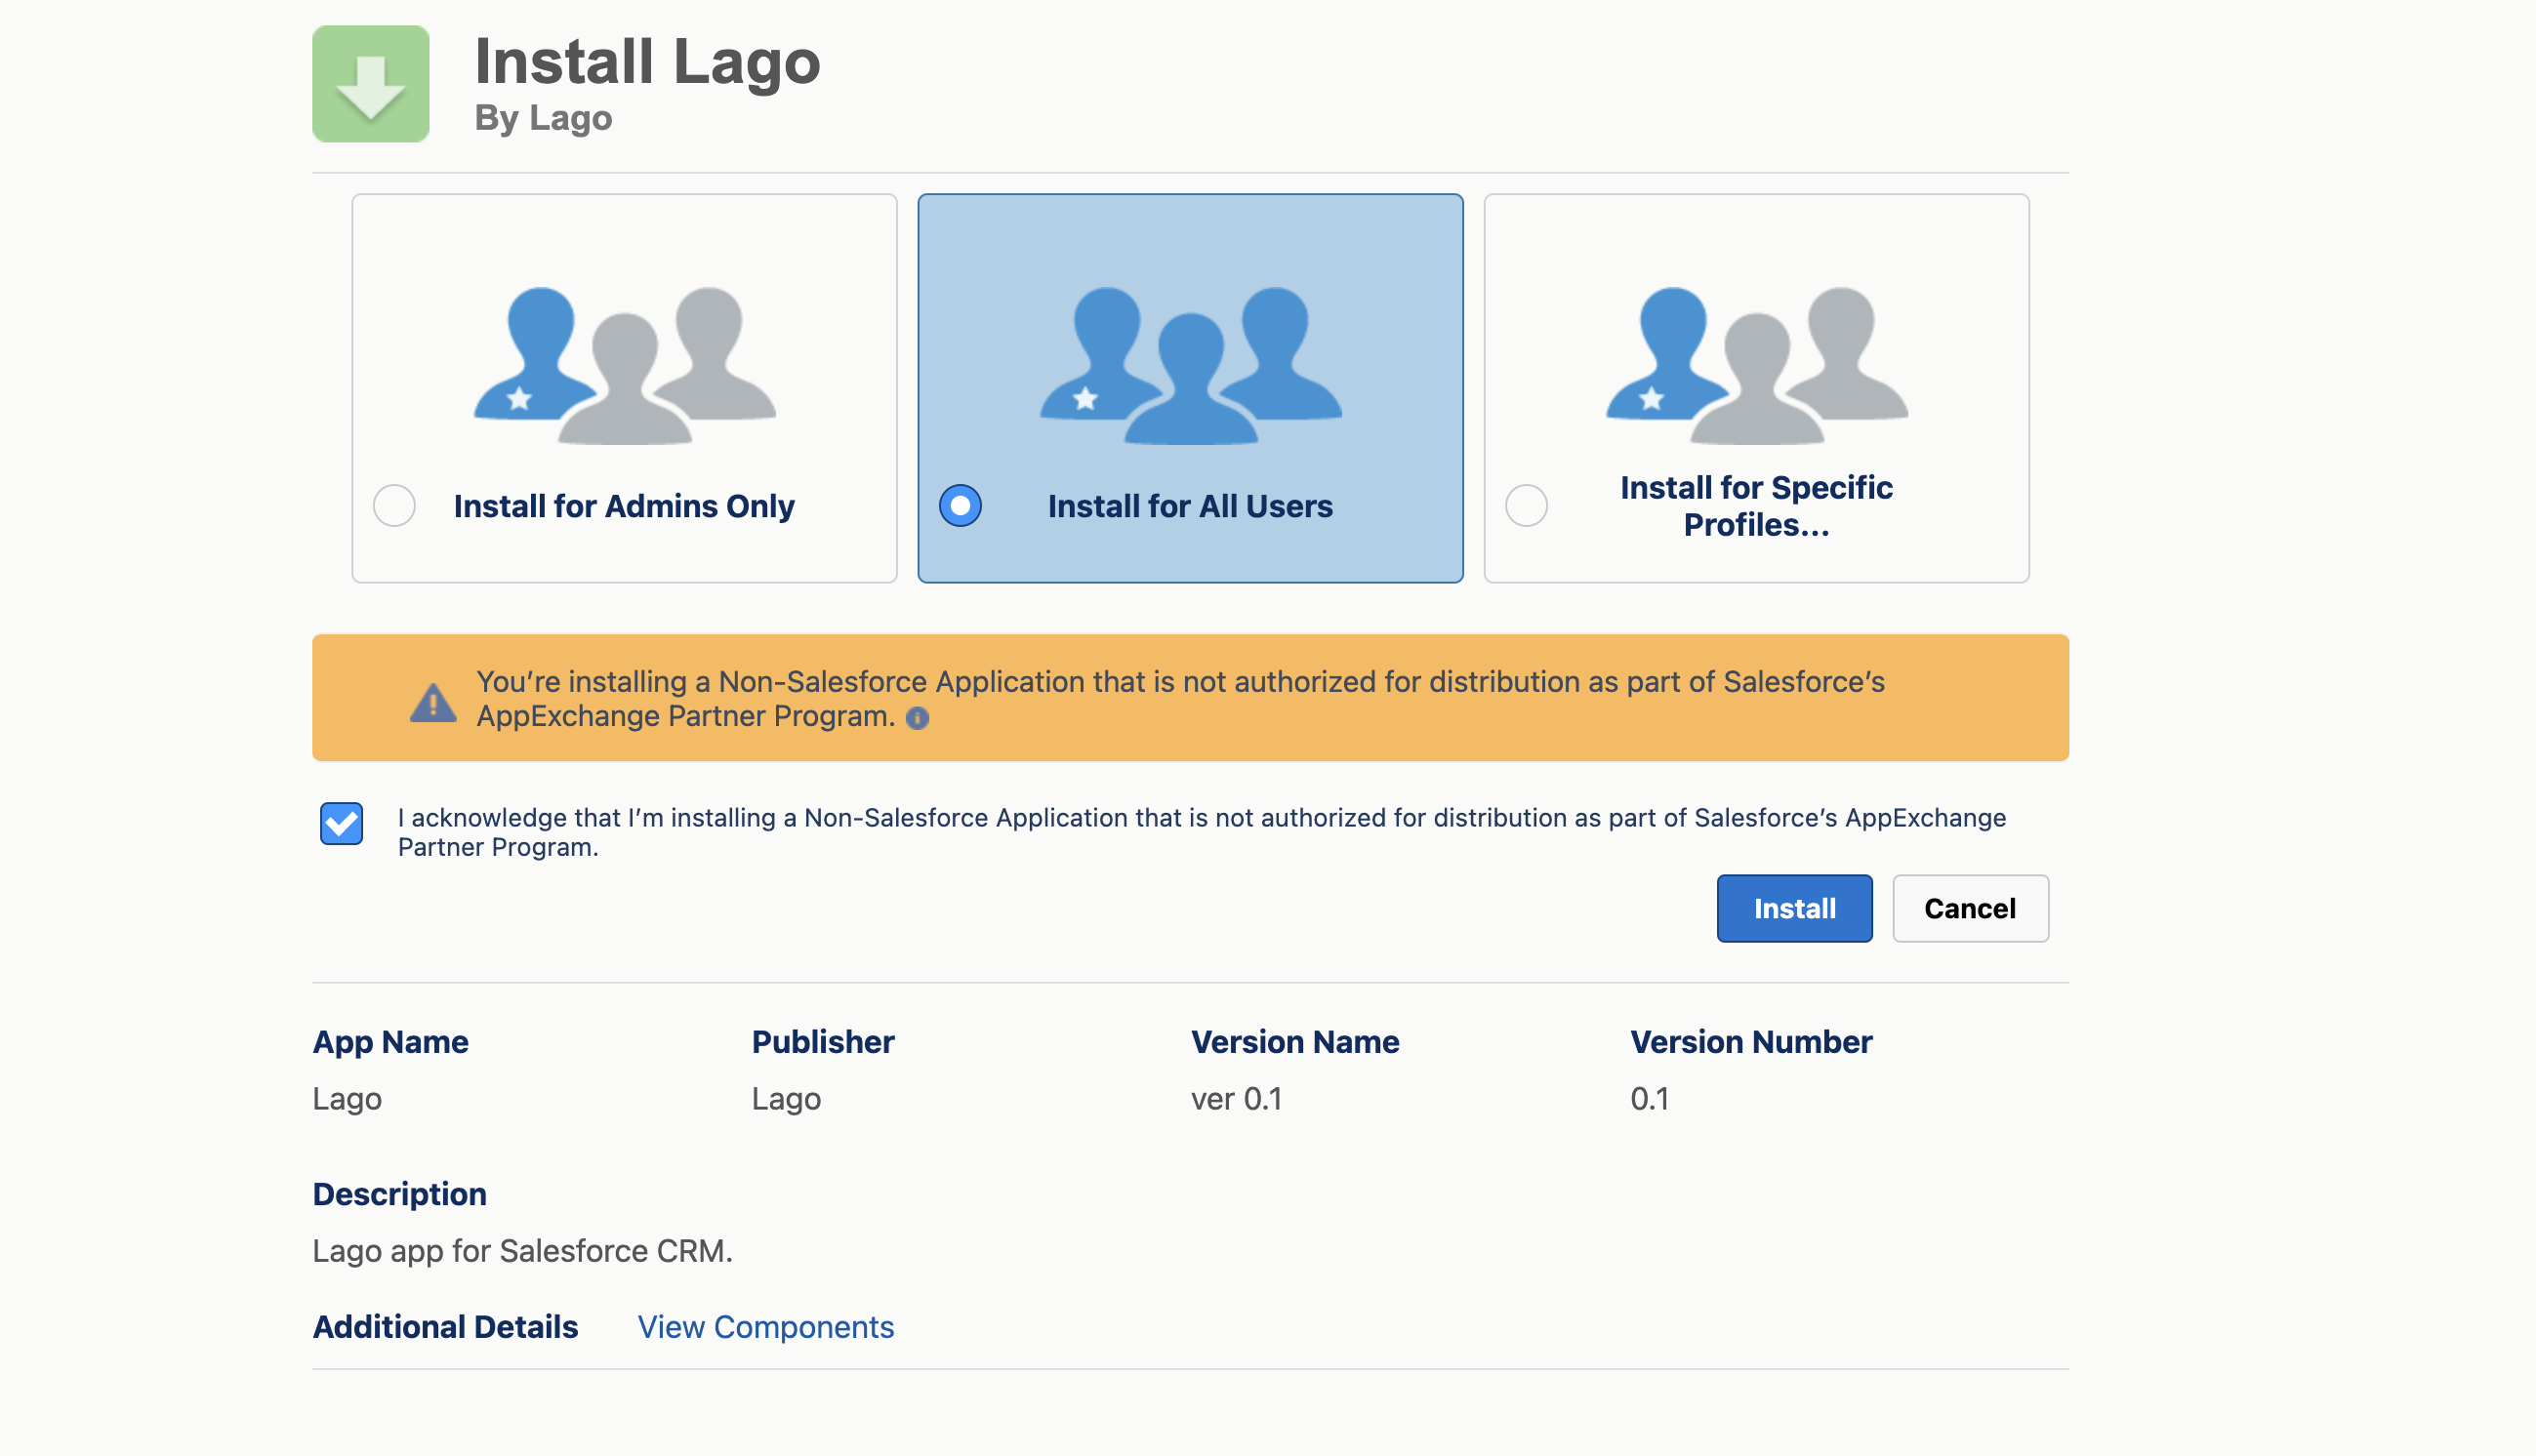
- We recommend selecting the “Install for all users” option;
- Click on the “Install” button;
- Make sure to check the box to grant access to these third-party websites; and
- Once completed, you’ll have successfully installed the Lago Salesforce App.
Please note that the installation process may take a few minutes to complete.
However, rest assured that you will receive an email confirmation once the installation is finished.
Webhook config: sync real-time data
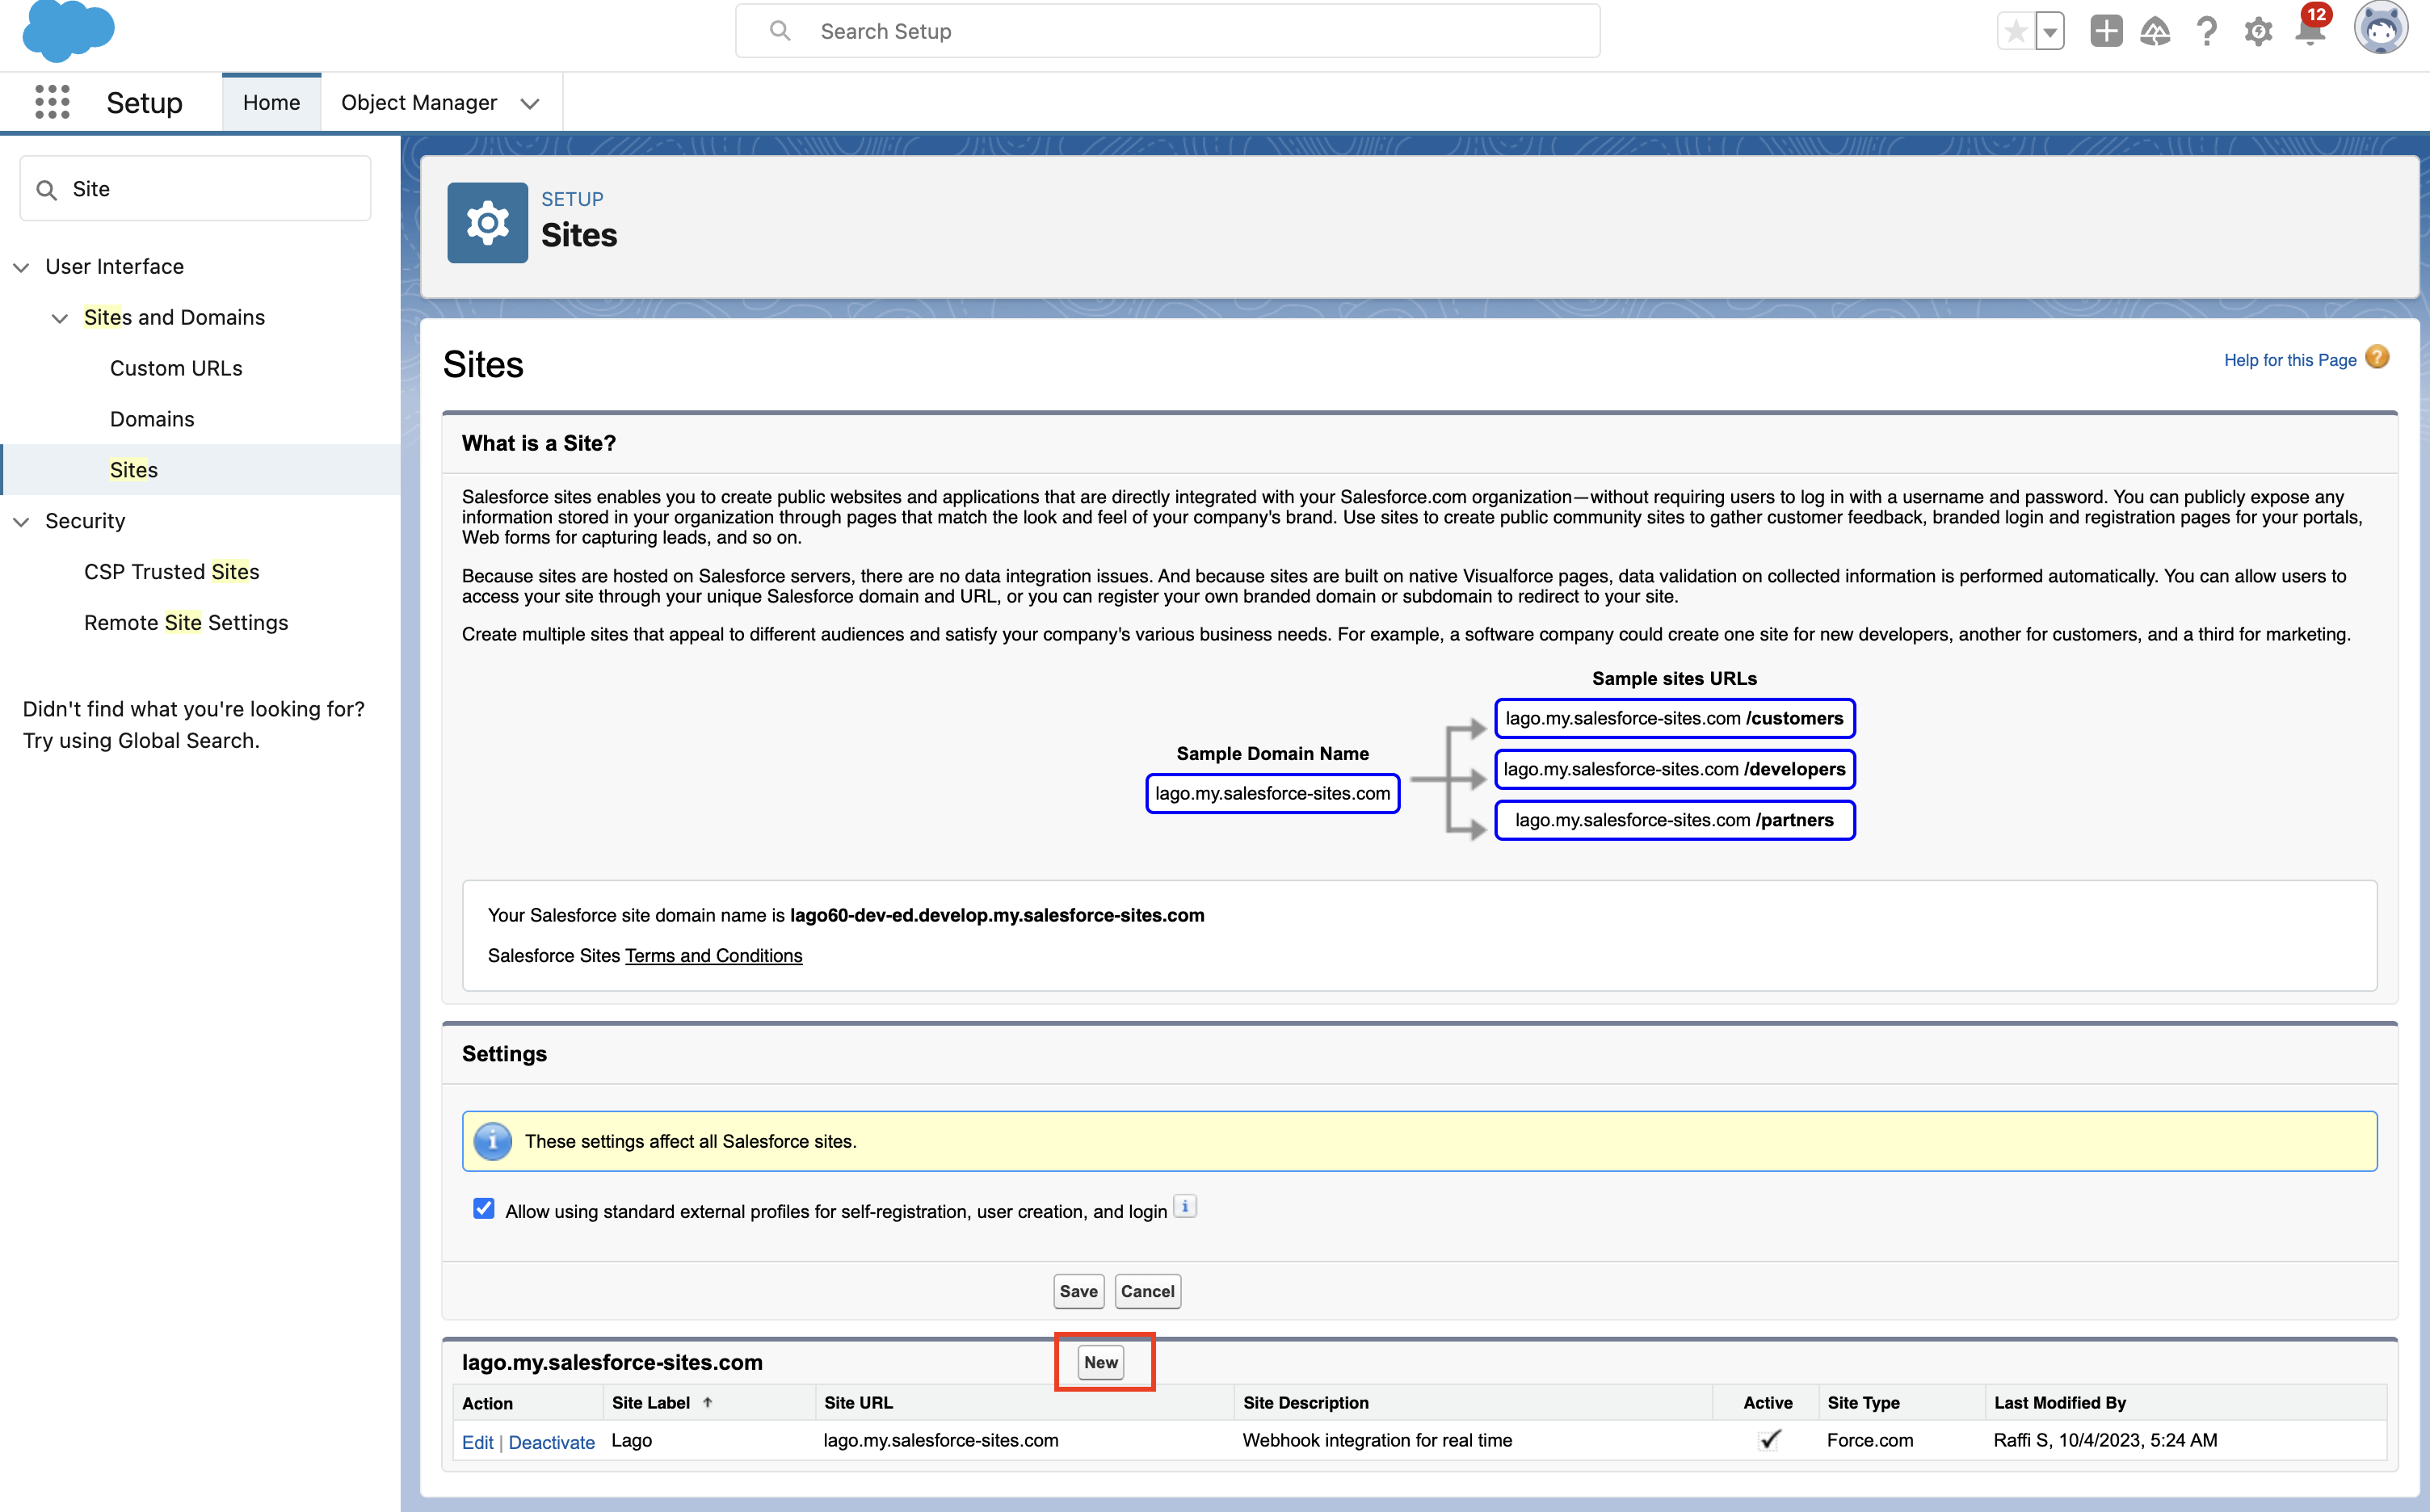
After installation in Salesforce CRM, set up a webhook URL in Salesforce to receive real-time data from Lago. This involves configuring a new “Site” in Salesforce’s setup section. Note that the four main actions described below should be performed by a Salesforce Admin and is only required during the initial setup.1
Access the Site section in Salesforce
- Click the gear icon in the upper right to access Salesforce Setup;
- Search and navigate to the Sites section; and
- Create a new Site (see picture below).
2
Create a new Site in Salesforce
When creating a new site, follow these steps: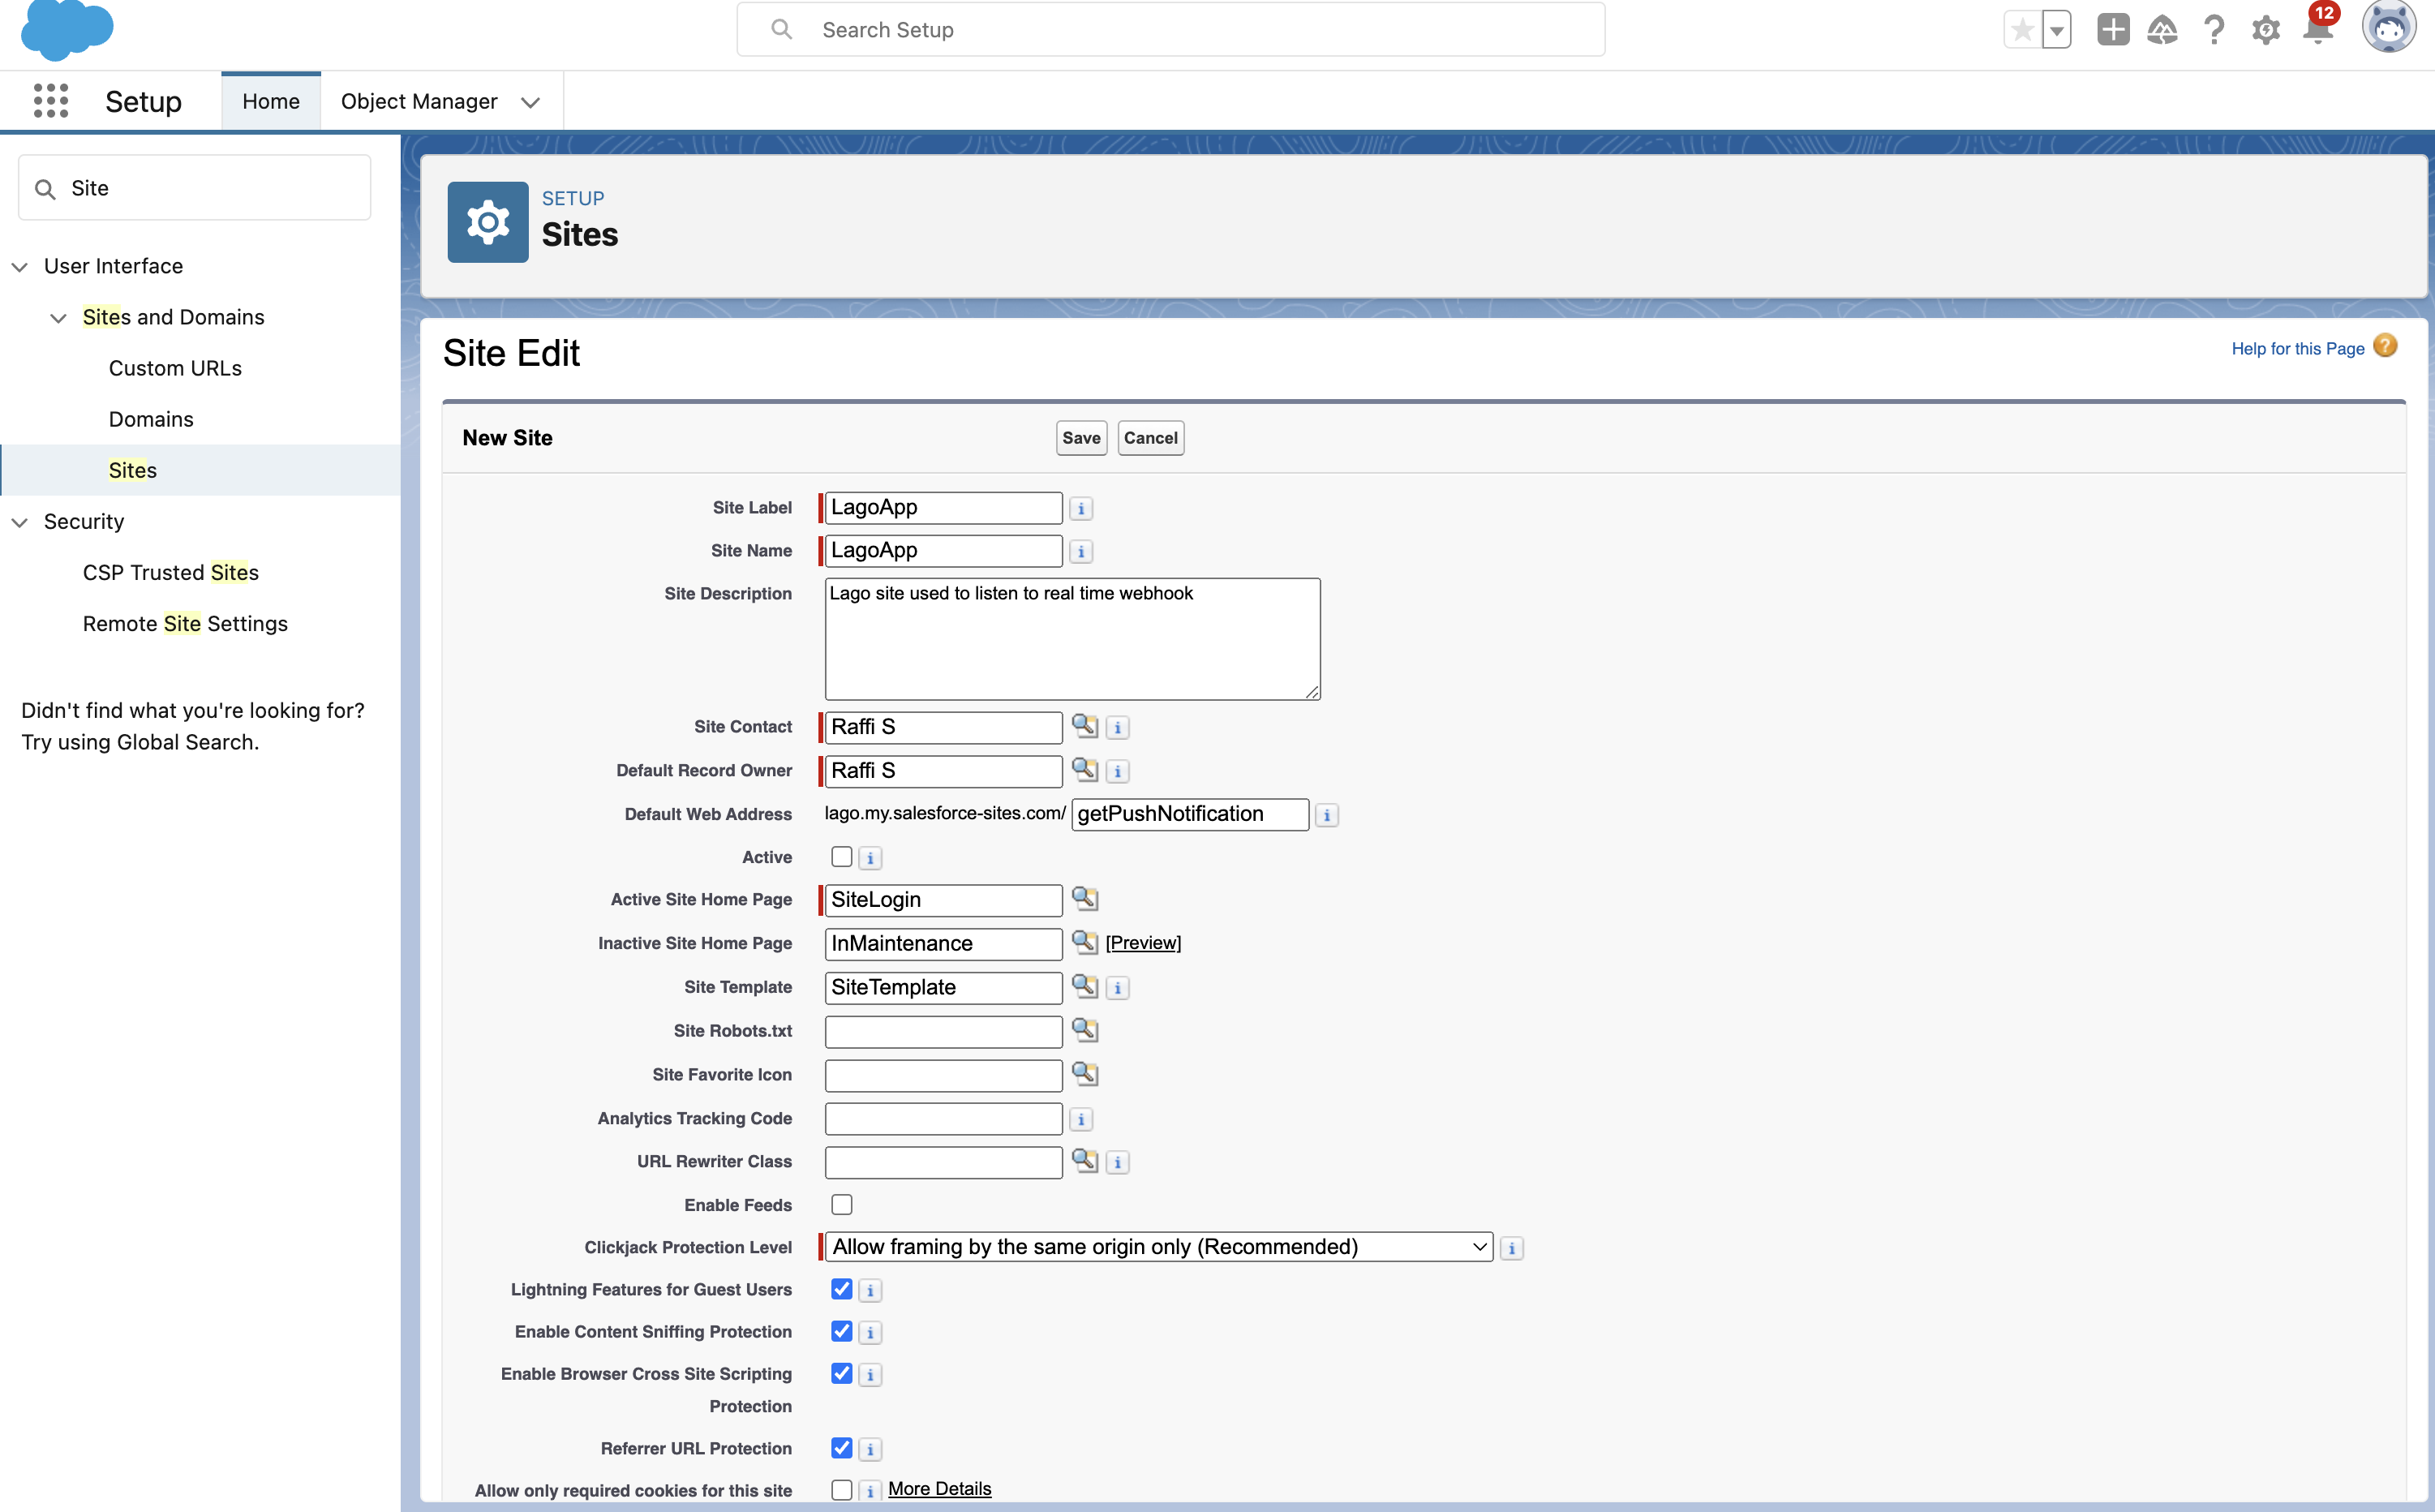
- Set a unique Site Label;
- Specify a unique Site Name;
- Optionally, add a Site Description;
- Ensure the Site Contact and Default Record Owner are filled;
- Set the Default Web Address prefix to
getPushNotification; - Choose
SiteLoginas the Active Site Home Page; and - Don’t forget to save the new site: and
- Activate the newly created site by going to the Site Details and clicking the
Activatebutton.
3
Edit Public Access Settings in Salesforce
To edit Public Access Settings for your new Site: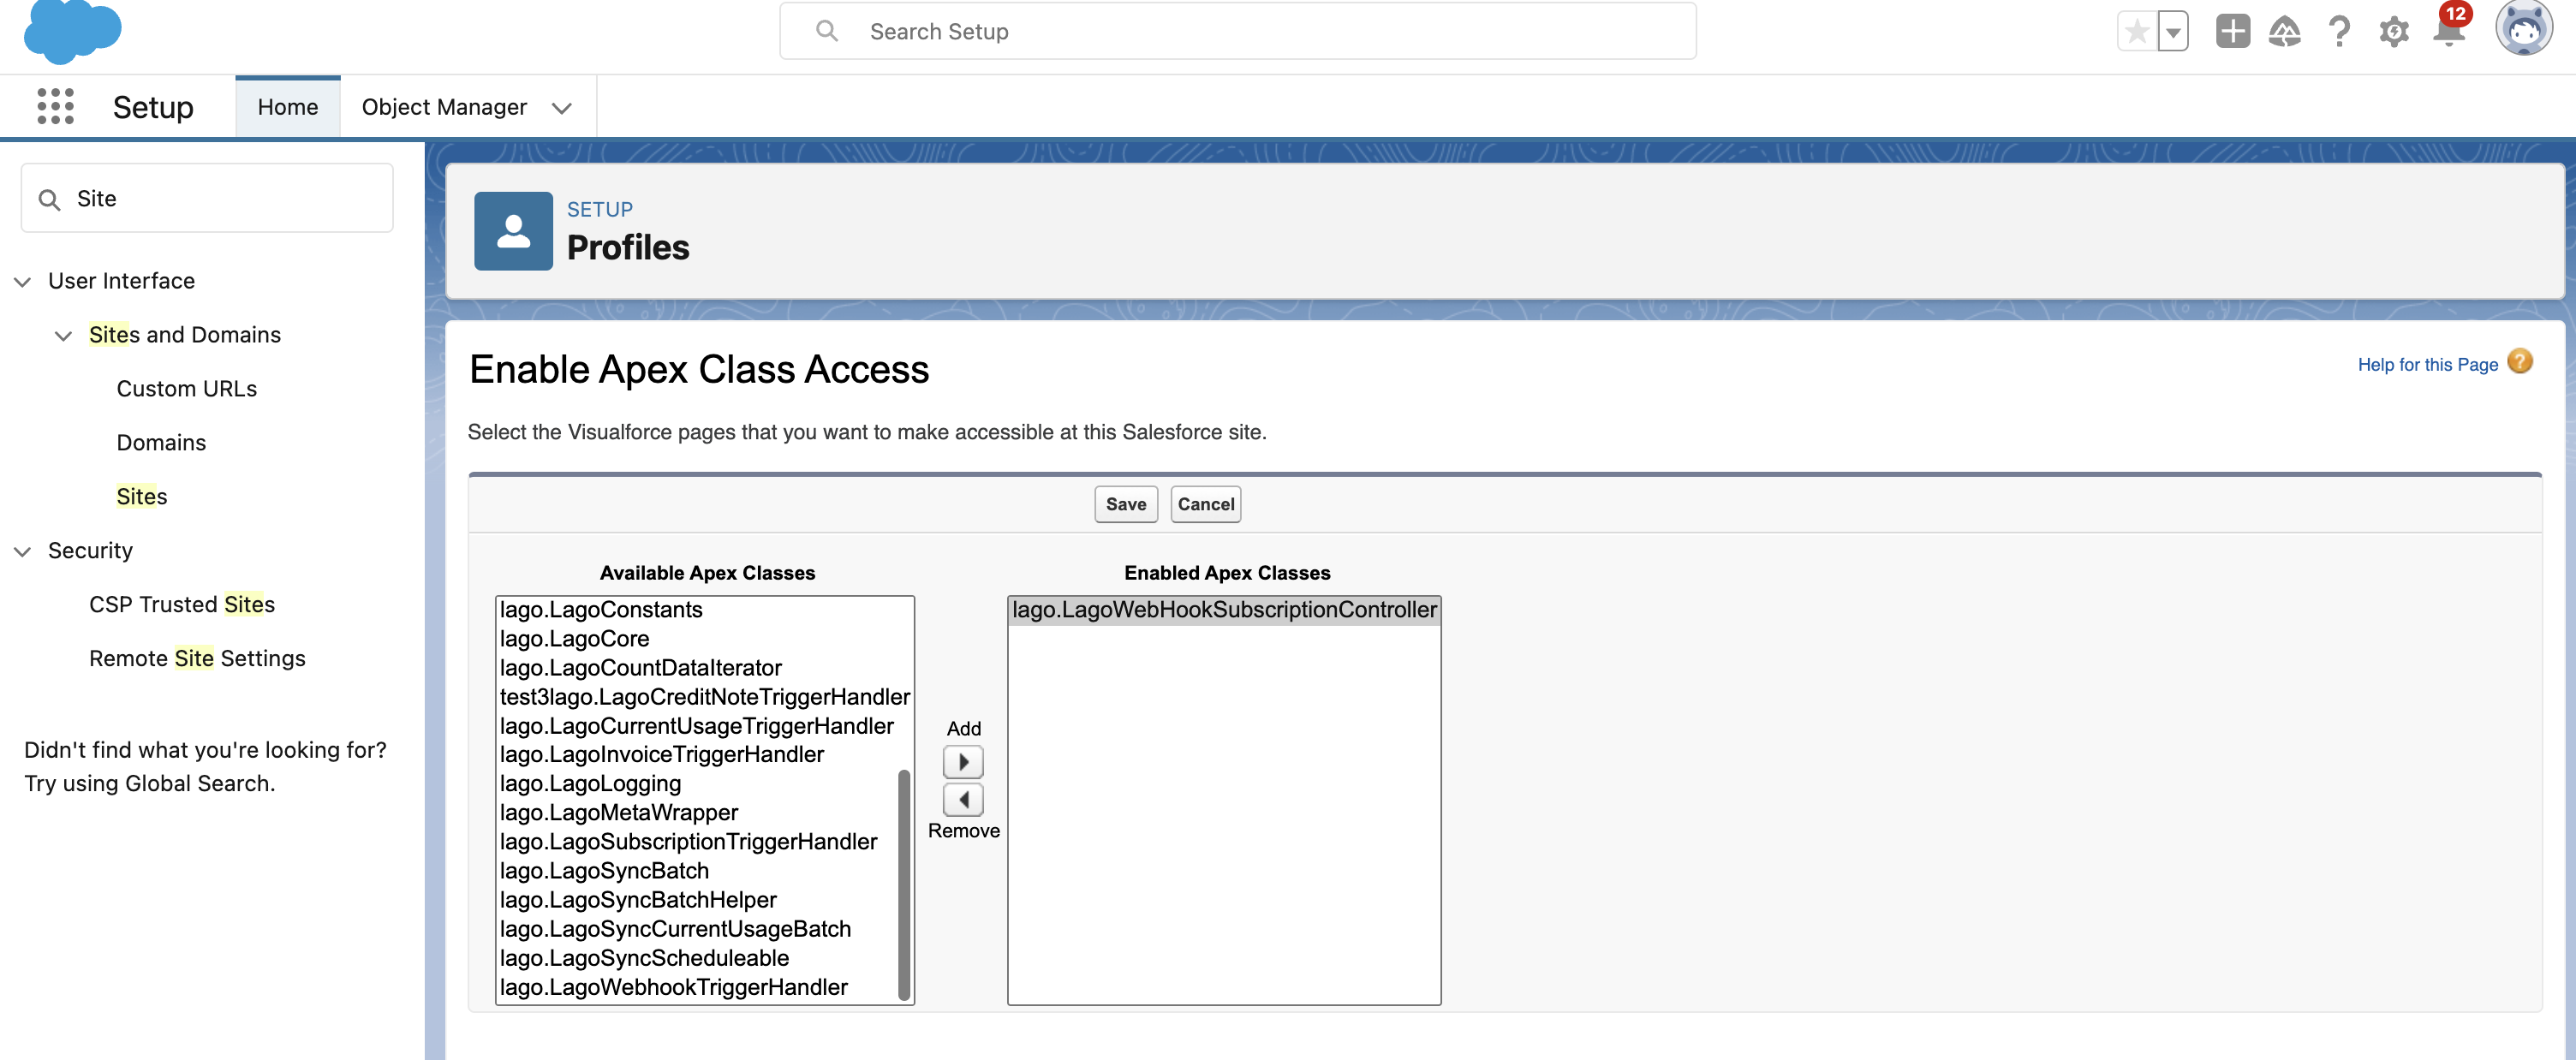
- Visit the site and click Public Access Settings;
- In the Enabled Apex Class Access section, click “edit”;
- Add
LagoWebHookSubscriptionControllerto Enabled Apex Classes; and - Save your changes.
4
Paste the Webhook URL into Your Lago App
To set up the webhook URL for real-time data syncing between Lago and Salesforce, follow these steps: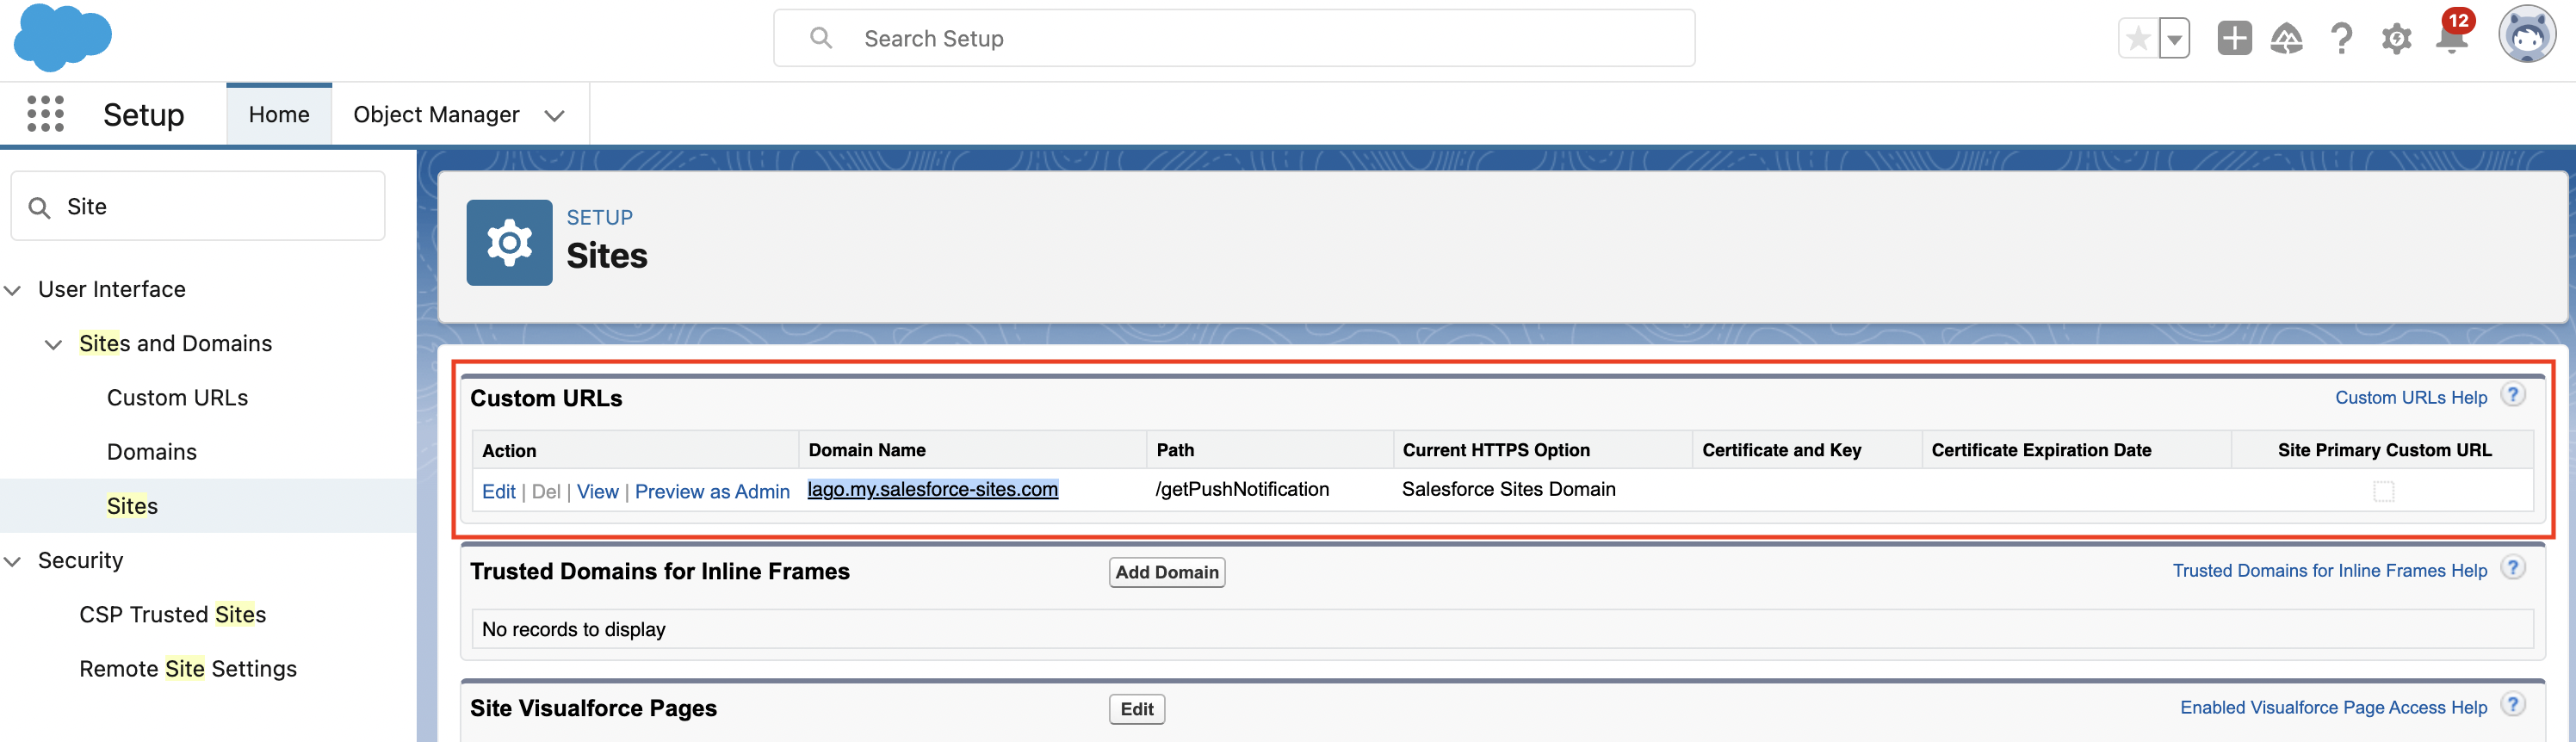
- Return to your newly created site;
- Locate the Custom URLs section;
- Copy the domain name (e.g., lago.my.salesforce-sites.com);
- Add the
https://prefix to this domain name (e.g.,https://lago.my.salesforce-sites.com); and - Append
/services/apexrest/lago/api/Webhooks/incoming/pushDetails/to the domain name (e.g.,https://lago.my.salesforce-sites.com/services/apexrest/lago/api/Webhooks/incoming/pushDetails/).
- Within Lago, navigate to Developers;
- Visit the Webhooks tab;
- Choose
HMACas the mandatory signature type; - Paste your Salesforce webhook URL; and
- Save this webhook endpoint.
Establish and finalize connection
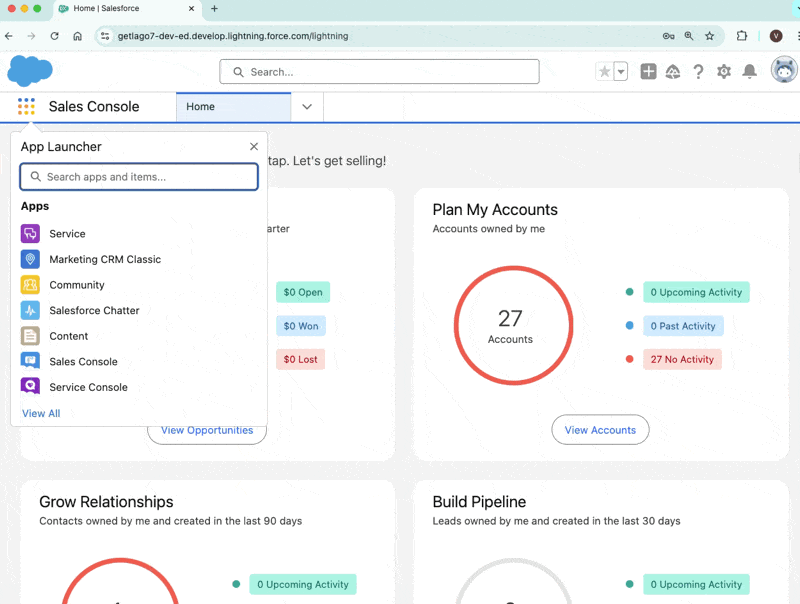
- Access Salesforce and locate the App Launcher;
- Find and open the Lago app you recently installed;
- Within the Lago Base Configuration tab:
- Provide your Lago API Key (located in Lago’s Developer Section)
- Enter your Lago API base URL. Do not insert the
api/v1at the end of the URL. By default, the valid URL ishttps://api.getlago.com/. If you want to change the API base URL to another one (e.g.,https://api.eu.getlago.com/or a custom self-hosted one), please follow option 2. - Enter lago app URL (Front End Base URL). By default, the valid URL is
https://app.getlago.com/(it will be different for self-hosted). - Enter Lago Integration code from Step 1
Salesforce integration on Lago
- “Save and validate” your connection; and
- If the Lago API Key is valid then only Start Data Sync button will be enabled.
- Click the “Start Data Sync” to finalize the connection between Lago and Salesforce.
- Navigate to Salesforce’s Setup;
- Search for and select Remote Site Settings;
- Find and access the remote site for the Lago App;
- Click the Edit button to modify the remote site’s details;
- Update the Remote Site URL with your preferred URL; and
- Save the changes.
II. Sync data from Lago to Salesforce
If your webhook endpoint is configured correctly, your customer, subbscription, and billing data will flow seamlessly in real-time*.Please note that from all the version above Salesforce for Lago v2.7 - Customer, Subscriptions, and Invoices will be created in Salesforce via webhooks seamlessly
Sync customers to Salesforce (> v2.7)
For organizations with existing Lago customers that need to be synchronized with Salesforce, our support team provides specialized assistance with the migration process. Please contact our team to initiate this synchronization.
- Navigate to the customer creation screen in Lago
- Complete the standard customer information fields
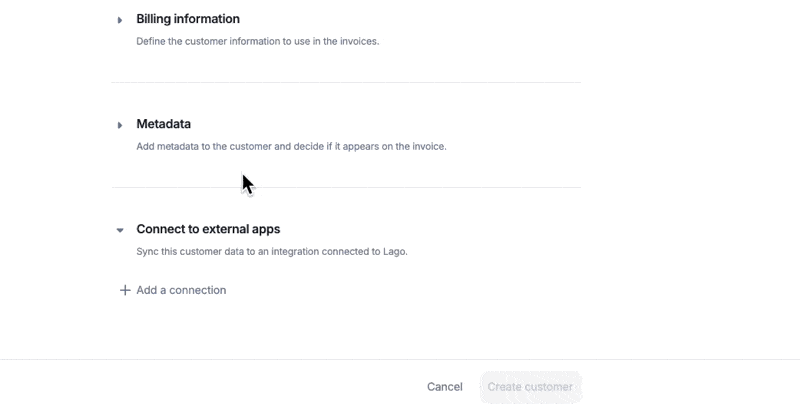
- Expand the ‘Connect to external apps’ section at the bottom of the form
- Select Salesforce and choose the integration established during the initial setup
- Choose the appropriate synchronization method:
- For new Salesforce customers: Enable the Create automatically this customer option
- For existing Salesforce customers: Enter the corresponding ‘Salesforce Account ID’
The system handles account creation in Salesforce based on your configuration:For Salesforce instances with Person Accounts enabled:When
Customer Type is set to `Individual1: Creates a Person Record type account.When Customer Type is Company or unspecified: Creates a standard company account using the default record type for the running userFor Salesforce instances without Person Accounts:
Creates all accounts using the default record type associated with the running userSync customers to Salesforce (< v2.7)
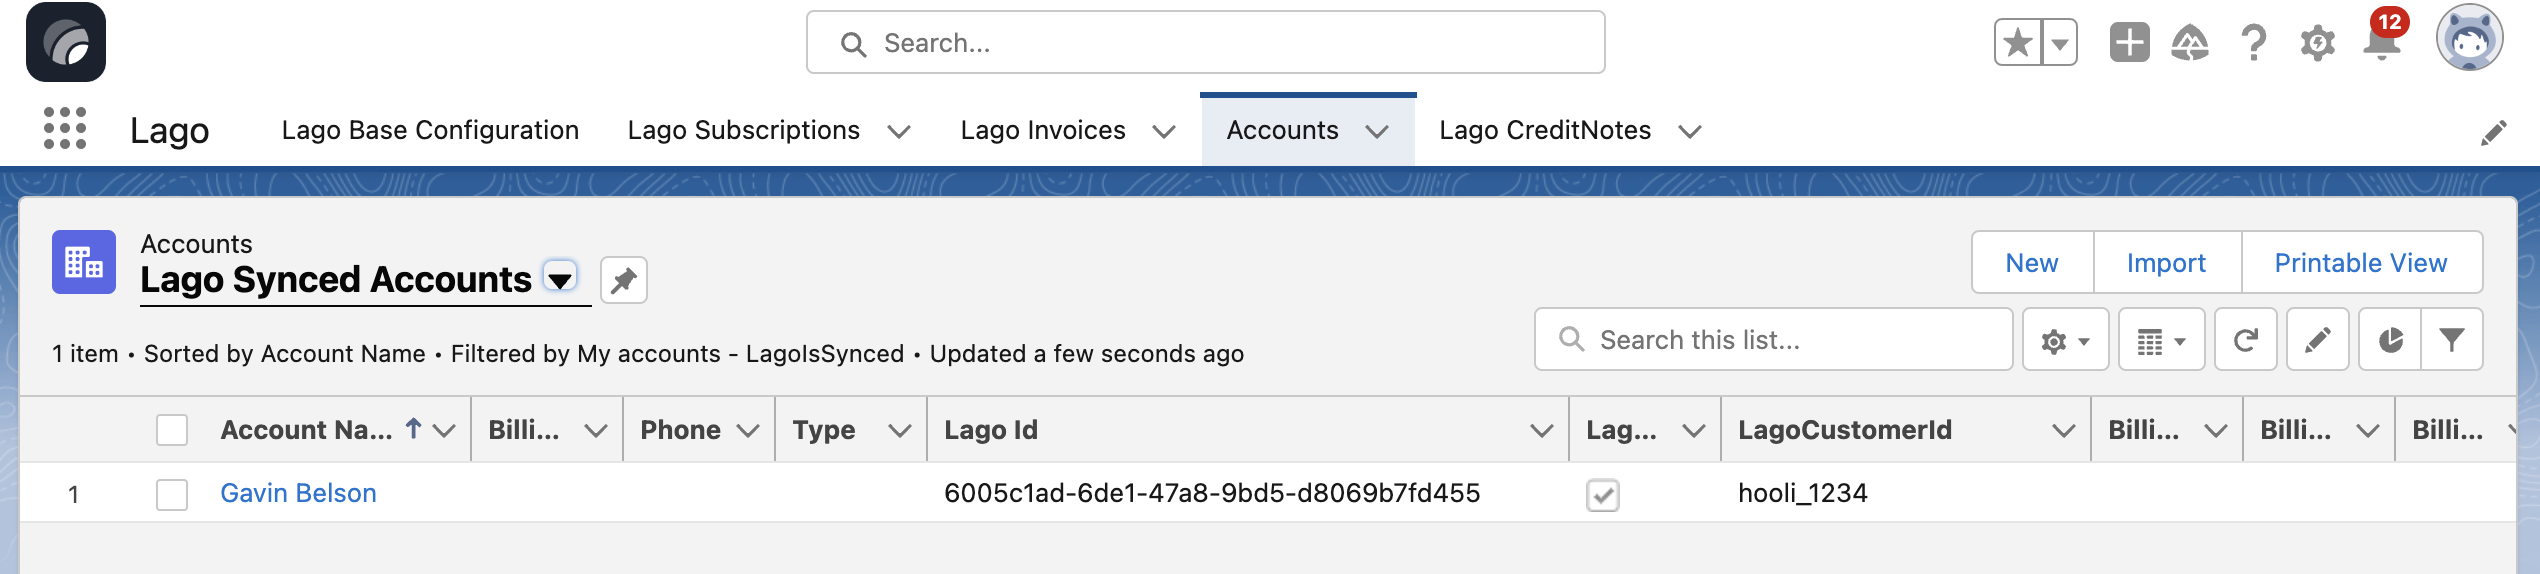
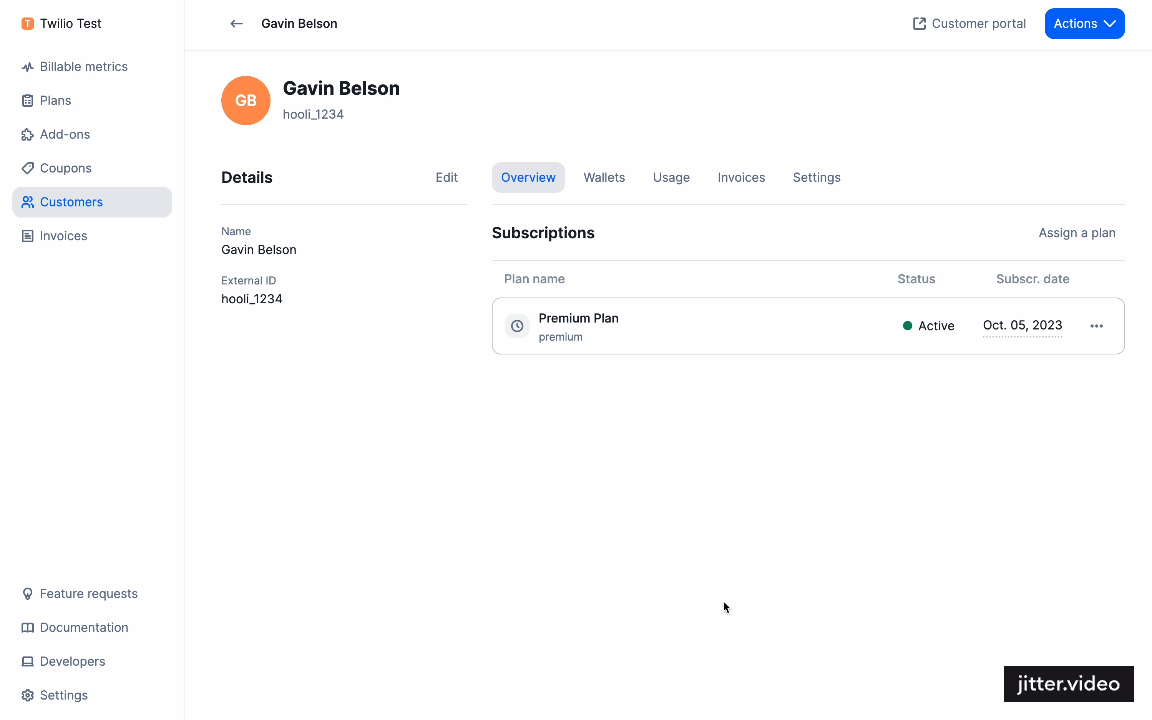
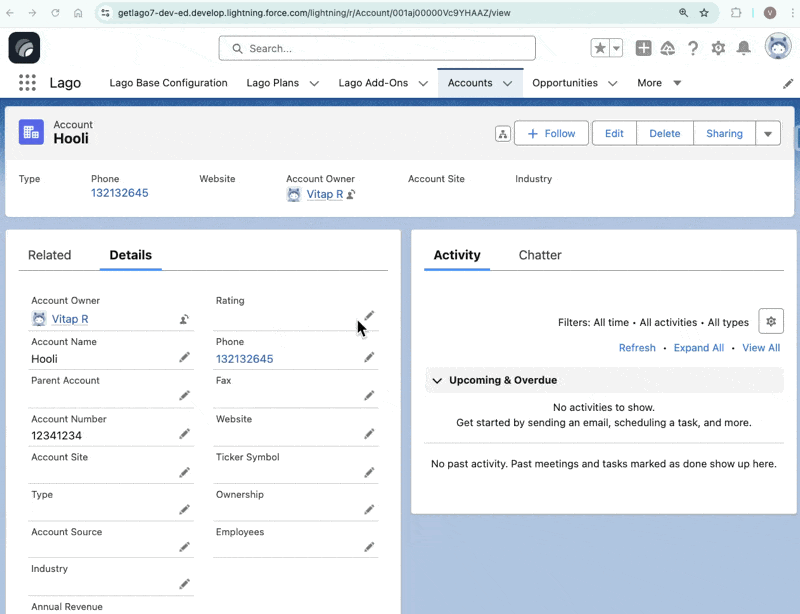
To synchronize Lago Customer data with Salesforce Accounts (native object), ensure that your Salesforce Account is created first, and that the Lago Customer’sexternal_salesforce_id is explicitly populated.
- Begin by creating a new Account in Salesforce or accessing an existing one;
- Next, create a customer in Lago and populate the
external_salesforce_idfield for a Lago Customer with the Salesforce Account Id; and - Finally, your Salesforce Account and Lago Customer are synchronized!
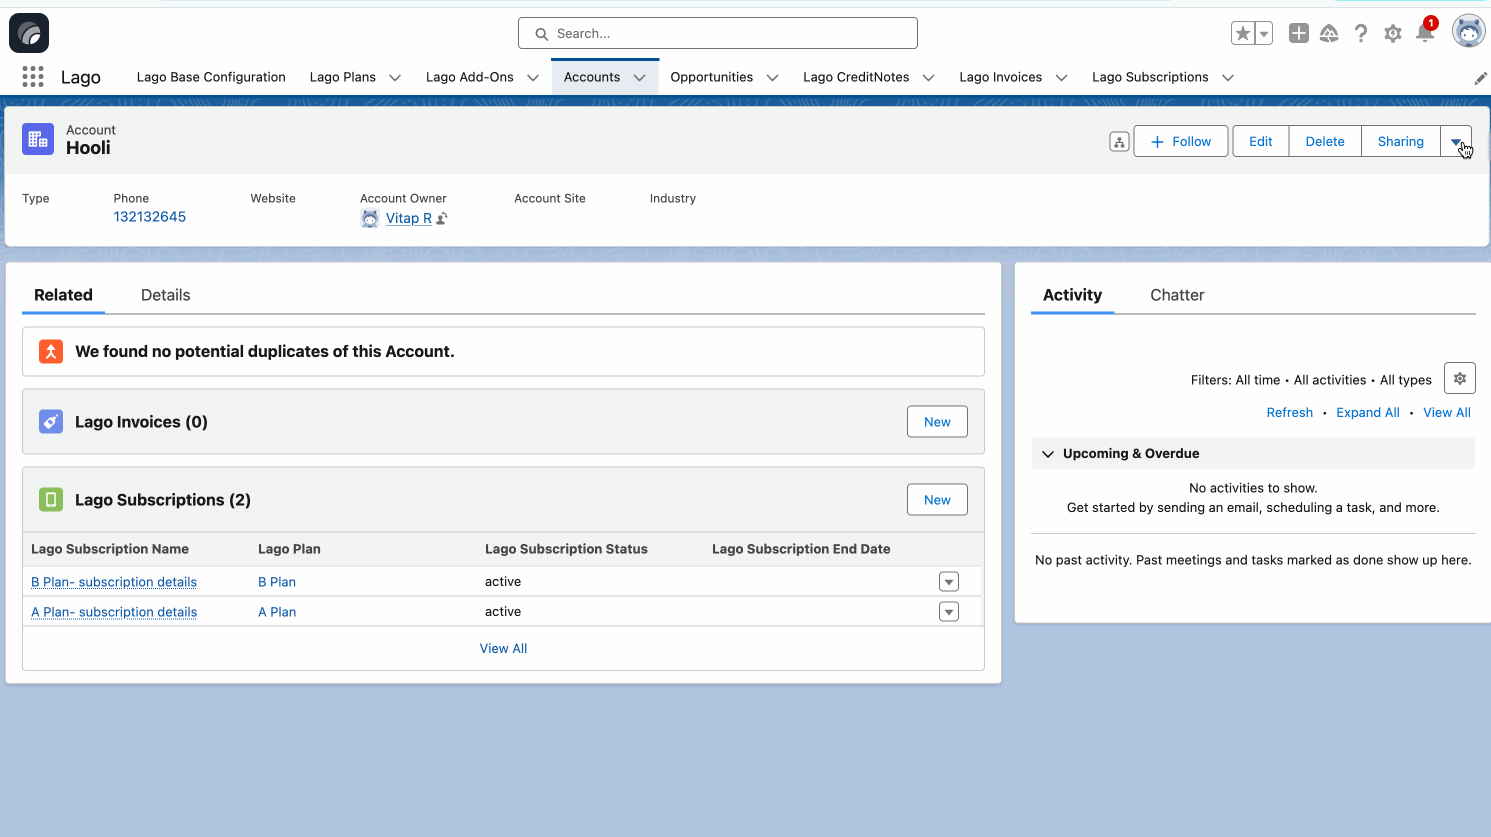
Sync subscriptions to Salesforce

Lago Subscriptions custom object.
Here is a list of Subscription fields that are automatically synced.
Note that this subcription is automatically linked to a Salesforce Account:
- Subscription Id;
- Subscription Name;
- Subscription Start Date;
- Subscription Status;
- Subscription Termination Date (synced when the subscription is terminated);
- Subscription Billing Time (either
calendaroranniversary); and - Plan Code.
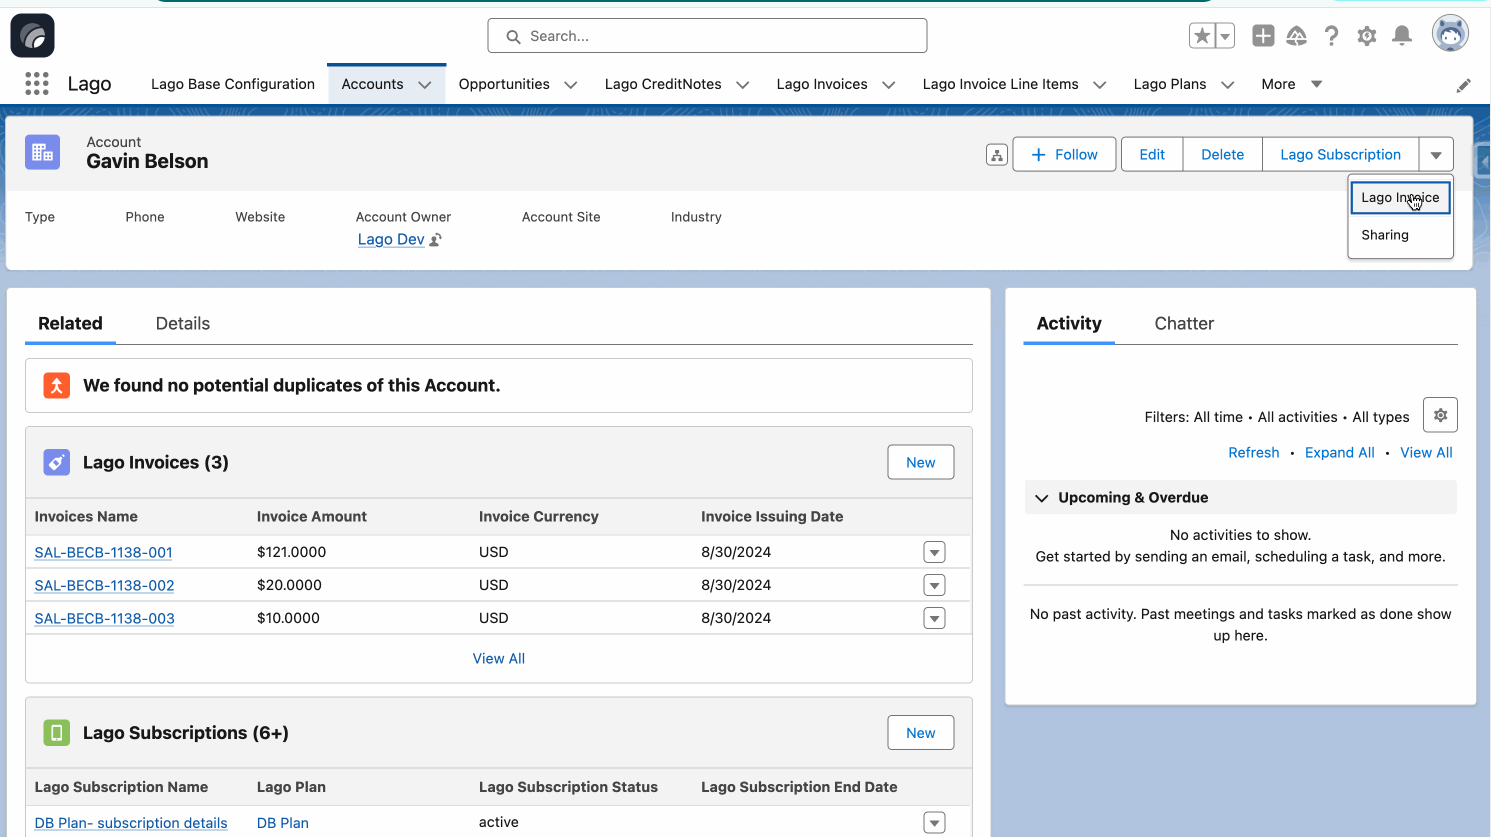
Sync invoices to Salesforce
Lago Invoices custom object.
Here is a list of Subscription fields that are automatically synced:
- Invoices Number;
- Invoice Payment Status;
- Invoice Type (
subscriptionorone-off); - Invoice Issuing Date;
- Invoice Amount;
- Invoice File Url; and
- Invoice Currency.
Sync credit notes to Salesforce
Whenever a credit note is issued for a Lago Invoice, the credit note details will be automatically synced in real-time with Salesforce using theLago CreditNotes custom object.
Sync Plans, Add-Ons, Coupons to Salesforce
Plans and Add-ons are synced to Salesforce when we initially click on Start Data Sync from Lago Base Configuration page.- Plans are synced to
Lago Plansobject andProduct2standard object. We also create a price book entry for all the products inStandard Price Bookprice book - Add-Ons are synced to
Lago Add-Onsobject andProduct2standard object. We also create a price book entry for all the products inStandard Price Bookprice book.
Sync coupons and applied coupons to Salesforce
Coupons and Applied coupons are synced to Salesforce when we click on Start Data Sync from Lago Base Configuration page.- Coupons are synced to
Lago Couponscustom object. All the existing coupons will be available in Salesforce. Please note: we cannot create coupons from Salesforce to Lago, we must create coupons in Lago. - Applied coupons are synced to
Lago Applied Couponcustom object.
Schedule Sync from Lago To Salesforce
We also provide option to schedule the data sync from Lago to Salesforce.LagoSyncScheduleable— a schedulable class which helps us schedule either all the data or any one of them.- To schedule the sync of any ONE of the object:
- Create a new instance of class by passing any one of the following string:
CUSTOMER,SUBSCRIPTION,PLAN,ADDON,INVOICE,CREDITNOTE- Ex: To sync Plans from lago to Salesforce everyday at 1PM, execute below anonymous code in Anonymous window in Developer Console. (click here to learn more about CRON expression)
- Ex: To sync Plans from lago to Salesforce everyday at 1PM, execute below anonymous code in Anonymous window in Developer Console. (click here to learn more about CRON expression)
- Create a new instance of class by passing any one of the following string:
- To schedule the sync of ALL the objects:
- create a new instance of class by passing
true- Ex: To sync all objects from lago to Salesforce everyday at 1PM, execute below anonymous code in Anonymous window in Developer Console. (click here to learn more about CRON expression)
- Ex: To sync all objects from lago to Salesforce everyday at 1PM, execute below anonymous code in Anonymous window in Developer Console. (click here to learn more about CRON expression)
- create a new instance of class by passing
III. Actions from Salesforce to Lago
Beyond just syncing data from Lago to Salesforce, you can also initiate actions in Lago directly from Salesforce. You can leverage SalesforceFlows to execute actions in Lago. Lago provides several customizable templates for creating customers from Salesforce Accounts, directly assigning subscriptions to customers from Salesforce, creating one-off invoice from salesforce.
Create customers
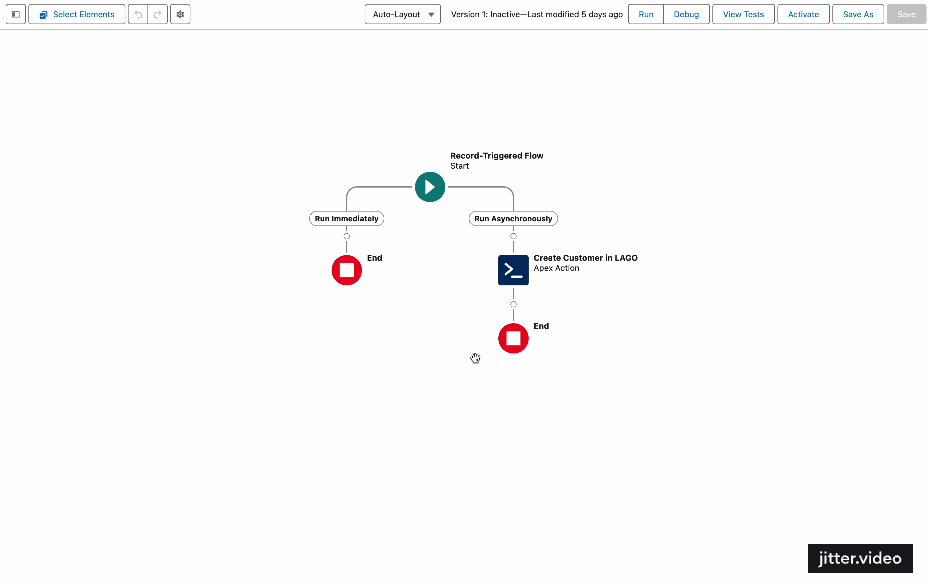
Flow: Lago Template - Create Customer in Lago on Account Create
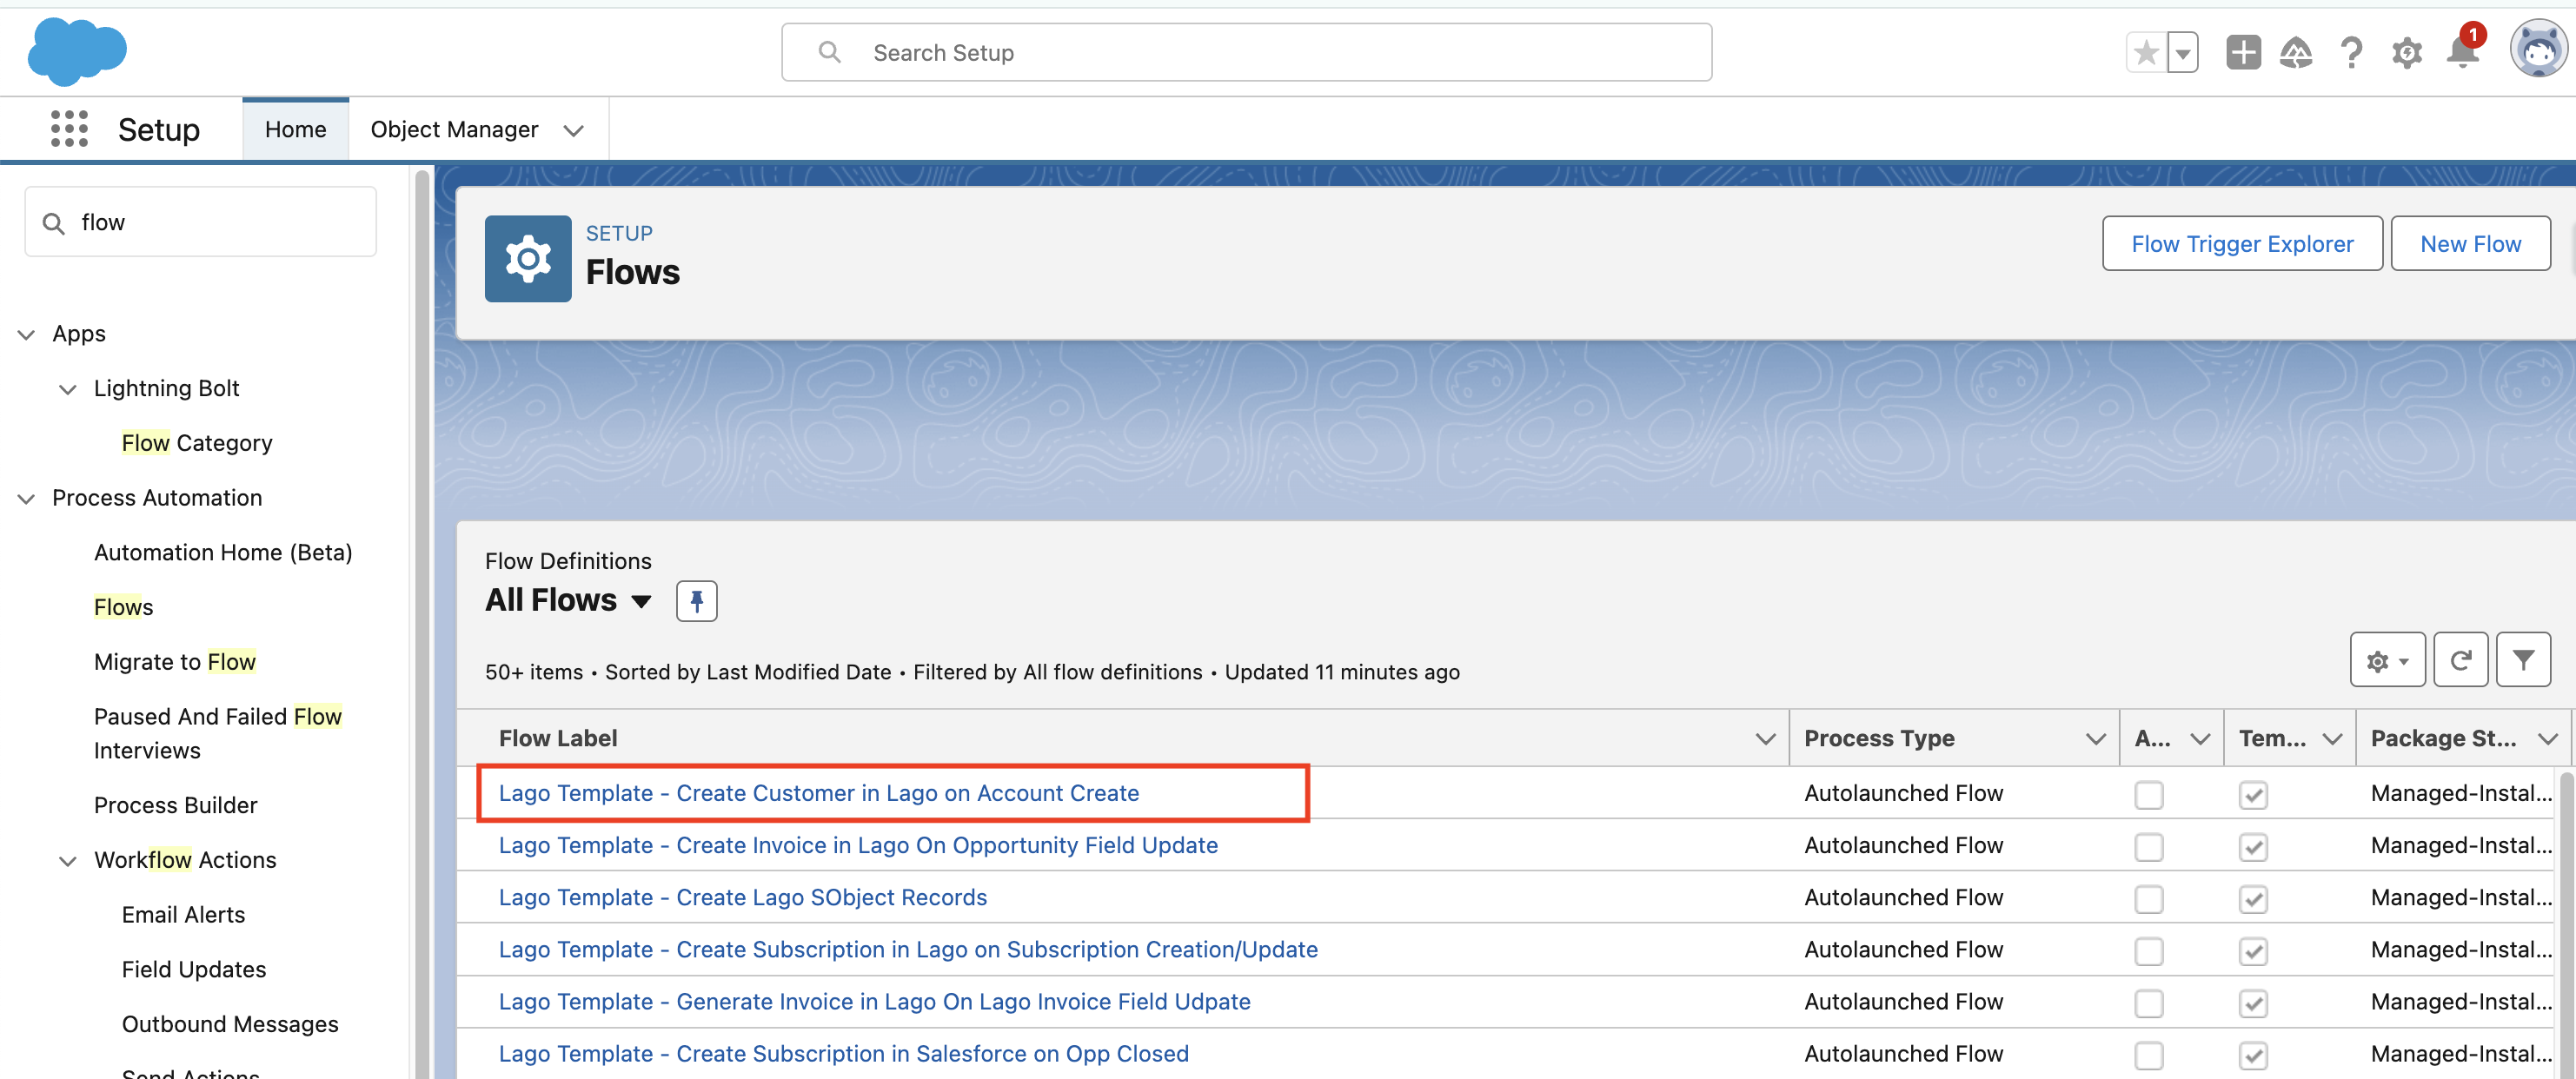
- Log into your Salesforce instance;
- Access the Setup section via the settings wheel icon in Salesforce;
- Find and select
Flowsunder Process Automation in the sidebar; - Locate and open the
Lago Template - Create Customer in Lago on Account Create; - Click ‘Save As’ to create and save your own version of the template; and
- Do not forget to click the
Activatebutton to activate your flow.
customer type to ‘Individual’ or ‘Company’ which creating customer from Salesforce to Lago.
Create subscriptions (automation)
Assigning a plan to a customer, adjusting negotiated prices, and initiating the subscription upon winning an opportunity represents a key action from Salesforce to Lago. This enables sales teams to remain within Salesforce, their primary tool, and activate billing processes directly, without the need to switch platforms. To assign a subscription and set prices in Lago directly from Salesforce, use the provided two flows via following Lago Flow templates.Flow 1: Lago Template - Create Lago SObject Records
This Flow is used to create intermediate records in Lago Objects - Lago Subscription
- Log into your Salesforce instance;
- Access the Setup section via the settings gear icon in Salesforce;
- Find and select
Flowsunder Process Automation in the sidebar; - Locate and open the
Lago Template - Create Lago SObject Records; - Click ‘Save As’ to create and save your own version of the template; and
- Do not forget to click the
Activatebutton to activate your flow.
1
Validate the flow
The default setting triggers plan assignment when a Salesforce Account links to a Lago customer and the opportunity status changes to closed-won.
You can customize this flow to suit your specific needs. Moreover, you have the option to adjust the subscription fields and subscription charges fields being synchronized from Salesforce to Lago.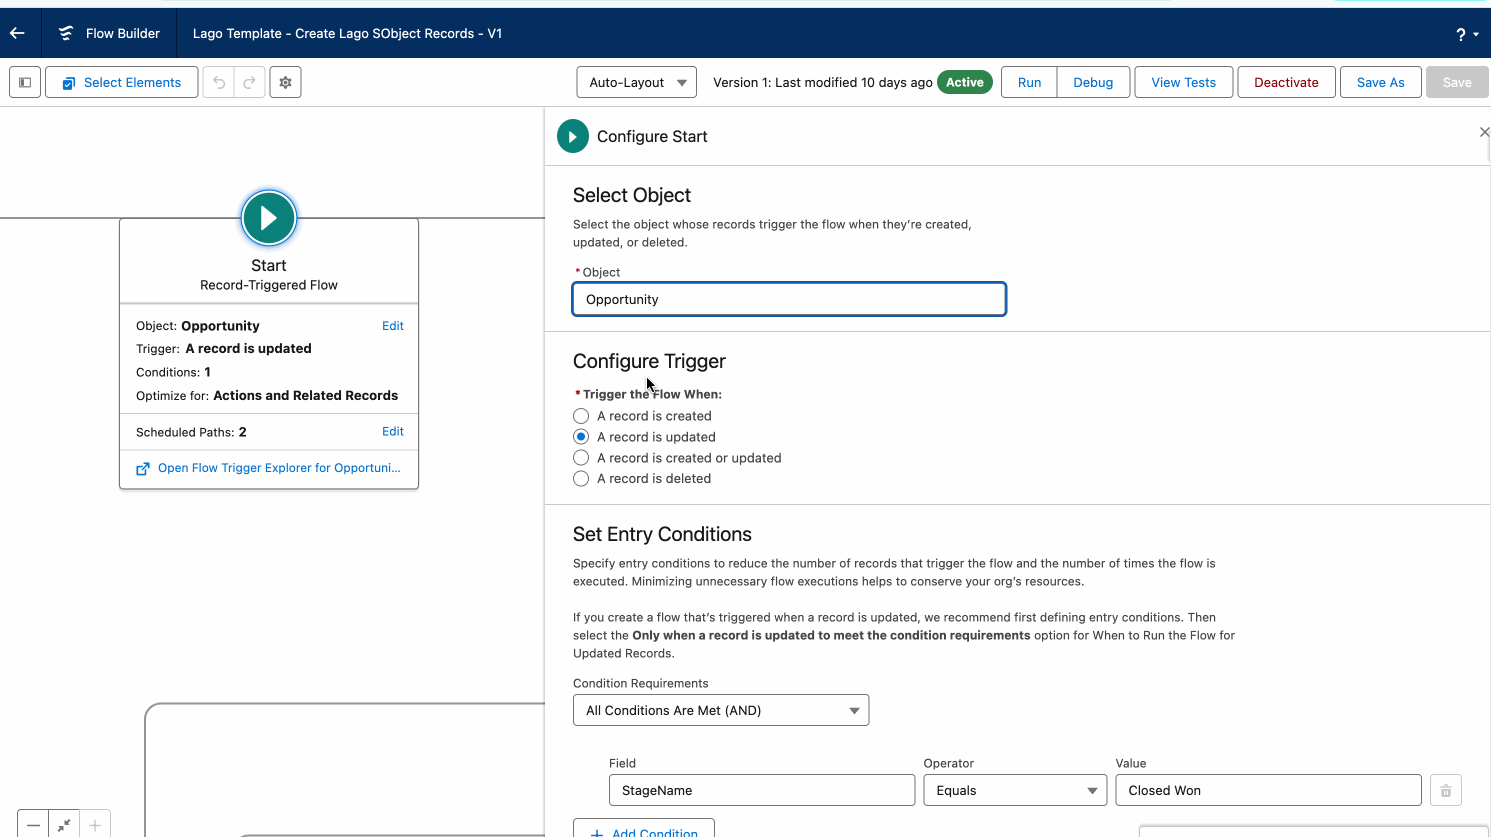
2
Assign subscription and override prices
- Create an opportunity by assigning an expected closed date and a stage;
- Add a Lago plan to this opportunity as a product (Salesforce will automatically retrieve all plans from Lago in
Standard Price Book); - Specify
1for the quantity of the plan; - Use the custom UI to either assign this plan directly or to override prices; and
- Click on ‘Lago Override Plan’ to finalize the subscription assignment.
By default, the lago subscription record in salesforce is created when the opportunity is
closed-won. You can assign multiple subscriptions for the same opportunity.Flow 2: Lago Template - Create Subscription in Lago on Subscription Creation/Update
This Flow is used to create subscriptions in Lago from Salesforce
- Log into your Salesforce instance;
- Access the Setup section via the settings gear icon in Salesforce;
- Find and select
Flowsunder Process Automation in the sidebar; - Locate and open the
Lago Template - Create Subscription in Lago on Subscription Creation/Update; - Click ‘Save As’ to create and save your own version of the template; and
- Do not forget to click the
Activatebutton to activate your flow.
SyncToLago checkbox is checked. You can customize this flow to suit your specific needs.
Create subscriptions (lago native UI)
We also have option to create subscriptions in Lago directly from Salesforce using Lago’s create subscription screen.- Log into your Salesforce instance;
- Access the setup section via the settings gear icon in Salesforce;
- Go to Object manager and find and open account object;
- Go to page layout (or Lightning record page) depending on what you are using, and open the page layout in which you’d like to add the button to create subscription.
- Add the button
Lago Subscription - Save the page layout or lightning record page.
lago_id populated. Click on Lago Subscription button; it will pop-up Lago Screen (make sure you’ve entered correct Front End URL in Lago Base Configuration page); enter correct username and password. Save. A new subscription will be directly created in Lago. And, if Webhooks are configured correctly, it will also create Lago Subscription record in Salesforce.
We can add a new button Lago Subscription on Account page or Opportunity page
A new Lago Subscription record will be created via webhooks (if configured).
And after 1 minute another callout will be made to sync Charges.
Terminate Subscription
We can terminate the subscription from Salesforce to lago only if the subscription is already synced to lago(status is active or pending). Go to Lago Subscription record in Salesforce, and checkTerminate Subscription checkbox.
As soon as
Terminate Subscription is checked it will terminate the subscription in Lago. It is handled from the backend via trigger.Create one-off invoice
This enables sales team to create one-off invoice in lago from Salesforce. Right from the opportunity record we add products which are related toLago Add-ons, specify the quantity, description and amount.
To create one-off invoice and set prices in Lago directly from Salesforce, use the provided two flows via following Lago Flow templates.
Flow 1: Lago Template - Create Lago SObject Records
The same flow as we created above to create subscription - is also used to create intermediate records in Lago Objects - Lago Invoice
Flow 2: Lago Template - Generate Invoice in Lago On Lago Invoice Field Update
This Flow is used to create one-off invoice in Lago from Salesforce
- Log into your Salesforce instance;
- Access the Setup section via the settings gear icon in Salesforce;
- Find and select
Flowsunder Process Automation in the sidebar; - Locate and open the
Lago Template - Generate Invoice in Lago On Lago Invoice Field Update; - Click ‘Save As’ to create and save your own version of the template; and
- Do not forget to click the
Activatebutton to activate your flow.
SyncToLago checkbox is checked. You can customize this flow to suit your specific needs.
Create one-off invoice (lago native UI)
We also have option to create one off invoice in Lago directly from Salesforce using Lago’s create invoice screen.- Log into your Salesforce instance;
- Access the setup section via the settings gear icon in Salesforce;
- Go to Object manager and find and open Account object or Opportunity;
- Go to page layout (or Lightning record page) depending on what you are using, and open the page layout in which you’d like to add the button to create Invoice.
- Add the button
Lago Invoice - Save the page layout or lightning record page.
lago_id populated. Click on Lago Invoice button; it will pop-up Lago Screen (make sure you’ve entered correct Front End URL in Lago Base Configuration page); enter correct username and password. Save. A new Invoice will be directly created in Lago. And, if Webhooks are configured correctly, it will also create Lago Invoice record in Salesforce.
We can add a new button Lago Invoice on Account page or Opportunity page
A new Lago Invoice record will be created via webhooks (if configured).
After 1 minute another callout will be made to sync invoice line items (add ons).
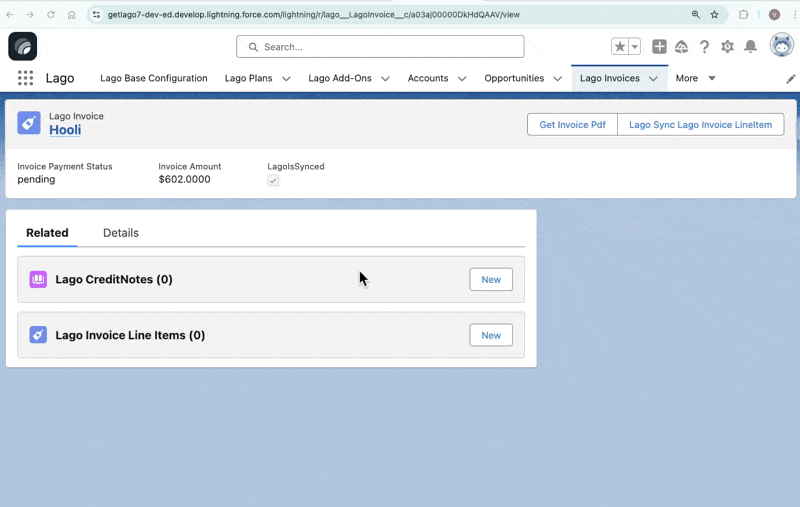
Get Invoice pdf
Now we can also get invoice pdf directly directly from Salesforce.- Go to Lago Invoice
- Open any Invoice which is already synced.
- Click
Get Invoice pdf> it will open PDF in a new tab.
Get Invoice Line Item Details
We can fetch Invoice line items manually for any invoices if required.- Go to Lago Invoice tab > Open any Invoice which is already synced.
- Click on
Lago Sync Invoice Line Itembutton. If button is not present on the layout, please add it on Page layout or Lightning record page. - All lago items will be synced and available in
Lago Line Itemschild custom object.
Managing Coupons in Salesforce
The Salesforce integration allows you to manage customer coupons directly from your Salesforce interface. This section explains how to apply new coupons to customer accounts and manage existing coupons effectively.Applying Coupons to Accounts
Before you begin applying coupons, you’ll need to ensure your Salesforce environment is properly configured. The “Apply Coupon” action button must be available in your account page layout or lightning record page. If you don’t see this button, work with your Salesforce administrator to add it through the page layout editor or lightning app builder. Once your environment is configured, follow these steps to apply a coupon to a customer account:- Navigate to the Account Details> Access the account details page for the customer who will receive the coupon.
- Initiate Coupon Application > Click the “Apply Coupon” action button. This will open a popup dialog for coupon configuration.
- Select and Configure the Coupon. The configuration options will vary depending on the type of coupon you’re applying:
- For Fixed Amount Coupons: Enter the discount amount, select the appropriate currency, Choose the frequency for applied coupon
If the Lago customer currency is already set in the account, the currency field will be locked to maintain consistency.
- For recurring frequencies, specify the duration period
-
For Percentage-Based Coupons: Verify or adjust the percentage rate, set the frequency of application
- For recurring frequencies, enter the duration period
- Complete the Application
- Click the “Apply Coupon” button to finalize the process.
- This action will:
- Create an Applied Coupon record in Salesforce
- Synchronize the coupon with the customer’s account in Lago
- Enable the discount for future qualifying transactions
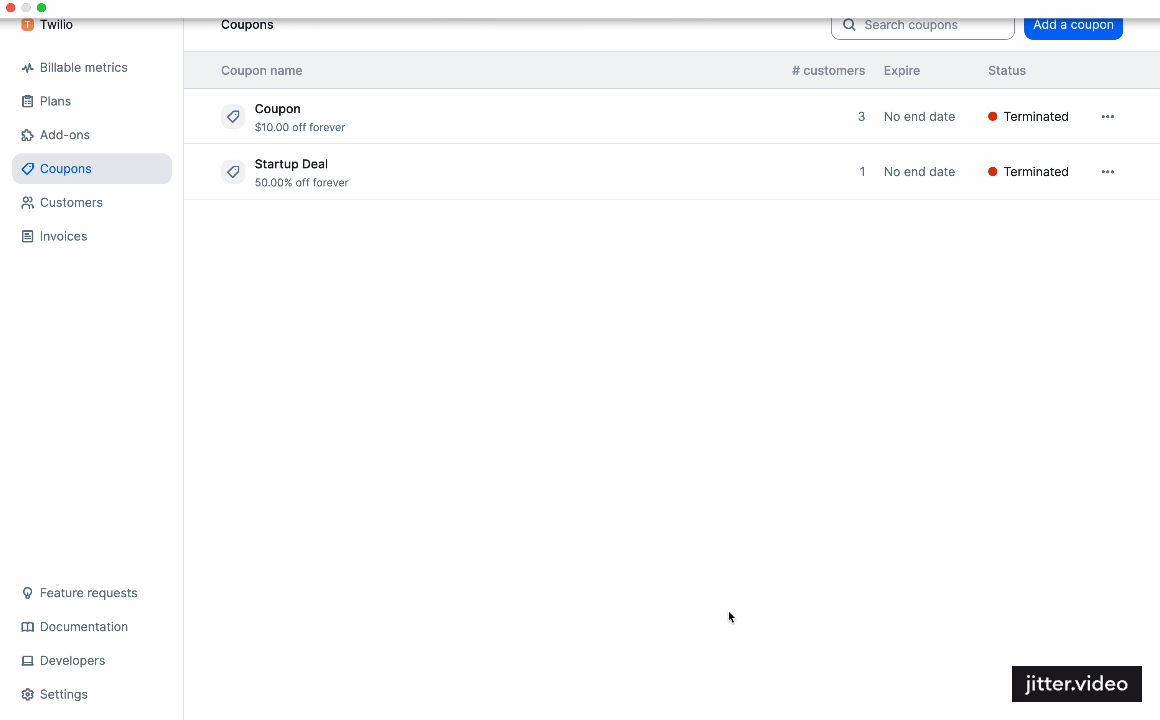
Terminating Active Coupons
There may be times when you need to end a coupon’s application before its natural expiration. Here’s how to terminate an active coupon:- Access the Coupon Record. Navigate to the Applied Coupon details page for the coupon you wish to terminate.
- Initiate Termination, locate the “Terminate Coupon” checkbox in the record.
- Confirm Termination: Check the box to initiate the termination process. Upon saving:
- The coupon status will update from “Active” to “Terminated”
- The change will synchronize with Lago
- The customer will no longer receive the discount
Debugging & logs
To ensure seamless data synchronization between Lago and Salesforce, every action and data transfer is meticulously logged. These logs are accessible directly through the Lago package for comprehensive debugging and analysis:- Navigate to ‘Lago Base Configuration’: This is your starting point for accessing the debugging tools. and
- Access Logs: Click on the ‘Logs’ tab to view a detailed record of all activities.